Introduction
Welcome to Patina - a pure Rust project dedicated to evolving and modernizing UEFI firmware with a strong focus on security, performance, and reliability. This book serves as high-level documentation for developers and platform owners working with or contributing to Patina.
To put it simply, Patina is a UEFI spec compliant pure Rust DXE Core with an interface for writing monolithically compiled Patina components (drivers) using a dependency injection model. It should be noted that Patina takes a more opinionated stance on some implementation details to provide a more secure runtime, so we are not fully PI spec compliant. Due to this, there are some key platform requirements that differ from a non-Patina implementation. See Patina Requirements for more information regarding this.
This book is the "catch-all" for Patina: it contains various documentation regarding Patina that can be broken up into these 5 categories:
- Background of Patina and its goals.
- Integrating the Patina code into your platform.
- Developing Patina components.
- Contributing to Patina.
- Development guidance and standards that apply to both Patina and Patina component developers.
If you have not read this book before, we suggest you start with (1) Patina Background, which outlines the project's goals and design philosophy. You can also watch an overview of Patina presented at UEFI Plugfest 2025.
Patina is not the only way to write UEFI firmware in Rust and has unique goals compared to other projects. More details are in the Patina in the UEFI Rust Ecosystem section.
Patina In Action
If you want to see Patina being actively used and "in action", then check out these two repositories:
1. patina-qemu: This repository has two virtual platforms, both of which use the patina-dxe-core. You can find setup instructions for building and running them locally in that repository's readme.
2. patina-dxe-core-qemu: This repository contains
the patina-dxe-core binary crates used by the two virtual platforms in patina-qemu. If you'd like to experiment,
you can clone this repo, modify the DXE core, and use the override feature in patina-qemu to boot with your
customized build.
Important Crates and Repositories
The Patina project maintains a large list of distinct crates throughout our various repositories (See below) in order to support proper decoupling and faster build times. If you are just starting with Patina, there are two main crates that you should review:
1. patina_dxe_core: The library crate containing the Patina DXE Core struct definition. This struct is instantiated and configured by a platform in their own respective binary crate, which ultimately compiles to an EFI binary.
2. patina: The SDK for working with Patina, whether you are creating a Patina component or developing the Patina DXE core.
Putting it all together
The patina-dxe-core crate provides the UEFI spec compliant Patina DXE Core. The Core produces the EFI System Table (with the core provided services) and a PI spec compliant* DXE Dispatcher.
Outside of UEFI spec compliance, platforms can attach Patina Components, which are conceptually similar to UEFI components, but are pure Rust and monolithically compiled with the Patina DXE Core. Some components are written and maintained by Patina, but are still optional. Over time, the Patina project will add more generically useful components. We are expecting that additional components will be written by platform maintainers. These may be specific to their platform or generic for the Patina ecosystem. See Patina Component Model for more information.
flowchart TD
 subgraph internal_crates["Internal Crates (1..N)"]
    direction TB
        internal2["Crate"]
        internalN["Crate"]
  end
 subgraph plugin_crates["Component Crates (1..N)"]
    direction TB
        plugin2["Component"]
        pluginN["Component"]
  end
    consumer_bin["Platform Patina DXE Core (binary)"] -- uses --> patina_core["patina_dxe_core"]
    consumer_bin -. optionally uses .-> plugin_crates
    patina_core -- uses --> internal_crates
    patina_core -. depends on .-> patina_sdk["patina (SDK crate)"]
    plugin2 -. depends on .-> patina_sdk
    pluginN -. depends on .-> patina_sdk
    internal2 -. depends on .-> patina_sdk
    internalN -. depends on .-> patina_sdk
All Repositories
| Repository | Description |
|---|---|
| patina-components | A repository where Patina components are developed and maintained. |
| patina-devops | A repository containing github workflows, actions, and notebooks used across our repositories. |
| patina-dxe-core-qemu | A reference implementation of patina-dxe-core for our two virtual QEMU platforms. |
| patina-edk2 | A collection of definitions and helper utilities designed for EDK II-style C firmware projects that integrate Patina. |
| patina-fw-patcher | A developer tool to quickly patch a new patina-dxe-core binary into a platform's firmware |
| patina-mtrr | A x86_64 MTRR solution we believe is generic enough to be useful outside of Patina. |
| patina-paging | A paging solution we believe is generic enough to be useful outside of Patina. |
| patina-qemu | Two reference virtual platforms (Q35, SBSA) |
| patina-readiness-tool | A DXE core replacement binary that reviews HOBs passed from PEI to DXE to validate your platform is ready to use the Patina DXE Core. |
| patina | Core codebase for Patina containing Patina-only crates. |
Final Notes
This documentation aims to be as detailed as possible, not assuming any previous knowledge. However some general Rust knowledge is beneficial throughout the book, and some EDK II knowledge is beneficial to understanding how consume the final pure-Rust platform Patina DXE core in EDK II style firmware.
While you can navigate to any section in this book via the left-side navigation bar, here are the quick links to the start of the different sections mentioned above:
- Patina Background
- Platform Integration
- Component Development
- Contributing to Patina
- Developer Guides
Patina training videos are also available for certain topics. These demonstrate how to work with Patina in a hands-on way, where developers share their screen while walking through a specific task.
Patina Overview at UEFI Plugfest 2025
UEFI Forum June 2026 - The State of Rust in UEFI and Q&A
Patina Background
Overview
Firmware and UEFI firmware in particular has long been written in C. Firmware operates in a unique environment compared to other system software. It is written to bootstrap a system often at the host CPU reset vector and as part of a chain of trust established by a hardware rooted immutable root of trust. Modern PC and server firmware is extraordinarily complex with little room for error.
We call the effort to evolve and modernize UEFI firmware in the Open Device Partnership (ODP) project "Patina". The remainder of this document will discuss the motivation for this effort, a high-level overview of the current state of Patina, and the current state of Rust in UEFI firmware.
Firmware Evolution
From a functional perspective, firmware must initialize the operating environment of a device. To do so involves integrating vendor code for dedicated microcontrollers, security engines, individual peripherals, System-on-Chip (SOC) initialization, and so on. Individual firmware blobs may be located on a number of non-volatile media with very limited capacity. The firmware must perform its functional tasks successfully or risk difficult to diagnose errors in higher levels of the software stack that may impede overall device usability and debuggability.
These properties have led to slow but incremental expansion of host firmware advancements over time.
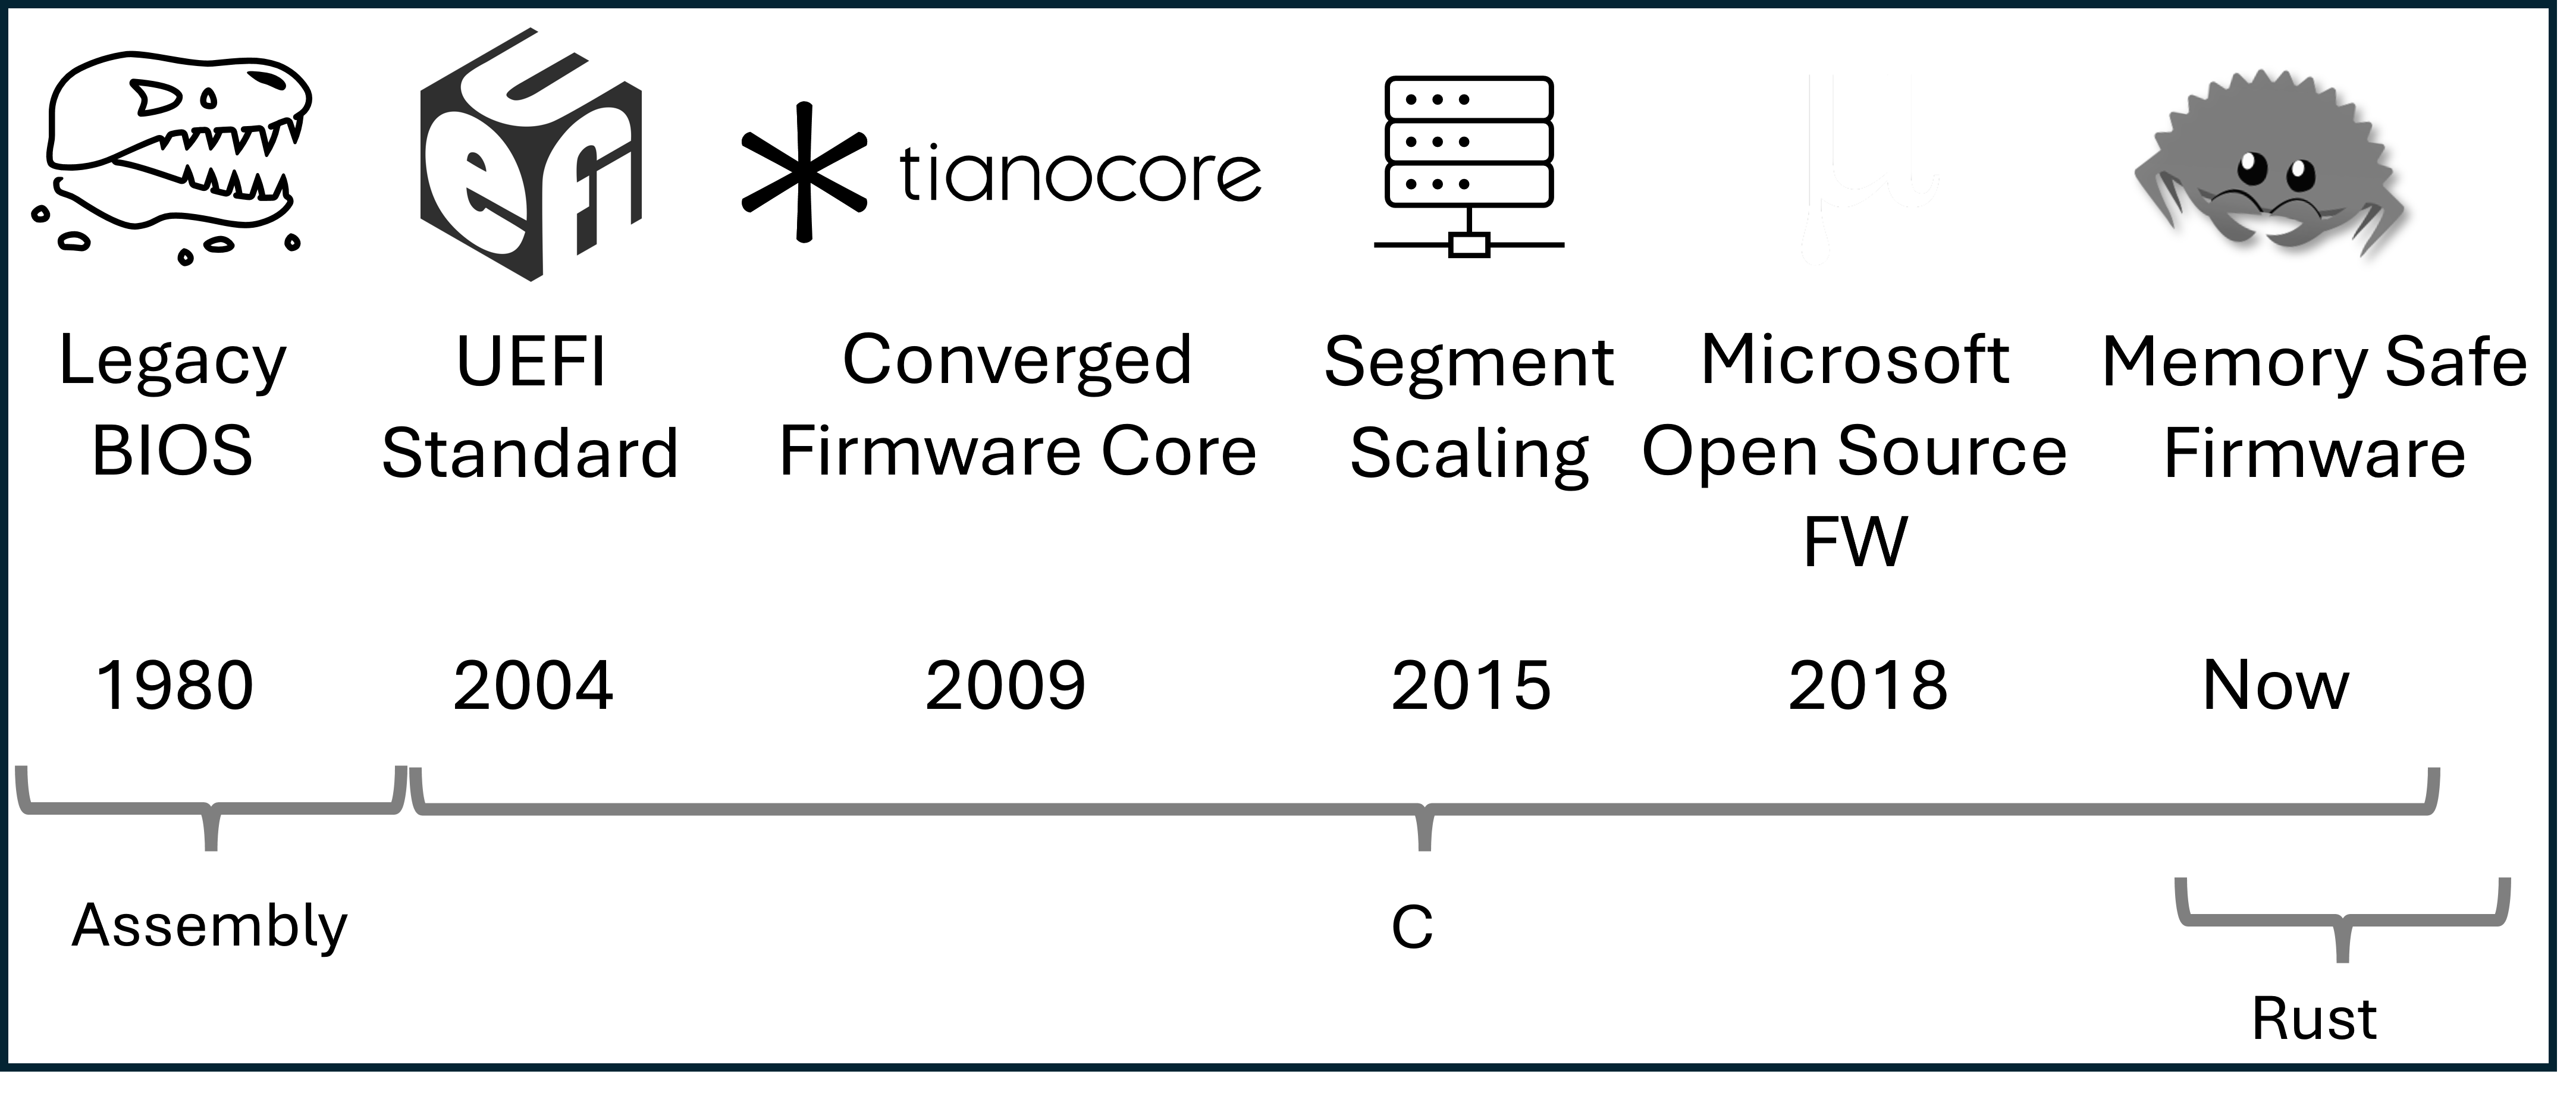
Firmware Security
From a security perspective, firmware is an important component in the overall system Trusted Computing Base (TCB). Fundamental security features taken for granted in later system software such as kernels and hypervisors are often based on secure establishment in a lower layer of firmware. At the root is a concept of "trust".
While operating systems are attractive targets due to their ubiquity across devices and scale, attackers are beginning to shift more focus to firmware as an attack surface in response to increasingly effective security measures being applied in modern operating systems. Securing the early boot process revolves around key inflection points and protections applied between those points. The earliest point is the device "root of trust", where the system needs to ensure it begins operating in a trusted state. This is often performed by code in immutable Read-Only Memory ROM located in a SOC. Since size is extremely limited, this logic typically hands off quickly to code of larger size on some mutable storage such as SPI flash that is first verified by a key stored in the SOC. In general, this handoff process continues throughout the boot process as hardware capabilities come online enabling larger and more complex code to be loaded forming what is referred to as a "chain of trust". Eventually some code must execute on the host CPU, that code is often UEFI based firmware. While significant research has been devoted across the entire boot process, UEFI firmware on the host CPU presents a unique opportunity to gain more visibility into early code execution details and intercept the boot process before essential activities take place such as application of important security register locks, cache/memory/DMA protections, isolated memory regions, etc. The result is code executed in this timeframe must carry forward proper verification and measurement of future code while also ensuring it does not introduce a vulnerability in its own execution.
Performant and Reliable
From a performance perspective, firmware code is often expected to execute exceedingly fast. The ultimate goal is for an end user to not even be aware such code is present. In a consumer device scenario, a user expects to press a power button and immediately receive confirmation their system is working properly. At the minimum, a logo is often shown to assure the user something happened and they will be able to interact with the system soon. In a server scenario, fleet uptime is paramount. Poorly written firmware can lead to long boot times that impact virtual machine responsiveness and workload scaling or, even worse, Denial of Service if the system fails to boot entirely. In an embedded scenario, government regulations may require firmware to execute fast enough to show a backup camera within a fixed amount of time.
All of this is to illustrate that firmware must perform important work in a diverse set of hardware states with code that is as small as possible and do so quickly and securely. In order to transition implementation spanning millions of lines of code written in a language developed over 50 years ago requires a unique and compelling alternative.
Rust and Firmware
As previously stated, modern systems necessitate a powerful language that can support low-level programming with maximum performance, reliability, and safety. While C has provided the flexibility needed to implement relatively efficient firmware code, it has failed to prevent recurring problems around memory safety.
To get a better idea of the memory safety challenges in firmware written in C and to see real-world examples of where this has been a problem, refer to:
- Patina DXE Core Memory Strategy
- Real World Case Study: UEFI Memory Safety Issues Preventable by Rust
Stringent Safety
Common pitfalls in C such as null pointer dereferences, buffer and stack overflows, and pointer mismanagement continue to be at the root of high impact firmware vulnerabilities. These issues are especially impactful if they compromise the system TCB. Rust is compelling for UEFI firmware development because it is designed around strong memory safety without the usual overhead of a garbage collector. In addition, it enforces stringent type safety and concurrency rules that prevent the types of issues that often lead to subtle bugs in low-level software development.
Languages aside, UEFI firmware has greatly fallen behind other system software in its adoption of basic memory vulnerability mitigation techniques. For example, data execution protection, heap and stack guards, stack cookies, and null pointer dereference detection is not present in the vast majority of UEFI firmware today. More advanced (but long time) techniques such as Address Space Layout Randomization (ASLR), forward-edge control flow integrity technologies such as x86 Control Flow Enforcement (CET) Indirect Branch Tracking (IBT) or Arm Branch Target Identification (BTI) instructions, structured exception handling, and similar technologies are completely absent in most UEFI firmware today. This of course exacerbates errors commonly made as a result of poor language safety.
Given firmware code also runs in contexts with high privilege level such as System Management Mode (SMM) in x86, implementation errors can be elevated by attackers to gain further control over the system and subvert other protections.
Developer Productivity
The Rust ecosystem brings more than just safety. As a modern language firmware development can now participate in concepts and communities typically closed to firmware developers. For example:
-
Higher level multi-paradigm programming concepts such as those borrowed from functional programming in addition to productive polymorphism features such as generics and traits.
-
Safety guarantees that prevent errors and reduce the need for a myriad of static analysis tools with flexibility to still work around restrictions when needed in an organized and well understood way (unsafe code).
Modern Tooling
Rust includes a modern toolchain that is well integrated with the language and ecosystem. This standardizes tooling fragmented across vendors today and lends more time to firmware development. Examples of tools and community support:
-
An official package management system with useful tools such as first-class formatters and linters that reduce project-specific implementations and focus discussion on functional code changes.
-
High quality reusable bundles of code in the form of crates that increase development velocity and engagement with other domain experts.
-
Useful compilation messages and excellent documentation that can assist during code development.
-
A modern testing framework that allows for unit, integration, and on-platform tests to be written in a consistent way. Code coverage tools that are readily available and integrate seamlessly with modern IDEs.
Rust's interoperability with C code is also useful. This enables a phased adoption pathway where codebases can start incorporating Rust while still relying upon its extensive pre-existing code. At the same time, Rust has been conscious of low-level needs and can precisely structure data for C compatibility.
Patina in ODP
The Patina team in ODP plans to participate within the open Rust development community by:
- Engaging with the broader Rust community to learn best practices and share low-level system programming knowledge.
- Leveraging and contributing back to popular crates and publishing new crates that may be useful to other projects.
- A general design strategy is to solve common problems in a generic crate that can be shared and then integrate it back into firmware.
- Collaborating with other firmware vendors and the UEFI Forum to share knowledge and best practices and incorporate elements of memory safety languages like Rust into industry standard specifications where appropriate. Some specifications have interfaces defined around concepts and practices common in unsafe languages that could be improved for safety and reliability.
Looking forward, we're continuing to expand the coverage of our firmware code written in Rust. We are excited to continue learning more about Rust in collaboration with the community and our partners.
Current State
We began our journey with Rust in UEFI firmware by adding support for building Rust code in the edk2 build system used for C code. We still have this support and it worked well for integrating smaller pieces of Rust code into the larger, conventional C codebase. We wrote a few EFI modules with this approach including USB and HID DXE drivers written in Rust.
However, to truly realize our vision of the benefits gained from Rust in firmware, we needed to shift our primary work environment to a pure Rust workspace. Further, we chose to build an entire execution environment from the ground up in pure Rust. When surveying what environment this should be, we noted that PEI is very divergent across architectures and silicon vendors, while DXE operates in a more standardized environment with well defined entry criteria and an overall larger share of functionality and drivers. This led to writing a DXE Core entirely in Rust.
In the course of developing the Patina DXE Core, supporting functionality was needed that led to the some new crates being spun off from the work that will be published individually for reuse in other core environments or drivers. All of this work is part of the Patina project.
Right now, those include:
- An "advanced logger" crate for UEFI debug output.
- A Platform Initialization (PI) crate that provides a Rust interface and implemention for the UEFI PI specification.
- A Rust UEFI SDK crate that contains Rust implementation of common interfaces and code needed in both UEFI drivers and core environments like the Patina DXE Core.
- A generic paging crate that implements the functionality needed to manage page tables and memory mappings in x86/64 and AArch64 environments.
- A generic Memory Type Range Register (MTRR) crate that implements the functionality needed to manage memory type ranges in x86/64 environments.
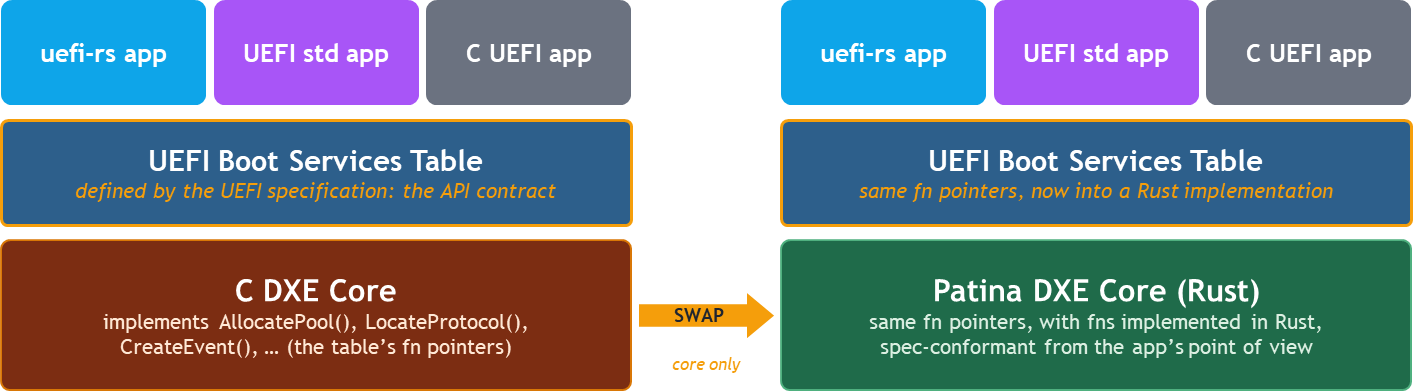
Patina DXE Core
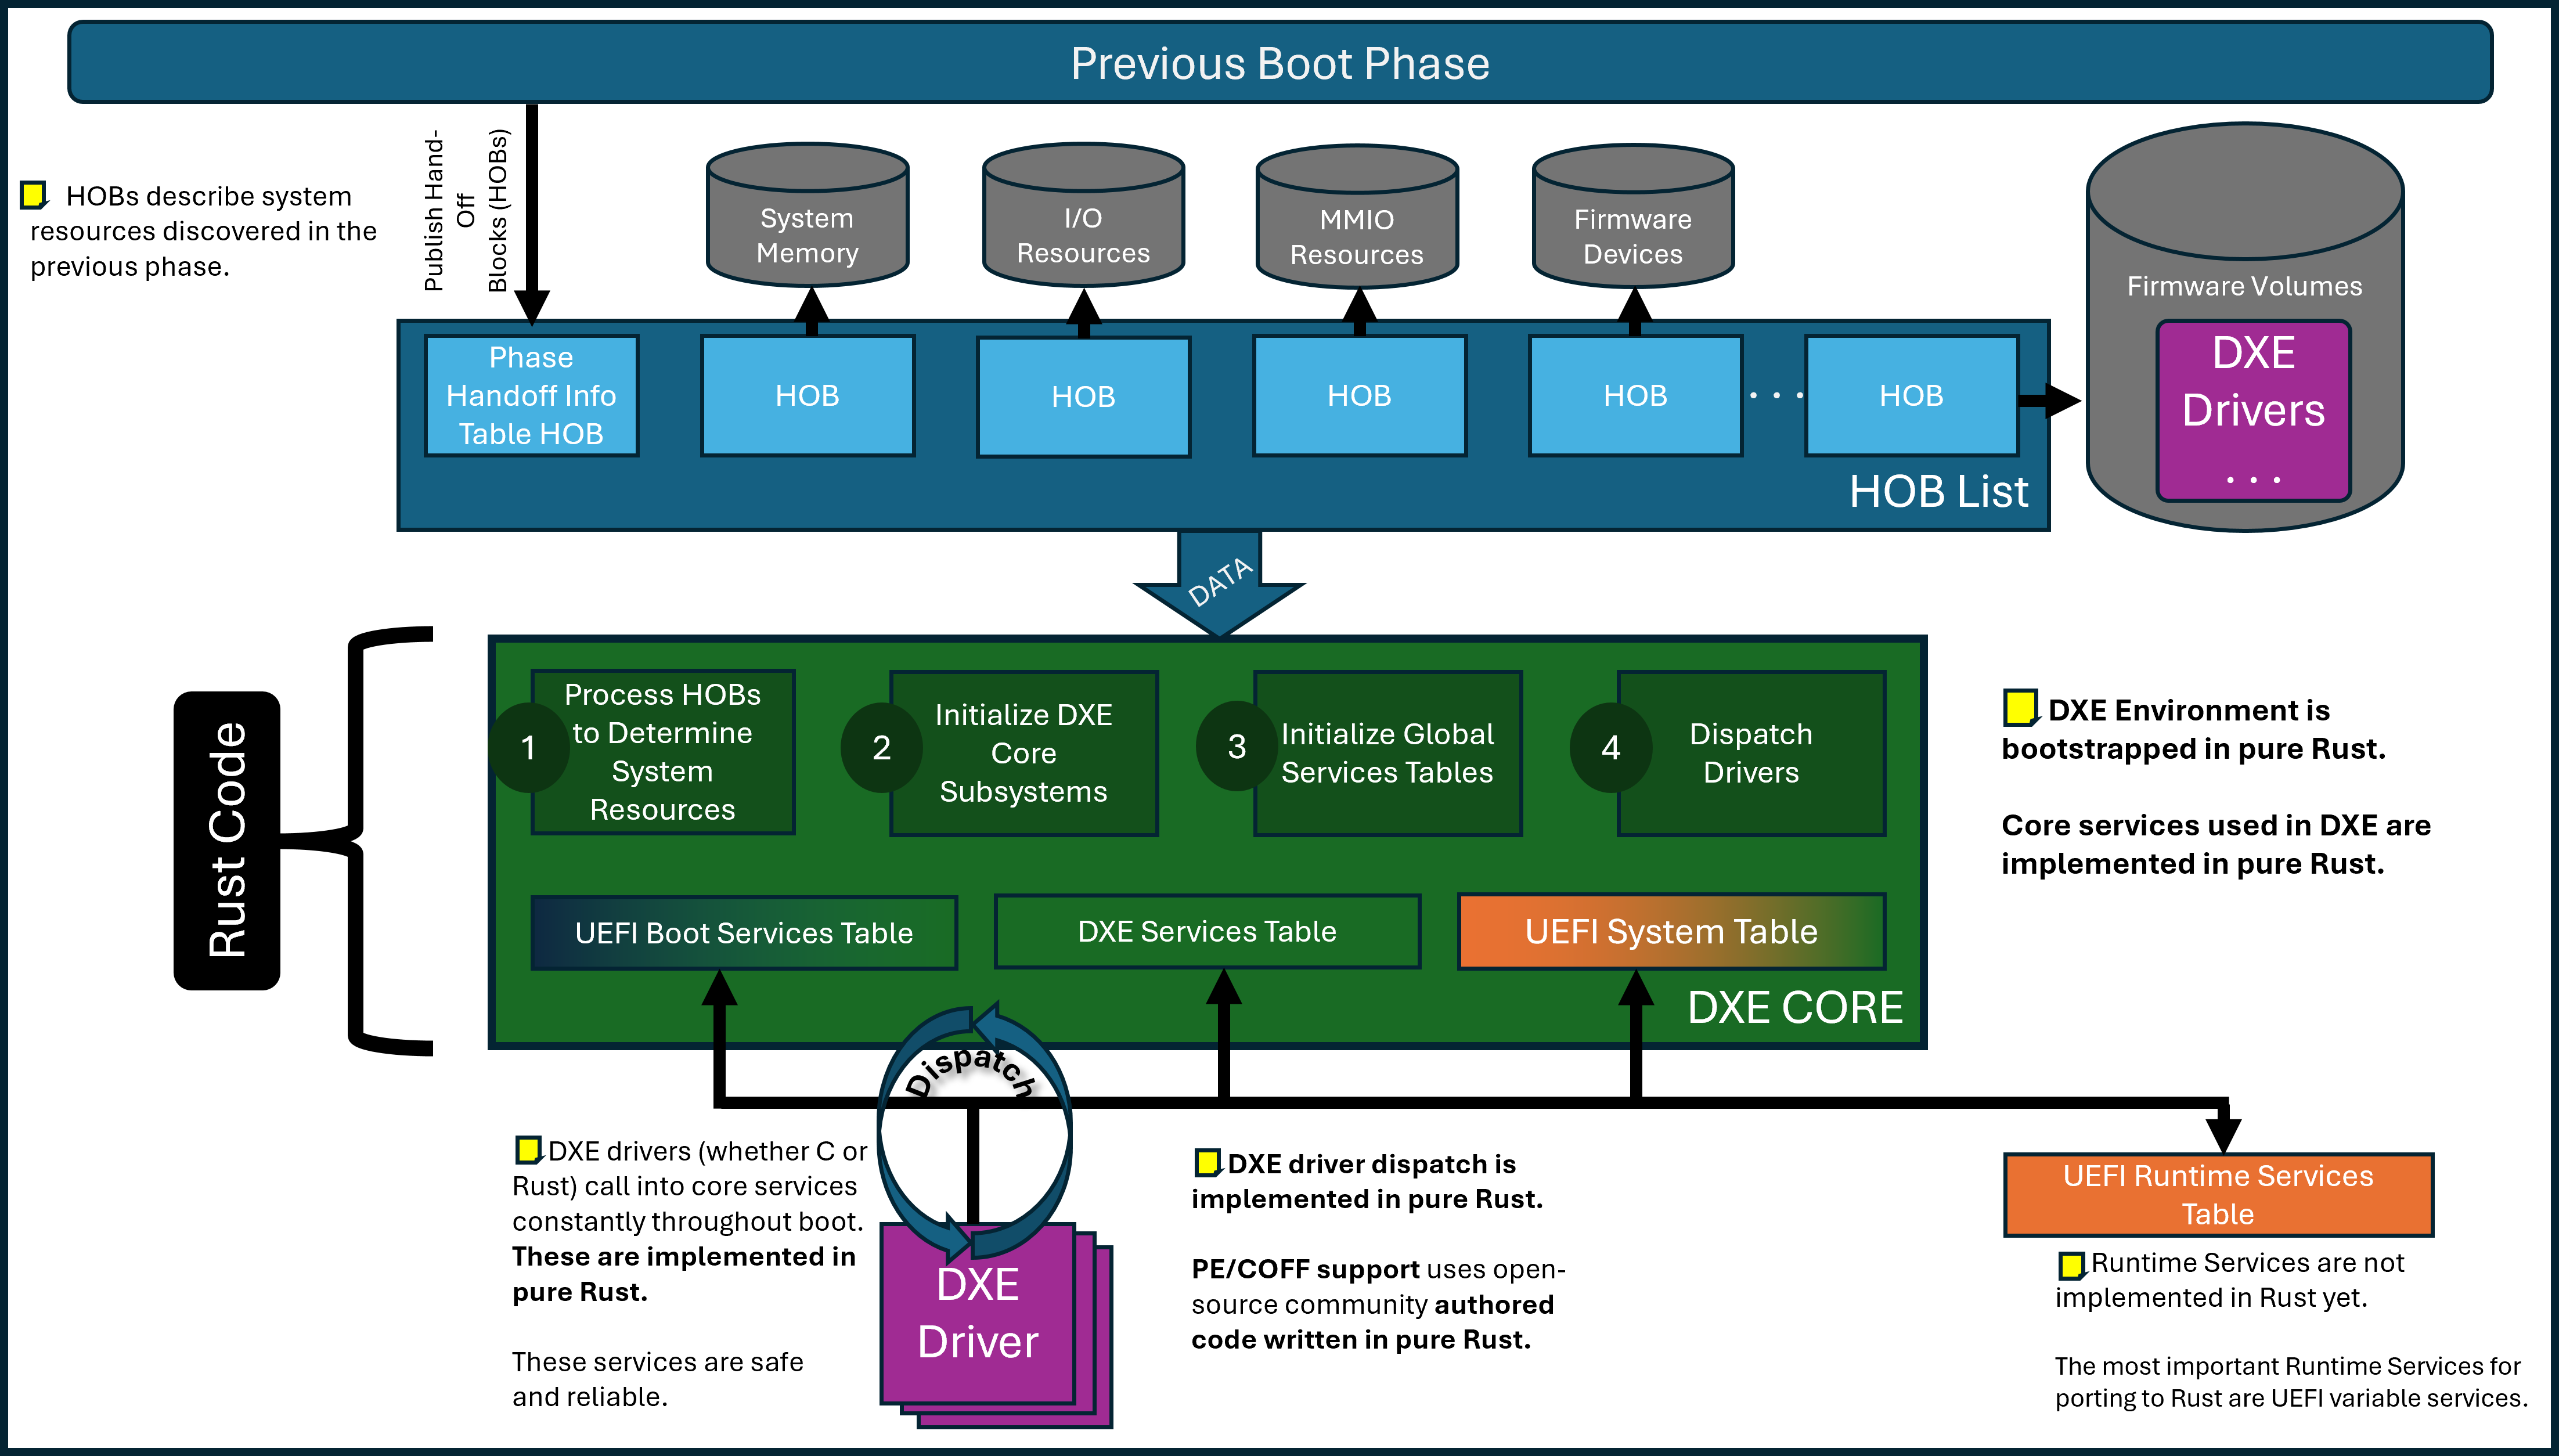
In the above high-level diagram, the Patina DXE Core takes system data input in the form of HOBs in the same way as the C DXE Core. The green box indicates that the core is written in Rust, while purple indicates that DXE drivers may be written either in C or Rust. Orange indicates code that is still written in C. For example, the UEFI Boot Services table and services themselves are largely written in pure Rust. The UEFI Runtime Services table itself has a Rust definition but many of the services are still implemented in C so it is orange.
Notable DXE Core Features
- AARCH64 and x86/64 support.
- Support for QEMU (Q35 and SBSA).
- Tested and developed on physical Intel and Arm hardware.
- Boots to Windows and Linux on these platforms.
- Performance record (FBPT) support.
- Page table management.
- A pure Rust dispatch system in addition to support for PI compatible FV/FFS dispatch.
- Parity with the C DXE Core in UEFI Self-Certification Test (SCT) results.
- >80% unit test coverage in the Patina DXE Core.
- Support for Enhanced Memory Protections.
- Source-level debugging support.
- Built-in Brotli and EFI decompression support.
- Infrastructure (in the
patina_testcrate) for on-platform execution of unit tests.
The Patina DXE Core otherwise supports the normal responsibilities of a DXE Core except for the design restrictions described in the "Compatibility" section.
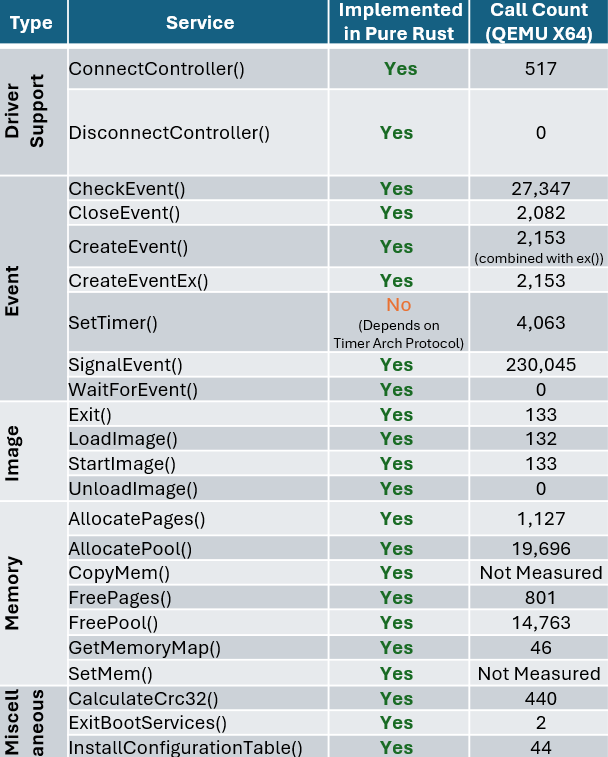
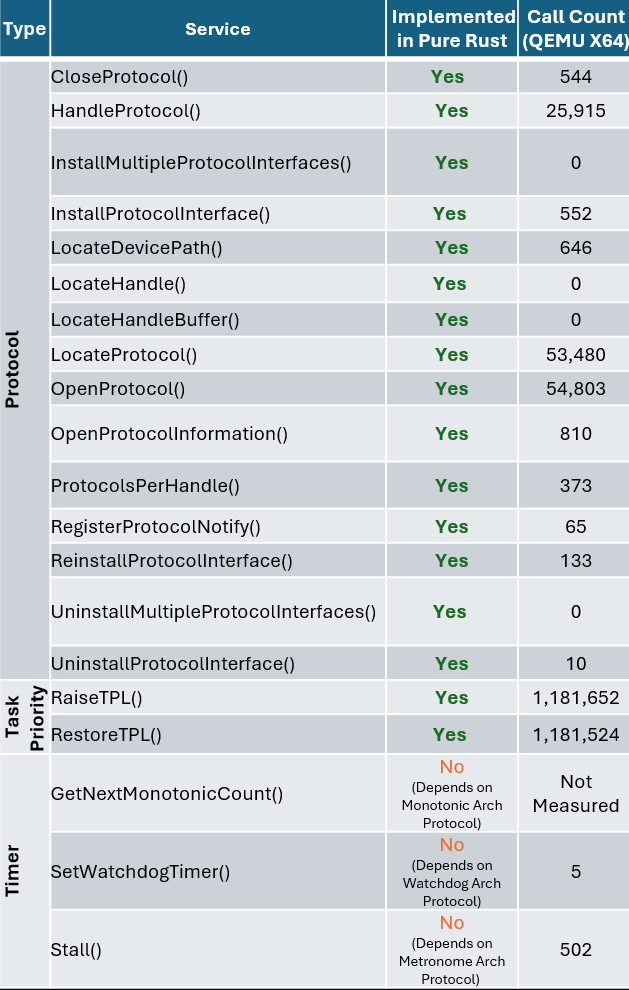
To illustrate why we believe the DXE Core is an ideal starting point, the following table summarizes the number of calls into boot services which are implemented in the DXE Core on a Q35 QEMU platform for reference. This is meant to show that while DXE drivers written in C are still dispatched and used during boot, the core services invoked and depended on by those drivers are written in Rust.
 |  |
|---|
Rust DXE Scaling Plan
While the Patina DXE Core is mostly a drop-in replacement for the C DXE Core, it does differ in terms of design to accommodate the Rust language, its safety guarantees, and more modern software practices that contribute to higher quality interfaces and testing.
While more detailed design documents will be available in the Patina DXE Core codebase, a key design goal to call out now is support to transition to a larger share of Rust code in DXE. To best take advantage of Rust's static safety guarantees and to avoid the need for unsafe code in interfacing between components (e.g. protocol database), we have implemented the ability for the Patina DXE Core dispatch process to dispatch platform defined static components called "components". Components are selected for dispatch by the platform and can share data and services with each other but through Rust interfaces that are safe and statically checked versus the dynamic and disjoint nature of the protocol database in the C DXE Core.
For an example of how the Patina DXE Core is instantiated and customized in a platform binary, see the Patina DXE Core Integration Guide.
Rust is an exciting new next step and there is more to share about the Patina DXE Core in future documentation.
Integration
This section is not meant to be a comprehensive guide to integrating Rust into UEFI firmware and more detailed information is available. This section is meant to share a high-level sense of how the Patina DXE Core is integrated into a platform.
The following integration documents might be helpful if you're beginning to work with the Patina DXE Core:
patina_dxe_core as a Library Crate
The Patina DXE Core itself is a library crate. This means a single set of common DXE Core is provided that can be linked into a binary crate. The binary crate is owned by the platform. The purpose of this separation is to allow the DXE Core to be reused across multiple platforms and to allow the platform to provide the necessary configuration and platform specific code to the DXE Core when it uses the DXE Core interface. The binary crate built by the platform is what produces the .efi DXE Core binary.
This separation also means that a Patina DXE Core can simply be swapped with the C DXE Core in an existing platform. The Patina DXE Core .efi file produced by the pure Rust platform binary crate can be placed into the flash map of the firmware volume that contains the DXE Core.
Platform Customization
The platform binary crate is where platform-specific customization is done. For example, the Patina DXE Core depends on a UART. However, the platform can configure the UART passed to the DXE Core to be either an I/O or MMIO UART and configure the UART base address, baud rate, stride size, and other parameters. The platform can specify pure Rust components to dispatch in the Patina DXE Core as well.
Transition Tooling
We plan to provide a "DXE Readiness" tool that will help test the input data (e.g. HOBs) and other system state to determine any compatibility issues and provide guidance where possible. We're hoping this will make the Patina DXE Core onboarding experience easier but also provide more visibility into the DXE Core's requirements and operating state in general.
Testing
Three main types of testing are currently supported.
- Unit tests are written in the exact file that you are working in. Tests are written in a conditionally compiled
sub-module and any tests should be tagged with
#[test]. - Integration tests are very similar to unit testing, however, the developer does not have access to the internal state of the module. Only the external interfaces are being tested. Cargo will detect and run these tests with the same command as for unit tests. More information about integration tests are available in the cargo book entry.
- On-platform tests are supported with code in a crate called
patina_testthat provides a testing framework similar to the typical rust testing framework. The key difference is that instead of tests being collected and executed on the host system, they are instead collected and executed via a component (patina_test::component::TestRunner) provided by the same crate. The platform must register this component with theDXE core. The DXE core will then dispatch this component, which will run all registered tests.
Compatibility
The Patina DXE Core is not only written in a newer, safer language but it is also designed for modern, more secure software practices. This means not everything that worked in the C DXE Core will work in the Patina DXE Core.
The main areas at this time that are not supported are:
- A priori dispatch of drivers.
- Traditional SMM support.
- "Dual Mode" drivers. For example, a driver that can run in both PEI and DXE (rarely used).
The Patina DXE Core also sets up memory protections and requires a more accurately and comprehensively defined memory map. The platform will likely need to describe more resources than before (via resource descriptor HOBs) so pages can be mapped correctly and UEFI code that violates memory protections will need to be fixed. For example, null pointer dereference detection and stack guard are active so code (C DXE driver or a third-party option ROM) will have memory protection violations caught at runtime.
For more details about mememory management in Patina see Memory Management.
Performance
While Rust provides some drawbacks when compared to C (e.g. binary size), it is generally the most performant of the memory-safe languages and adds comparatively minimal overhead. It is a more feature-rich language; for example, exposing complex data structures like HashMaps, Vectors, iterators (compare to the simple linked lists used in C). Patina uses these abstractions to provide more robust implementations of core functionality and enables core CPU capabilities differently than standard C firmware; as such, simple wall clock timing is not a fully accurate performance comparison. However, as a baseline measurement, with Patina v16.0 running on Intel x64 hardware, the Rust DXE core executes approximately 10% slower than the C core when timed across identical checkpoints (with magnitude in tens of ms).
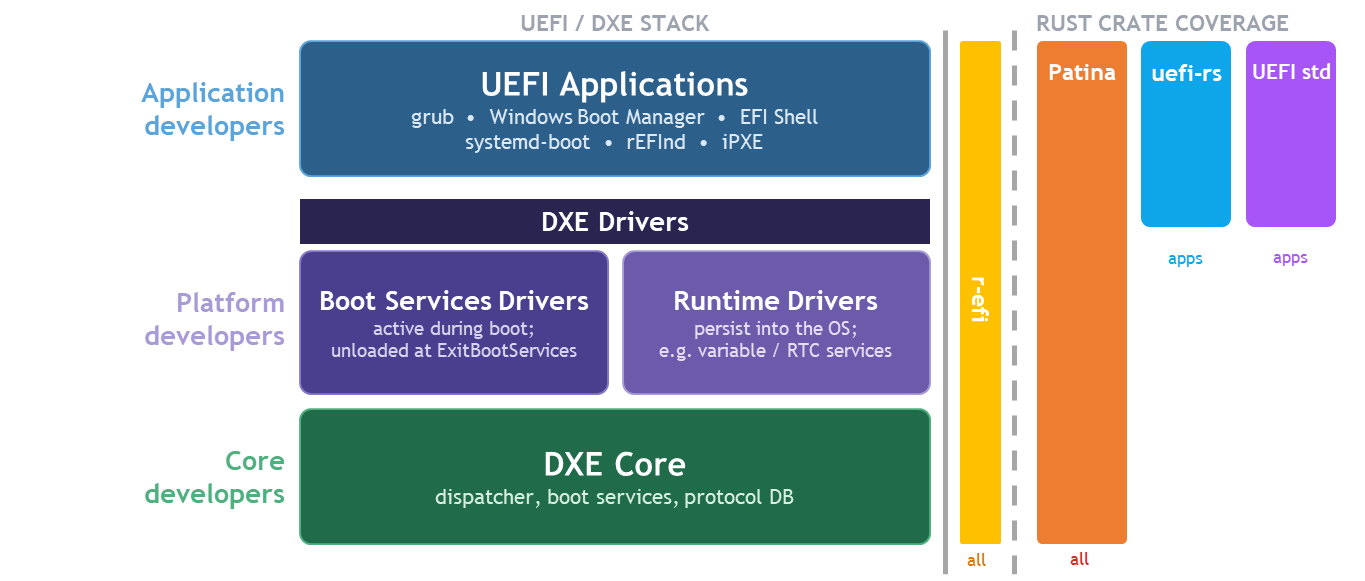
Patina in the UEFI Rust Ecosystem
This section provides an overview of the most likely options you will encounter when first considering writing UEFI firmware in Rust. The ecosystem is still in its early stages, but there are already a number of projects that have been active for years.
- r-efi
- UEFI Reference Specification Protocol Constants and Definitions. A pure transpose of the UEFI specification into Rust. This provides the raw definitions from the specification, without any extended helpers or Rustification. It serves as baseline to implement any more elaborate Rust UEFI layers.
- uefi-rs
- Safe and easy-to-use wrapper for building UEFI apps. An elaborate library providing safe abstractions for UEFI protocols and features. It implements allocators and provides an execution environment to UEFI applications written in Rust.
Though not a project, you can also write UEFI code using uefi std support tracked by the official Rust language. Additionally, more information about the *-unknown-uefi target is a great place to understand information that applies to all UEFI Rust projects building against that target.
It is important to understand that Patina is fundamentally different from these projects.
| Aspect | Patina | uefi-rs | r-efi | uefi std |
|---|---|---|---|---|
| Abstraction level | High-level firmware framework | High-level safe abstractions | Low-level raw bindings | Standard library port |
| Target use case | Full firmware implementation ground up in Pure Rust | UEFI applications & drivers | Simple spec type bindings reused in other implementations | UEFI applications |
| Safety | Safe Rust APIs | Safe Rust APIs | Unsafe raw FFI | Safe Rust APIs |
| Opinionated design | Yes | Moderate | No | No |
Because of the "raw" nature of r-efi, it is used in many other places including Patina and uefi-rs. uefi-rs and
Rust std support provide a path to write UEFI applications (and to some extent, DXE drivers) in Rust using safe and
ergonomic interfaces. They are both compatible with an underlying core written in C (such as Tianocore EDK II)
or Rust (such as Patina) since UEFI Specification defined interfaces like the Boot Services table
serve as a common abstraction.
Patina, implements the entire core environment in Rust with a design that supports porting drivers to Pure Rust over time while providing backward compatibility with Platform Initialization (PI) Specification dispatch. Therefore, while Patina provides an SDK that can be used for general-purpose UEFI development, its main focus is to write the entire execution environment in Rust as opposed to a wrapper around services that ultimately are implemented in C. Due to this, Patina has an audience ranging from core developers to application developers.
By writing the core in Rust, Patina provides a unique opportunity to leverage Rust's safety and other language features up and down the entire DXE build for a given platform. A key goal of Patina is to leverage this by porting more DXE drivers to Patina components over time that use idiomatic Rust interfaces while maintaining backward compatibility with the remaining DXE drivers.
In particular, a call to action for the ecosystem is to port those existing drivers to Patina components. Because there are hundreds of DXE drivers in a typical platform today, Patina components are likely to depend on functionality in some code that is not ported yet and we lose some of the benefits of Rust's safety when we have to call back into C code.
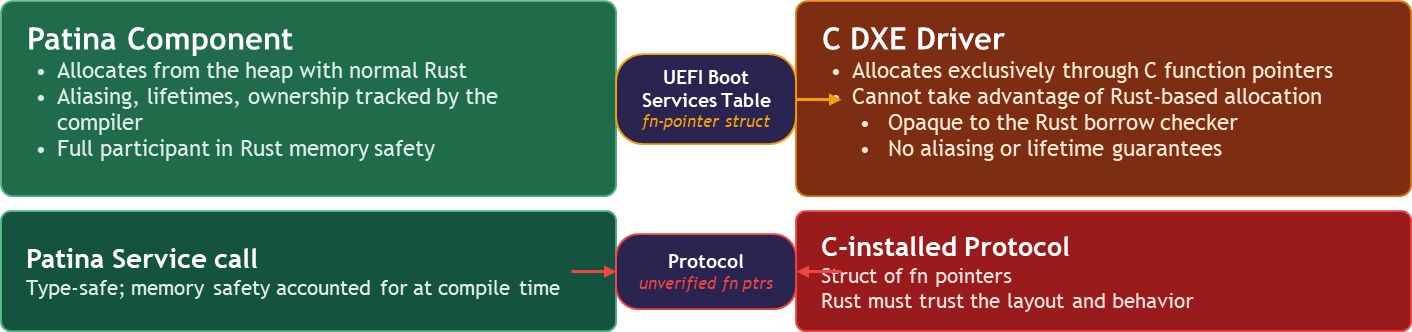
When a C DXE driver installs a protocol that Patina-based code must consume, the Rust compiler cannot verify the struct’s function pointers behave safely. We are forced to trust the layout and the implementation.
A Patina Service call, by contrast, is fully accounted for at compile time. Aliasing, lifetimes, and ownership all checked end-to-end. Read Getting Started with Components for more information.
Patina Training Videos
The Patina project occassionally produces training videos to supplement the documentation. These videos are intended to provide a more visual and interactive way to learn about the project, its architecture, and how to contribute. It is recommended to watch these videos in order and to review the associated documentation for a more comprehensive understanding of the project.
Videos are uploaded to the Patina Training YouTube playlist in the Open Device Partnership YouTube channel.
Project Introduction
An overview of Patina, featuring an introduction, a high-level architectural breakdown, primary Patina use cases, and a brief tour of the GitHub repository.
- Presenter: Michael Kubacki
Creating a Platform DXE Core and Integrating Components
Covers the creation and integration of a platform-specific customized DXE Core, including how to incorporate Patina components into the platform’s DXE Core.
- Presenter: Joey Vagedes
Patina QEMU Developer Workflow
Demonstrates how to build Patina Rust firmware, integrate it into a QEMU firmware image, and boot to the UEFI shell. This is the core developer workflow for implementing and testing project changes.
- Presenter: Joey Vagedes
Commands demonstrated in the video:
- 1:50 -
py -m venv venv_wizard - 2:05 -
.\venv_wizard\scripts\activate - 2:20 -
py .\workspace_setup.py - 4:25 -
py .\workspace_setup.py - 4:50 -
..\patina-fw-patcher - 5:05 -
..\patina-dxe-core-qemu - 5:15 -
..\patina - 6:35 -
py .\workspace_setup.py - 7:50 -
py .\workspace_setup.py - 9:00 -
py .\workspace_setup.py
Source Debugging
Learn how to source-level debug Patina, including an overview of the supporting components and available tools, with a hands-on demonstration in WinDbg. Applicable to both physical and virtual platforms.
- Presenter: Chris Fernald
Patina DXE Core Memory Strategy
Memory Safety in Rust-Based Firmware
Executive Summary
Patina provides a memory-safe Rust UEFI development model that eliminates entire classes of memory safety vulnerabilities present in traditional C-based (e.g. EDK II) firmware. This document focuses specifically on Rust's memory safety benefits and capabilities that provide tangible security improvements for firmware development.
This document explains:
- Why memory safety is a critical challenge in current C-based UEFI firmware
- How Rust's memory safety features and Patina's architecture address these challenges
- Why the Patina DXE Core implementation provides the most immediate security impact
If you are trying to understand why a programming language matters for firmware security, this document is for you.
Document Structure
- Problem: Memory safety challenges in current C-based UEFI firmware
- Solution: Rust's memory safety advantages and guarantees
- Implementation Prioritization: Why the DXE Core provides maximum memory safety impact
1. The Problem: Memory Safety Challenges in C Firmware
Traditional firmware development in C suffers from systemic memory safety issues that constantly present the opportunity for security vulnerabilities. For example, global tables of opaque function pointers are common in C firmware. The specific issues with that pattern are described further below.
Global Function Pointer Vulnerabilities
Traditional EDK II firmware relies heavily on global tables of function pointers, such as:
// Boot Services Table - Global function pointers
typedef struct {
  EFI_ALLOCATE_POOL          AllocatePool;
  EFI_FREE_POOL              FreePool;
  // ... dozens more function pointers
} EFI_BOOT_SERVICES;

extern EFI_BOOT_SERVICES *gBS; // Global pointer accessible everywhere
This leaves firmware vulnerable to several classes of memory safety problems:
- Pointer Corruption: Memory corruption can overwrite function pointers, potentially leading to arbitrary code execution
- No Type Safety: Function pointers can be cast to incompatible types, resulting in system instability
- Runtime Verification: No compile-time verification that function pointers point to valid functions
- Global Mutability: Global accessibility allows potential modification of critical function pointers
It is difficult for a platform owner to assert confidence that these global pointers are never corrupted or misused, especially when third-party drivers are loaded into the same address space. It has been observed that third-party drivers DO modify these global pointers. In that case, if a vulnerability is discovered in the driver that has patched the table, it can be exploited to compromise the entire firmware environment as firmware now calls into the vulnerability at a global-scale. In addition, third-party drivers may "fight" over these global pointers, leading to a situation where even their modification is overwritten by another driver.
This creates a fragile and insecure execution environment.
Does memory safety really matter? Where's the evidence?
For a more detailed analysis of real UEFI security vulnerabilities that would be prevented by Rust's memory safety features, see UEFI Memory Safety Case Studies.
The UEFI (EDK II) Separate Binary Model
In this model, each driver is compiled into a separate PE/COFF binary:
Platform.dsc defines drivers to build:
  MyDriverA/MyDriverA.inf  -> MyDriverA.efi (separate binary)
  MyDriverB/MyDriverB.inf  -> MyDriverB.efi (separate binary)

Platform.fdf packages binaries into flash images:
  FV_MAIN {
    INF MyDriverA/MyDriverA.inf
    INF MyDriverB/MyDriverB.inf
  }
Limitations of Separate Binaries:
- Compilation Isolation: Each driver compiles independently with no visibility into other drivers.
- Separate Address Spaces: Each driver has isolated memory spaces with potential for ABI mismatches.
- Opaque Memory Origination: It is difficult or impossible to trace memory ownership and lifetimes across binaries. Pointers have to be "trusted" to point to the correct objects of the correct size in the correct location.
- Limited Optimization: No cross-driver optimization possible.
2. Solution: Rust Memory Safety with Patina
Rust's Memory Safety Advantages
The Borrow Checker: Compile-Time Memory Safety Analysis
Rust's borrow checker is a sophisticated static analysis system that prevents memory safety violations at compile time—before code ever executes. Unlike C, where memory safety bugs like use-after-free, double-free, and buffer overflows can lurk undetected until runtime (often in production systems), Rust's borrow checker enforces three fundamental rules that firmware developers must write code to comply with:
- Ownership: Every value has exactly one owner at any time
- Borrowing: References must always be valid for their entire lifetime
- Mutability: Data can be accessed immutably by many or mutably by one, but never both simultaneously
This means:
- No use-after-free errors: The borrow checker ensures references cannot outlive the data they point to
- No double-free errors: Ownership tracking prevents the same memory from being freed multiple times
- No data races: Mutability rules prevent concurrent access violations that could corrupt critical firmware state
- No buffer overflows: Rust's array bounds checking and safe abstractions eliminate this entire vulnerability class
This is done at compile time, so there is no runtime performance cost. In Rust (and Patina), developers write code that is guaranteed to be memory safe by the compiler.
Patina Services vs. Global Function Pointers
Patina implements a trait-based service system to replace global function pointers:
// Rust service definition with compile-time safety
trait MemoryService {
    fn allocate_pool(&self, pool_type: MemoryType, size: usize) -> Result<*mut u8, MemoryError>;
    fn free_pool(&self, buffer: *mut u8) -> Result<(), MemoryError>;
}

// Services are dependency-injected, not globally accessible
fn component_entry(memory: Service<dyn MemoryService>) -> Result<(), ComponentError> {
    // Compiler verifies this service exists and has the correct interface
    let buffer = memory.allocate_pool(MemoryType::Boot, 1024)?;
    // ...
}
This provides:
- Compile-Time Verification: The type system ensures services implement required interfaces correctly
- Controlled Access: Services are dependency-injected rather than globally mutable
- Interface Safety: Traits ensure all implementations provide consistent, type-safe interfaces
Patina's Monolithic Compilation Model
Patina compiles all components into a single binary:
#![allow(unused)]
fn main() {
extern crate patina_dxe_core;
extern crate patina;
extern crate patina_ffs_extractors;
use patina::component::component;
use patina_ffs_extractors::LzmaSectionExtractor;
// Note: Begin mock types for compilation
#[derive(Default)]
struct PlatformConfig {
    secure_boot: bool,
}
pub struct MemoryManagerExampleComponent;
#[component]
impl MemoryManagerExampleComponent {
    fn new() -> Self { MemoryManagerExampleComponent }
   fn entry_point(self) -> patina::error::Result<()> { Ok(()) }
}
pub struct SecurityPolicyExampleComponent;
#[component]
impl SecurityPolicyExampleComponent {
   fn new() -> Self { SecurityPolicyExampleComponent }
   fn entry_point(self) -> patina::error::Result<()> { Ok(()) }
}
pub struct DeviceDriverExampleComponent;
#[component]
impl DeviceDriverExampleComponent {
   fn new() -> Self { DeviceDriverExampleComponent }
   fn entry_point(self) -> patina::error::Result<()> { Ok(()) }
}
// Note: End mock types for compilation

use patina_dxe_core::*;

struct ExamplePlatform;

impl ComponentInfo for ExamplePlatform {
  fn configs(mut add: Add<Config>) {
    add.config(PlatformConfig { secure_boot: true });
  }

  fn components(mut add: Add<Component>) {
    add.component(MemoryManagerExampleComponent::new());
    add.component(SecurityPolicyExampleComponent::new());
    add.component(DeviceDriverExampleComponent::new());
  }
}

// No default implementation overrides
impl MemoryInfo for ExamplePlatform { }

impl CpuInfo for ExamplePlatform { }

impl PlatformInfo for ExamplePlatform {
  type MemoryInfo = Self;
  type CpuInfo = Self;
  type ComponentInfo = Self;
  type Extractor = LzmaSectionExtractor;
}

static CORE: Core<ExamplePlatform> = Core::new(LzmaSectionExtractor::new());
}
Monolithic Compilation Benefits
- Cross-Module Optimization: The compiler can inline functions across component boundaries, eliminate dead code globally, and optimize data usage across the entire firmware image
- Whole-Program Analysis: Static analysis tools can reason about the complete control flow and data dependencies across all components, identifying potential issues that would be invisible when components are compiled separately
- Lifetime Verification: The borrow checker can verify that references between components remain valid throughout the entire firmware execution lifecycle, preventing inter-component memory safety violations
3. Implementation Prioritization: Why the DXE Core First?
DXE Core Role in UEFI Architecture
The Driver Execution Environment (DXE) Core:
- Contains more code than any other phase of UEFI firmware
- Has complex interations with third-party drivers
- Has the most consistently initialized hardware state upon entry of any execution phase across platforms
- Because pre-DXE firmware has already initialized basic SOC functionality, the DXE Core can have a common expectation that basic hardware capabilities such as main memory and APs are initialized.
This makes it the ideal first target to improve memory safety in UEFI firmware while maximizing portability of the work across platforms and vendors.
In addition, the DXE Core implements and manages critical system services that are heavily used by all subsequent drivers and components, including:
- Driver Dispatch: Loading and executing DXE drivers and securing the execution environment of those drivers
- Event Management: Coordinating system-wide events and callbacks critical to firmware correctness
- Memory Management: Managing memory allocation, memory protections, and the memory map
- Protocol Management: Managing the global protocol database
- Service Table Management & Functionality: Providing the fundamental Boot Services and Runtime Services that all other firmware components depend upon
Service Call Coverage
Every UEFI driver (including all C drivers used in a Patina DXE Core boot) make hundreds, thousands, even millions of calls to Boot Services and Runtime Services during system boot. By securing the DXE Core in Rust, these core services now reside in a Pure Rust call stack with all key operations such as memory allocations maintained entirely in safe Rust code. In short, this offers the most effective way to immediately take advantage of Rust's reliability across the lifetime of the boot phase with the least amount of effort since one component (the core) is written in Rust benefiting hundreds of components (remaining in C) with no changes in those components.
The following table demonstrates the implementation status and call frequency of key UEFI services in the Patina DXE Core, measured during QEMU X64 boot. This shows how frequently this critical code paths are executed during a typical boot, and how many of these services are now implemented in memory-safe Rust:
| Type | Service | Implemented in Pure Rust | Call Count (QEMU X64) |
|---|---|---|---|
| Driver Support | ConnectController() | Yes | 517 |
| DisconnectController() | Yes | 0 | |
| Event | CheckEvent() | Yes | 27,347 |
| CloseEvent() | Yes | 2,082 | |
| CreateEvent() | Yes | 2,153 | |
| CreateEventEx() | Yes | (combined with CreateEvent()) | |
| SetTimer() | No (Depends on Timer Arch Protocol) | 4,063 | |
| SignalEvent() | Yes | 230,045 | |
| WaitForEvent() | Yes | 0 | |
| Image | Exit() | Yes | 133 |
| LoadImage() | Yes | 132 | |
| StartImage() | Yes | 133 | |
| UnloadImage() | Yes | 0 | |
| Memory | AllocatePages() | Yes | 1,127 |
| AllocatePool() | Yes | 19,696 | |
| CopyMem() | Yes | Not Measured | |
| FreePages() | Yes | 801 | |
| FreePool() | Yes | 14,763 | |
| GetMemoryMap() | Yes | 46 | |
| SetMem() | Yes | Not Measured | |
| Miscellaneous | CalculateCrc32() | Yes | 440 |
| ExitBootServices() | Yes | 2 | |
| InstallConfigurationTable() | Yes | 44 | |
| Protocol | CloseProtocol() | Yes | 544 |
| HandleProtocol() | Yes | 25,915 | |
| InstallMultipleProtocolInterfaces() | Yes | 0 | |
| InstallProtocolInterface() | Yes | 552 | |
| LocateDevicePath() | Yes | 646 | |
| LocateHandle() | Yes | 0 | |
| LocateHandleBuffer() | Yes | 0 | |
| LocateProtocol() | Yes | 53,480 | |
| OpenProtocol() | Yes | 54,803 | |
| OpenProtocolInformation() | Yes | 810 | |
| ProtocolsPerHandle() | Yes | 373 | |
| RegisterProtocolNotify() | Yes | 65 | |
| ReinstallProtocolInterface() | Yes | 133 | |
| UninstallMultipleProtocolInterfaces() | Yes | 0 | |
| UninstallProtocolInterface() | Yes | 10 | |
| Task Priority | RaiseTPL() | Yes | 1,181,652 |
| RestoreTPL() | Yes | 1,181,524 | |
| Timer | GetNextMonotonicCount() | No (Depends on Monotonic Arch Protocol) | Not Measured |
| SetWatchdogTimer() | No (Depends on Watchdog Arch Protocol) | 5 | |
| Stall() | No (Depends on Metronome Arch Protocol) | 502 |
Conclusion
The Patina DXE Core's monolithic Rust compilation strategy allows the firmware to maximize the benefit of Rust's memory safety guarantees at compile time. This prevents memory safety vulnerabilities from ever being introduced in the first place, rather than relying on reactive vulnerability patching after the fact. In C, a myriad of static analysis tools are run against the codebase to try to identify potential memory safety issues, but these tools can only find a subset of issues and often generate false positives. That is not necessary in Safe Rust.
Key Benefits Summary
- Comprehensive Static Analysis: Monolithic compilation enables verification across all firmware components
- Immediate Security Impact: The Patina DXE Core strategy protects the most frequently executed firmware code paths
- Strategic Migration Path: Gradual transition from C drivers to Rust components preserves existing investments
- Vulnerability Elimination: Entire classes of memory safety vulnerabilities are prevented by design rather than addressed reactively
Rust Tooling in Patina
Overview
The Patina project relies on Rust's tooling ecosystem to maintain consistent quality, security, and reliability for UEFI firmware development. This document summarizes the tooling in use, highlights how it is integrated into Patina's workflow, and contrasts the approach with common practices in C-based firmware projects where relevant.
For first-time rust tooling setup instructions, please review the project's README.
Summary Table
The table below shows the comprehensive tool suite used in Patina compared to traditional C firmware development tools:
| Tool Category | Patina (Rust) Tool | Traditional C Tool | Key Advantages |
|---|---|---|---|
| Benchmarking | cargo bench | Custom timing code | Statistical analysis, regression detection |
| Build System | cargo-make | GNU Make, CMake | Cross-platform, declarative |
| Code Formatting | rustfmt | Uncrustify, ClangFormat | Built-in, consistent, configurable |
| Documentation | rustdoc | Doxygen | Code-synchronized, testable examples |
| Security & License Auditing | cargo-deny | Manual tracking and spreadsheets | Automated vulnerability and license policy enforcement |
| Spell Checking | cspell | Manual proofreading | Automated technical dictionary |
| Static Analysis | clippy | PC-lint, PVS-Studio, Coverity | Compiler-integrated, zero-config |
| Supply Chain Auditing | cargo vet | Manual review processes | Web-of-trust based dependency auditing |
| Test Coverage | cargo-llvm-cov | gcov, OpenCppCoverage | Integrated coverage collection |
| Undefined Behavior Analysis | cargo miri | Valgrind, UBSan | Catches memory safety issues in unsafe code |
Definitions
CI Features: The set of all features in a crate that should be tested in CI against a no_std build. This only omits
the features that require std.
Default Features: The features for a given crate that are in the default feature, i.e. the features that are enabled
by default when building a crate.
The cargo Ecosystem: Central Command Hub
Tooling Strategy
Patina prioritizes mature, off-the-shelf tooling to avoid maintaining bespoke infrastructure. Experience with other firmware projects shows that custom build systems and analyzers introduce long-term maintenance risk and complicates onboarding. Using standard Rust tooling keeps Patina aligned with the broader ecosystem and allows the Patina team to focus on firmware functionality.
cargo is the common entry point for these tools. It offers a consistent interface for building, testing, and extending the workflow without constraining developers to project-specific wrappers. Cargo provides a standardized interface that works identically across host environments (Windows, Linux, macOS) and is the central command used to orchestrate all development tasks.
cargo
Purpose: Cargo is Rust's integrated package manager and build system that serves as the central command hub for the entire development workflow, from dependency management to tool management.
Why a "Central Commans" is valuable:
- Universal Interface: Single command entry point for all development tasks (
cargo make build,cargo make test,cargo make doc, etc.) - Plugin Architecture: Extensible through cargo subcommands that integrate seamlessly with existing workflows
- Tool Discovery: Automatic discovery and integration of third-party tools
- Workspace Management: Unified management of multi-crate projects with shared configurations
Tool Installation and Management
Cargo also handles tool distribution. Patina supports two installation strategies, depending on whether a build from source is required or a pre-built binary is acceptable. In most cases, Patina uses pre-built binaries to minimize setup time.
Source-based Installation:
This will compile tools from source, which can take several minutes per tool. It is particularly useful if the user needs the tool to be built against their exact environment (e.g. rustc version, custom patches, etc.).
# Install tools from source with full compilation
cargo install cargo-make        # Build orchestration
cargo install cargo-deny        # Security and license auditing
cargo install cargo-llvm-cov    # Coverage analysis
Binary Installation with cargo-binstall:
The cargo-binstall helper downloads pre-built artifacts when they are
available:
# Install cargo-binstall itself
cargo install cargo-binstall

# Install tools as pre-compiled binaries (much faster)
cargo binstall cargo-make
cargo binstall cargo-deny
cargo binstall cargo-llvm-cov
It is recommended to use cargo-binstall when possible to minimize setup time.
Automated Installation of Project Tools:
Patina maintains a pinned set of tool versions in the [tools] section of rust-toolchain.toml:
[tools]
cargo-deny = "^0.18"
cargo-llvm-cov = "0.6.18"
cargo-make = "0.37.21"
# ...
Run the install-tools task to install every tool at its specified version so a local environment matches CI:
cargo make install-tools
The task reads the [tools] section and installs each entry with cargo binstall, falling back to cargo install
when a pre-built binary is unavailable. If cargo-binstall is not already present, the task installs it first. Because
the versions come from rust-toolchain.toml, this is the recommended way to keep local tooling in sync with CI.
Tool Discovery and Version Management
cargo-binstall streamlines discovery and version control for external tooling by downloading pre-built binaries when
available.
Automatic Release Discovery and Selection:
- Scans GitHub releases for compatible binaries
- Detects the target architecture/platform automatically
- Downloads the appropriate binary for the current system
Version Management:
- Tracks semantic versioning of installed tools
- Provides an easy upgrade path for tool updates
- Allows specific versions of tools to be installed as needed
Security and Verification:
- Verifies checksums and signatures when available
- Downloads from trusted sources (GitHub releases)
Integration with Development Workflow
The tools available with cargo make development simple and consistent across all Patina repos:
# Standard cargo commands work universally
cargo make check        # Fast compilation check
cargo make build        # Full compilation
cargo make test         # Run test suite
cargo make patina-test  # Build with Patina test features enabled for on-platform tests
cargo make doc          # Generate documentation
cargo make cov          # Generate unit test code coverage
cargo make deny         # Check for security and license compliance in dependencies

cargo make all   # Run the same commands used in CI/CD
Developers can run targeted commands based on the changes they've made and then run the full suite (cargo make all)
when they are finished to test against the same commands that will be used in CI. This allows for quick feedback during
development without waiting for the full suite to complete.
Traditional C Firmware Tools
In a traditional C UEFI workspace, there is often developer confusion about how to build, what is supported in a given workspace and/or firmware package, and which tools to use for various tasks. In Patina, these commands are standardized, documented, and work identically across all supported platforms.
Benefits of Standard Tooling
Patina's use of community tooling has several benefits:
- Bug fixes and improvements benefit the entire ecosystem
- Easy onboarding and skill set transfer between Rust projects
- No time investment needed from firmware developers to maintain custom tools
- No licensing fees for proprietary analysis tools
- No vendor lock-in to elaborate project-specific tooling
- Security updates provided by tool maintainers
- Tools evolve with the language and best practices
These practices let Patina developers concentrate on firmware behavior instead of maintaining custom infrastructure.
Rust Tools
cargo bench (Performance Benchmarking)
Purpose: Statistical benchmarking framework for performance regression detection and optimization validation.
Value:
- Integration: Works with existing test infrastructure
- Micro-benchmarks: Fine-grained performance measurement
- Regression Detection: Automated performance regression alerts
- Statistical Analysis: Multiple iterations with outlier detection
Provides statistically rigorous benchmarking:
#![allow(unused)]
fn main() {
#[cfg(test)]
mod benches {
    use super::*;
    use test::Bencher;  // Built-in benchmarking framework

    #[bench]
    fn bench_process_buffer(b: &mut Bencher) {
        let mut buffer = vec![0u8; 1024];

        b.iter(|| {
            // Automatically runs multiple iterations with statistical analysis
            process_buffer(&mut buffer);
        });
    }
}
}
Configuration in Patina:
# Makefile.toml - Benchmarking support
[tasks.bench]
command = "cargo"
args = ["bench", "@@split(CARGO_MAKE_TASK_ARGS,;)"]
cargo-make (Advanced Build Orchestration)
Purpose: Cross-platform task runner that abstracts complex build tasks into simple commands.
Value:
- Conditional Execution: Tasks execute based on environment, features, or dependencies
- Cross-Platform Scripts: Single configuration works on Windows, Linux, macOS
- Customization: Ability to establish dependencies between tasks and add custom script logic
cargo-make provides declarative, cross-platform task definition. It is
the key extension to cargo that enables Patina to define complex workflows in a single configuration file and make
build commands consistent across all platforms and Patina repositories.
# Makefile.toml - works identically on all platforms
[tasks.check]
description = "Comprehensive code quality checks"
run_task = [
    { name = ["check_no_std", "check_std", "check_tests"], parallel = true }
]

[tasks.all]
description = "Complete PR readiness pipeline"
dependencies = [
    "deny", "clippy", "build", "build-x64", "build-aarch64",
    "test", "coverage", "fmt", "doc"
]
Configuration in Patina:
# Multi-target build support
[tasks.build-x64]
command = "cargo"
args = ["build", "--target", "x86_64-unknown-uefi", "@@split(NO_STD_FLAGS, )"]

[tasks.build-aarch64]
command = "cargo"
args = ["build", "--target", "aarch64-unknown-uefi", "@@split(NO_STD_FLAGS, )"]
The Patina cargo-make makefile: Makefile.toml
rustfmt (Code Formatting)
Purpose: Automatic code formatting tool that enforces consistent style across the entire codebase.
Value:
- Easy & Documented Configuration: Simple
rustfmt.tomlfile for project-wide rules - Editor Integration: Real-time formatting in editors like VS Code, IntelliJ, Vim, Emacs
- Deterministic Output: Code is always formatted identically
- Incremental Formatting: Only formats changed code for faster execution
- Zero Configuration: Works out-of-the-box with sensible defaults
Comparison to C Development:
Traditional C firmware projects have struggled with formatting consistency and formatting feedback consumes valuable code review time and energy. Some projects have adopted tools like Uncrustify, but they require extensive configuration and customization and are not used consistently across all firmware repositories. This means when a platform integrates firmware for multiple repositories, their codebase is often formatted inconsistently.
Patina uses the standard rustfmt tool to produce consistently formatted code.
Patina configuration is defined in rustfmt.toml.
rustdoc (Documentation Generation)
Purpose: Built-in documentation generator that creates interactive, searchable documentation directly from source code and comments.
Value:
- Code Synchronization: Documentation is embedded in source code, preventing drift from code
- Cross-References: Automatic linking between types, functions, and modules
- Interactive Examples: Runnable code examples in the browser
- Testable Examples: Code examples in documentation are automatically tested
Comparison to C Development:
Traditional C documentation uses external tools like Doxygen, which often become outdated and is not synchronized with the codebase:
/**
  Processes a buffer by zeroing all elements.

  @param[in,out] Buffer         Pointer to the buffer to process.
  @param[in]     BufferSize     Size of the buffer in bytes.

  @retval EFI_SUCCESS           The buffer was processed successfully.
  @retval EFI_INVALID_PARAMETER Buffer is NULL or BufferSize is 0.

**/
EFI_STATUS
ProcessBuffer (
  IN OUT UINT8  *Buffer,
  IN     UINTN  BufferSize
  );
Rust documentation using rustdoc is embedded and testable:
#![allow(unused)]
fn main() {
/// Processes a buffer by zeroing all elements.
///
/// # Arguments
/// * `buffer` - Mutable slice to process
///
/// # Examples
/// ```
/// let mut buffer = vec![1, 2, 3, 4];
/// process_buffer(&mut buffer);
/// assert_eq!(buffer, vec![0, 0, 0, 0]);  // This example is automatically tested!
/// ```
///
/// # Safety
/// This function is memory-safe due to Rust's slice bounds checking.
pub fn process_buffer(buffer: &mut [u8]) {
    for byte in buffer.iter_mut() {
        *byte = 0;
    }
}
}
Configuration in Patina:
# Makefile.toml - Documentation generation
[tasks.doc]
command = "cargo"
args = ["doc", "@@split(INDIVIDUAL_PACKAGE_TARGETS, )", "--features", "doc"]

[tasks.doc-open]
command = "cargo"
args = ["doc", "--features", "doc", "--open"]

# Environment variables for strict documentation
[env]
RUSTDOCFLAGS = "-D warnings -D missing_docs"
Note: Patina defines its documentation requirements in the Documentation Reference guide.
cargo-deny (Security and License Auditing)
Purpose: Comprehensive dependency auditing tool that checks for security vulnerabilities, license compliance, and dependency policy violations.
Value:
- Dependency Policy: Prevents supply chain attacks through dependency restrictions
- License Compliance: Ensures all dependencies meet licensing requirements
- SBOM Generation: Software Bill of Materials for regulatory compliance
- Vulnerability Database: Automatically checks against RustSec advisory database
cargo-deny is configured in Patina with a single configuration file
deny.toml is tracked and reviewed like any
other source code file in the codebase.
Sample cargo-deny Output:
error[A001]: Potential security vulnerability detected
    ┌─ Cargo.lock:123:1
    │
123 │ openssl-sys v0.9.60
    │ ------------------- security vulnerability ID: RUSTSEC-2023-0044
    │
    = advisory: https://rustsec.org/advisories/RUSTSEC-2023-0044
    = Affected versions: < 0.9.61
    = Patched version: >= 0.9.61
Configuration in Patina:
# deny.toml - Comprehensive security and compliance policy
[advisories]
ignore = [
    { id = "RUSTSEC-2024-0436", reason = "Macros for token pasting. No longer maintained per readme." }
]

[licenses]
allow = ["Apache-2.0", "BSD-2-Clause-Patent", "MIT"]

[bans]
deny = [
    { crate = "tiny-keccak", reason = "Not updated in 5 years. Use alternative." }
]
Key Documentation: cargo-deny Book
cargo vet (Supply Chain Auditing)
Purpose: Supply chain security tool that provides a web-of-trust based auditing system for Rust dependencies, to check that dependencies have been reviewed by trusted auditors.
Value:
- Audit Sharing: Leverages existing audits from Mozilla, Google, and other organizations to reduce audit burden
- Open Device Partnership shares audits across the organization in OpenDevicePartnership/rust-crate-audits
- Delta Auditing: Focuses audit effort on changes between versions rather than full re-audits
- Import Management: Allows importing audits from other projects and organizations
- Policy Enforcement: Requires explicit audits or exemptions for all dependencies
- Web of Trust: Builds on audits from trusted organizations and maintainers in the Rust ecosystem
Comparison to cargo-deny:
cargo vet provides a different approach to supply chain security compared to
cargo-deny. While cargo-deny focuses on known vulnerabilities and license compliance, cargo vet ensures that
dependencies have been reviewed by trusted auditors before they can be used and it tracks unaudited dependencies
so they can be prioritized for review.
cargo-deny is reactive - it flags known issues after they're discovered. cargo vet is proactive - it requires
confirmation that dependencies are safe before they can be used.
Usage in Patina:
cargo vet                    # Check all dependencies are audited
cargo vet check             # Check without updating imports
cargo vet certify           # Certify a new dependency
cargo vet add-exemption     # Add temporary exemption for unaudited dependency
cargo vet prune             # Remove unused audits
Key Documentation: cargo vet Book
cspell (Spell Checking)
Purpose: Spell checker that is applied against all technical documentation and source code with the ability to use programming-language specific and custom dictionaries.
Value:
- Automation: Automated spell checking in local and sever CI
- Custom Dictionaries: Supports project-specific terminology and abbreviations
- Multi-Language: Supports code comments in multiple programming languages
- Technical Dictionaries: Built-in support for programming terms, acronyms, and technical jargon including the import of third-party dictionaries
Configuration in Patina:
# cspell.yml example in Patina
language: en
dictionaries: ["makefile", "rust"]
ignorePaths: ["**/target/**", "**/book/**"]
ignoreRegExpList: ["/0x[0-9a-fA-F]+/", "asm!\\(.*?\\);"]
words:
  - aarch      # Architecture terms
  - acpibase   # ACPI terminology
  - dxefv      # UEFI-specific terms
  - edkii      # EDK II references
  ...
Further Documentation:
cargo-check (Fast Compilation Without Code Generation)
Purpose: Fast build checking, use by Rust Analyzer to aid in development
Value:
- Compiler Integration: Leverages Rust's compiler infrastructure to do a quick build check
- Rust Analyzer Integration: Allows a quick dev inner loop with Rust Analyzer reporting results in near real time
Comparison to C Development:
Code is written and later built fully to test, harder to have near real time results as code is being written.
Coverage in Patina:
Patina runs check against the UEFI targets and test code. std is not done separately from
tests because this is a small set of Patina code and is expected to be built with the normal
build commands. The --all-features parameter can only be used for std/tests because it pulls in
std which conflicts with the no_std build. As such, the ci_features are tested for the
no_std builds to test all features that do not require std.
| aarch64-unknown-uefi | x86_64-unknown-uefi | std | test | |
|---|---|---|---|---|
| All Features | X | |||
| CI Features | X | X | X | |
| No Default Features | X | X |
Further Documentation:
clippy (Static Analysis and Linting)
Purpose: Advanced static analysis tool that catches bugs, performance issues, and style problems beyond what the compiler detects.
Value:
- Compiler Integration: Leverages Rust's compiler infrastructure for deep semantic analysis
- Memory Safety: Additional checks beyond Rust's built-in memory safety guarantees
- Performance Insights: Identifies inefficient patterns specific to systems programming
- UEFI-Specific Lints: Custom lints can be added for firmware-specific patterns
Comparison to C Development:
Traditional C static analysis tools like Coverity and CodeQL are expensive, require extensive configuration, and often produce false positives:
// C code that passes basic compilation but has subtle bugs
void ProcessBuffer(UINT8* Buffer, UINTN Size) {
    UINTN Index = 0;
    while(Index <= Size) {    // Off-by-one error - tools may miss this
        Buffer[Index] = 0;    // Potential buffer overflow
        Index++;
    }
}
Clippy provides analysis that detects and suggests design changes to improve the code:
#![allow(unused)]
fn main() {
// Clippy warns about potential issues
fn process_buffer(buffer: &mut [u8]) {
    // Clippy suggests using an iterator instead of manual indexing
    for byte in buffer.iter_mut() {    // Automatic bounds checking
        *byte = 0;
    }
}
}
Sample Clippy Output:
warning: this loop could be written as a `for` loop
  --> src/lib.rs:10:5
   |
10 |     while index < buffer.len() {
   |     ^^^^^^^^^^^^^^^^^^^^^^^^^^^^ help: try: `for (index, item) in buffer.iter_mut().enumerate()`
   |
   = help: for further information visit https://rust-lang.github.io/rust-clippy/master/index.html#while_let_loop
Coverage in Patina:
Patina runs clippy against the UEFI targets and std (primarily for tests).
The --all-features parameter can only be used for std/tests because it pulls in
std which conflicts with the no-std build. As such, the ci_features are tested for the
no_std builds to test all features that do not require std.
| aarch64-unknown-uefi | x86_64-unknown-uefi | std | test | |
|---|---|---|---|---|
| All Features | X | X | ||
| CI Features | X | X | X | X |
Further Documentation:
cargo miri (Undefined Behavior Detection)
Purpose: Executes tests under the Miri interpreter to detect memory safety
issues resulting in undefined behavior (UB). This is particularly useful in unsafe code. For example, out-of-bounds
pointer arithmetic, use-after-free, invalid use of uninitialized data, alignment violations, etc.
In Patina, the goal is to write as little unsafe code as possible, but some low-level operations require it. Patina
then builds safe abstractions on top of that unsafe code that all other Rust code in Patina uses. Miri helps ensure
that this minimal unsafe layer of code is correct and that the safe abstractions built on top of it are valid.
Value:
- Early UB Detection: Catches issues such as use-after-free, data races in
Synctypes, and invalid pointer math. - No Extra Harness: Reuses existing unit tests, so validation focuses on expanding coverage rather than wiring up custom tooling.
- Targeted Verification: Developers can gate changes that introduce new
unsafecode on passing Miri runs to keep Patina's invariants explicit and documented. - Unsafe Code Validation: Exercises
unsafeblocks under an interpreter that checks aliasing, alignment, and initialization rules that the optimizer assumes are upheld.
Comparison to C Development:
Traditional firmware workflows rely on Valgrind or compiler sanitizers, which struggle with firmware-specific runtime constraints and often cannot model the exact aliasing rules required by Rust's unsafe code contracts:
Running the test with cargo miri test produces a detailed error describing the violated aliasing rule, letting the
developer either refactor to safe abstractions or document the invariants with additional assertions.
Usage in Patina:
cargo miri setup             # Configure the toolchain the first time
cargo miri test -p patina_mm # Run interpreter-backed tests for a specific crate
Patina developers prioritize running Miri on modules that contain low-level memory manipulation, MMIO shims, or FFI
shims. Documenting why unsafe blocks remain valid after fixes helps future reviewers and keeps invariants explicit.
Further Documentation:
cargo-llvm-cov (Test Coverage Analysis)
Purpose: LLVM-based code coverage collection and reporting tool that integrates seamlessly with Rust's testing infrastructure.
Value:
- Integration: Works with standard
cargo testwithout additional setup - Multiple Formats: Supports LCOV, HTML, JSON output formats for CI/CD integration
- Precise Coverage: LLVM instrumentation provides accurate line and branch coverage
- Threshold Enforcement: Fails builds when coverage drops below specified levels
Code coverage in C firmware has traditionally been difficult to set up and maintain, often requiring custom scripts and limitations in the types of tests that can be measured and the host environments supported.
Rust code coverage with cargo-llvm-cov works automatically with existing tests:
#![allow(unused)]
fn main() {
// Automatic coverage collection with zero additional code
#[cfg(test)]
mod tests {
    use super::*;

    #[test]  // Automatically included in coverage
    fn test_buffer_processing() {
        let mut buffer = vec![1, 2, 3, 4];
        process_buffer(&mut buffer);
        assert_eq!(buffer, vec![0, 0, 0, 0]);
    }
}
}
Configuration in Patina:
Patina has several tasks defined in Makefile.toml to collect coverage data and generate reports in different formats:
cargo make coverage-collect: Runs tests and collects coverage data without generating reports. This allows multiple report formats to be generated from the same data efficiently.cargo make coverage-lcov: Generates an LCOV coverage report from the collected data.cargo make coverage-html: Generates an HTML coverage report from the collected data.
[tasks.coverage]
description = "Build and run all tests and calculate coverage (generates both LCOV and HTML outputs efficiently)."
dependencies = ["coverage-collect", "coverage-lcov", "coverage-html"]
Note: Patina previously used
tarpaulinfor coverage, but switched tocargo-llvm-covas it has proven to be more accurate using LLVM-based instrumentation.
Code Coverage During Development
A nice feature of code coverage in Rust is that it can integrate seamlessly with IDEs like VS Code. For example, the
Coverage Gutters extension
can read the lcov.info file generated by cargo llvm-cov and display coverage information directly in the editor:
In this example, green lines indicate code that is covered by tests, while red lines indicate code that is not covered.
This provides real-time feedback on which lines of code are covered by tests, helping developers identify untested code paths and improve overall test coverage during development.
Tool Integration and Workflow
Complete Set of Commands
A single all task is used in Patina to run all the commands. This is the same command used in CI to validate pull
requests:
The up-to-date command definition is in Makefile.toml,
this is a representative example to show how all bundles all of the other commands together:
# Complete PR readiness pipeline
[tasks.all]
description = "Run all tasks for PR readiness."
dependencies = [
    "deny",          # Security and license auditing
    "clippy",        # Static analysis and linting
    "build",         # Standard library build
    "build-x64",     # x86_64 UEFI target build
    "build-aarch64", # AArch64 UEFI target build
    "test",          # Unit and integration tests
    "coverage",      # Test coverage analysis
    "fmt",           # Code formatting
    "doc",           # Documentation generation
]
Real World Case Study: UEFI Memory Safety Issues Preventable by Rust
Overview
This document provides analysis of real UEFI firmware vulnerabilities found in the EDK II codebase and demonstrates how Rust's memory safety features would have prevented each one. The analysis is based on actual CVEs that affected production systems and required security patches.
⚠️ Note: These case studies are based on publicly disclosed CVEs and are intended for education only.
- The examples are simplified for clarity and may not represent the full complexity of the original vulnerabilities.
- The goal of the examples is to show how Rust's safety features can prevent memory safety problems in real-world firmware code. The suggestions are not intended to be complete or production-ready Rust implementations.
Summary Table
The are actual CVEs found in UEFI firmware that could have been prevented with the memory safety features in Rust.
| CVE ID | CVSS Score | Vulnerability Type | Potential Rust Prevention Mechanism |
|---|---|---|---|
| CVE-2023-45230 | 8.3 (HIGH) | Buffer Overflow in DHCPv6 | Automatic slice bounds checking |
| CVE-2022-36765 | 7.0 (HIGH) | Integer Overflow in CreateHob() | Checked arithmetic operations |
| CVE-2023-45229 | 6.5 (MEDIUM) | Out-of-Bounds Read in DHCPv6 | Slice bounds verification |
| CVE-2014-8271 | 6.8 (MEDIUM) | Buffer Overflow in Variable Processing | Dynamic Vec sizing eliminates fixed buffers |
| CVE-2023-45233 | 7.5 (HIGH) | Infinite Loop in IPv6 Parsing | Iterator patterns with explicit termination |
| CVE-2021-38575 | 8.1 (HIGH) | Remote Buffer Overflow in iSCSI | Slice-based network parsing with bounds checking |
| CVE-2019-14563 | 7.8 (HIGH) | Integer Truncation | Explicit type conversions with error handling |
| CVE-2024-1298 | 6.0 (MEDIUM) | Division by Zero from Integer Overflow | Checked arithmetic prevents overflow-induced division by zero |
| CVE-2014-4859 | Not specified | Integer Overflow in Capsule Update | Safe arithmetic with explicit overflow checking |
Vulnerability Classes Eliminated by Rust
These CVEs would be prevented by Rust's compile-time checks or runtime safety guarantees by preventing these common vulnerability classes:
- Buffer Overflows: Automatic bounds checking eliminates this entire vulnerability class
- Use-After-Free: Ownership system prevents dangling pointers at compile time
- Integer Overflow: Checked arithmetic operations prevent overflow-induced vulnerabilities
- Out-of-Bounds Access: Slice bounds verification ensures memory safety
- Infinite Loops: Iterator patterns with explicit termination conditions
- Type Confusion: Strong type system prevents conversion errors
Detailed CVE Analysis
CVE-2023-45230: Buffer Overflow in DHCPv6 Client
- CVE Details: CVE-2023-45230
- CVSS Score: 8.3 (HIGH)
- Vulnerability Type: CWE-119 (Improper Restriction of Operations within Memory Buffer Bounds)
- Vulnerabilities in EDK2 NetworkPkg IP stack implementation
- Fixed in: f31453e8d6 (Unit Tests)
Issue Description: "EDK2's Network Package is susceptible to a buffer overflow vulnerability via a long server ID option in DHCPv6 client when constructing outgoing DHCP packets."
C Problem:
// From NetworkPkg/Dhcp6Dxe/Dhcp6Utility.c (prior to the fix)
UINT8 *
Dhcp6AppendOption (
  IN OUT UINT8   *Buf,
  IN     UINT16  OptType,
  IN     UINT16  OptLen,
  IN     UINT8   *Data
  )
{
  // Vulnerable: No bounds checking
  WriteUnaligned16 ((UINT16 *)Buf, OptType);
  Buf += 2;
  WriteUnaligned16 ((UINT16 *)Buf, OptLen);
  Buf += 2;
  CopyMem (Buf, Data, NTOHS (OptLen));  // Buffer overflow is possible if the packet is too small
  Buf += NTOHS (OptLen);

  return Buf;
}

// Usage in Dhcp6SendRequestMsg, Dhcp6SendRenewRebindMsg, etc:
Cursor = Dhcp6AppendOption (
           Cursor,
           HTONS (Dhcp6OptServerId),
           ServerId->Length,
           ServerId->Duid  // Large ServerId->Length causes overflow
           );
How Rust Prevents This:
#![allow(unused)]
fn main() {
extern crate zerocopy;
extern crate zerocopy_derive;
use std::marker::PhantomData;
use zerocopy_derive::*;

// Type-safe DHCP6 option codes
#[derive(Debug, Clone, Copy, PartialEq, Eq)]
#[repr(u16)]
pub enum Dhcp6OptionCode {
    ClientId = 1,
    ServerId = 2,
    IaNa = 3,
    IaTa = 4,
    IaAddr = 5,
    OptionRequest = 6,
    Preference = 7,
    ElapsedTime = 8,
    // ... other options
}

// Safe packet builder that tracks remaining space
#[derive(Debug)]
pub struct Dhcp6PacketBuilder {
    buffer: Vec<u8>,
    max_size: usize,
}

impl Dhcp6PacketBuilder {
    pub fn new(max_size: usize) -> Self {
        Self {
            buffer: Vec::with_capacity(max_size),
            max_size,
        }
    }

    // Safe option appending with automatic bounds checking
    pub fn append_option(
        &mut self,
        option_type: Dhcp6OptionCode,
        data: &[u8],
    ) -> Result<(), Dhcp6Error> {
        let option_header_size = 4; // 2 bytes type + 2 bytes length
        let total_size = option_header_size + data.len();

        // Rust prevents buffer overflow through bounds checking
        if self.buffer.len() + total_size > self.max_size {
            return Err(Dhcp6Error::InsufficientSpace);
        }

        // Safe serialization with automatic length tracking
        self.buffer.extend_from_slice(&(option_type as u16).to_be_bytes());
        self.buffer.extend_from_slice(&(data.len() as u16).to_be_bytes());
        self.buffer.extend_from_slice(data);

        Ok(())
    }

    pub fn append_server_id(&mut self, server_id: &ServerId) -> Result<(), Dhcp6Error> {
        self.append_option(Dhcp6OptionCode::ServerId, server_id.as_bytes())
    }

    pub fn finish(self) -> Vec<u8> {
        self.buffer
    }
}

// Type-safe Server ID that prevents overflow
#[derive(Debug, Clone)]
pub struct ServerId {
    duid: Vec<u8>,
}

impl ServerId {
    pub fn new(data: &[u8]) -> Result<Self, Dhcp6Error> {
        // Validate server ID length (DHCP6 spec limits)
        if data.len() > 130 { // RFC 8415 section 11.1
            return Err(Dhcp6Error::InvalidServerIdLength);
        }

        Ok(Self { duid: data.to_vec() })
    }

    pub fn as_bytes(&self) -> &[u8] {
        &self.duid
    }
}

#[derive(Debug)]
pub enum Dhcp6Error {
    InsufficientSpace,
    InvalidServerIdLength,
}

// Usage example - safe by construction:
fn build_dhcp6_request(server_id: &ServerId) -> Result<Vec<u8>, Dhcp6Error> {
    let mut builder = Dhcp6PacketBuilder::new(1500); // Standard MTU

    // The bounds checking is automatic - no manual buffer management needed
    builder.append_server_id(server_id)?;

    Ok(builder.finish())
}

// Similar to `EFI_DHCP6_PACKET_OPTION` in the C code.
//
// Note this is deriving some zerocopy traits onto this type that provide these benefits:
// - `FromBytes` - Allows for safe deserialization from bytes in the memory area without copying
// - `KnownLayout` - Allows the layout characteristics of the type to be evaluated to guarantee the struct layout
//   matches the defined C structure exactly
// - `Immutable` - Asserts the struct is free from interior mutability (changes after creation)
#[derive(Debug, FromBytes, KnownLayout, Immutable)]
#[repr(C)]
pub struct Dhcp6OptionHeader {
    pub op_code: u16,
    pub op_len: u16,
}

// Type-safe wrapper for DHCP6 options
#[derive(Debug)]
pub struct Dhcp6Option<'a> {
    _lifetime: PhantomData<&'a ()>,
}
}
How This Helps (Eliminates Buffer Overflow):
- Automatic Bounds Checking:
append_optionchecks available space before writing - Type-Safe Buffer Management:
Vec<u8>grows dynamically and prevents overflows - Structured Error Handling:
Result<T, E>forces explicit error handling - Safe by Construction: The API prevents creation of oversized packets
- Compile-Time Prevention: Buffer overflow becomes a compile error, not a runtime vulnerability
How is This Different from Just Adding Bounds Checks in C?
The fundamental difference between Rust's memory safety and defensive C programming lies in where and how safety is enforced. While both approaches can prevent vulnerabilities, Rust's approach provides stronger guarantees through language-level enforcement rather than solely relying on developer discipline.
Language-Level Safety vs. Defensive Programming
In C, safety depends entirely on developer discipline and tooling:
- Bounds checks are optional and easily forgotten
- Memory management is manual and error-prone
- Safety violations compile successfully but fail at runtime
- No clear (and enforced) separation between safe and potentially dangerous operations
- Tools like static analyzers are external, optional, and of varying quality
// C: All of these compile successfully, but some are dangerous
UINT8 *cursor = packet->options;
cursor = Dhcp6AppendOption(cursor, type, len, data);       // No bounds checking
cursor = Dhcp6AppendOption(cursor, type, huge_len, data);  // Potential overflow - compiles fine

// No way to tell which operations are safe just by looking
int *ptr = malloc(sizeof(int));
*ptr = 42;                         // Safe right now
free(ptr);                         // ptr becomes dangling
*ptr = 43;                         // Use-after-free, compiles fine
In Rust: Safety is enforced by the compiler at the language level:
- Memory safety violations are compile-time errors, not runtime bugs
- There is clear (and enforced) separation between safe and unsafe code using the
unsafekeyword - Safe abstractions are guaranteed safe by the compiler, not by developer promises
- Unsafe code has strict requirements and caller obligations that are compiler-enforced
It is important to understand that unsafe code does not mean the code is not safe. It is a way to tell the compiler that the programmer is taking responsibility for upholding certain safety guarantees that the compiler cannot automatically verify. There are tools like Miri that can help verify unsafe code correctness, but the key point is that the compiler enforces a clear boundary between safe and unsafe code.
Rust's Safe/Unsafe Code Separation
The separation between safe and unsafe code is enforced by the compiler:
Safe Code (Most Rust code)
#![allow(unused)]
fn main() {
// Safe code - the compiler guarantees memory safety
let mut buffer = Vec::new();           // Dynamic allocation
let user_input = &[1, 2, 3];
buffer.extend_from_slice(user_input);  // Automatic bounds checking
let value = buffer[0];                 // Bounds checked - panics if out of bounds
let safe_value = buffer.get(0);        // Returns Option<T> - no panic possible
}
#![allow(unused)]
fn main() {
// Ownership prevents use-after-free at compile time
let data = vec![1, 2, 3];
let reference = &data[0];
drop(data);                            // COMPILE ERROR: cannot drop while borrowed
println!("{}", reference);             // This line would never be reached
}
The compiler guarantees that safe code cannot:
- Access memory out of bounds
- Use memory after it's freed
- Have data races in multi-threaded code
- Dereference null or dangling pointers
Unsafe Code (requires explicit opt-in)
#![allow(unused)]
fn main() {
// Unsafe code must be explicitly marked and justified
let buffer = vec![1u8, 2, 3];
let index = 1;
unsafe {
    // Raw pointer operations that bypass Rust's safety checks
    let raw_ptr = buffer.as_ptr();
    let value = *raw_ptr.add(index);   // Could be out of bounds
}

// Unsafe functions must declare their safety requirements
/// # Safety
///
/// The caller must ensure:
/// - `ptr` is valid for reads of `size` bytes
/// - `ptr` is properly aligned for type T
/// - The memory referenced by `ptr` is not mutated during this function call
/// - The memory referenced by `ptr` contains a valid value of type T
unsafe fn read_unaligned<T>(ptr: *const u8, size: usize) -> T {
    // Implementation that bypasses compiler safety checks
    std::ptr::read_unaligned(ptr as *const T)
}
}
Compiler-Enforced Safety Requirements
Unlike C where safety comments are just documentation, Rust's unsafe keyword creates compiler-enforced
obligations. This is required. The developer cannot perform operations (such as dereferencing a raw pointer) that
are considered "unsafe" without marking the code as such.
1. Unsafe Code Must Be Explicitly Marked
#![allow(unused)]
fn main() {
// This will NOT compile - raw pointer dereference requires unsafe
fn broken_function(ptr: *const u8) -> u8 {
    *ptr  // COMPILE ERROR: dereference of raw pointer is unsafe
}
}
A safer approach is to contain the unsafe operation and document the invariants:
#![allow(unused)]
fn main() {
fn safe_wrapper(ptr: *const u8) -> Option<u8> {
    if ptr.is_null() {
        return None;
    }

    unsafe {
        // SAFETY: We checked for null above
        Some(*ptr)
    }
}
}
2. Unsafe Functions Require Safety Documentation
The Rust compiler and tools in the ecosystem enforce that unsafe functions document their safety requirements:
#![allow(unused)]
fn main() {
// Note: Begin mock types for compilation
struct Packet;
struct ParseError;
impl Packet {
    fn parse(_slice: &[u8]) -> Result<Packet, ParseError> { Ok(Packet) }
}
// Note: End mock types for compilation

/// # Safety
///
/// This function is unsafe because it dereferences a raw pointer without
/// verifying its validity. The caller must ensure:
///
/// 1. `data_ptr` points to valid memory containing at least `len` bytes
/// 2. The memory remains valid for the duration of this function call
/// 3. The memory is properly aligned for the data type being read
/// 4. The memory contains valid UTF-8 data if being interpreted as a string
unsafe fn parse_network_packet(data_ptr: *const u8, len: usize) -> Result<Packet, ParseError> {
    // Implementation that works with raw bytes from network
    let slice = unsafe {
        // SAFETY: Caller guarantees ptr and len are valid
        std::slice::from_raw_parts(data_ptr, len)
    };

    // Rest of function uses safe code operating on the slice
    Packet::parse(slice)
}
}
An unsafe function (like parse_network_packet) cannot be called from safe code without an unsafe block, forcing
the caller to acknowledge the safety requirements.
3. Safe Abstractions Hide Unsafe Implementation Details
#![allow(unused)]
fn main() {
// Note: Begin mock types for compilation
struct Packet;
struct ParseError;
struct NetworkError;
impl NetworkError {
    fn OffsetOutOfBounds() -> Self { NetworkError }
}
impl Packet {
    fn parse(_slice: &[u8]) -> Result<Packet, ParseError> { Ok(Packet) }
}
unsafe fn parse_network_packet(data_ptr: *const u8, len: usize) -> Result<Packet, ParseError> {
    let slice = std::slice::from_raw_parts(data_ptr, len);
    Packet::parse(slice)
}
// Note: End mock types for compilation

// Public safe interface - users cannot misuse this
struct NetworkBuffer {
    data: Vec<u8>,
}
impl NetworkBuffer {
    fn len(&self) -> usize { self.data.len() }

    /// Safe interface for reading network packets
    ///
    /// This function handles all bounds checking and validation internally.
    /// Users cannot cause memory safety violations through this interface.
    pub fn read_packet(&self, offset: usize) -> Result<Packet, NetworkError> {
        // Bounds checking in safe code
        if offset >= self.len() {
            return Err(NetworkError::OffsetOutOfBounds());
        }

        // All unsafe operations are contained within this implementation
        unsafe {
            // SAFETY: We verified bounds above and self.data is always valid
            let ptr = self.data.as_ptr().add(offset);
            let remaining = self.len() - offset;
            parse_network_packet(ptr, remaining).map_err(|_| NetworkError::OffsetOutOfBounds())
        }
    }
}

// Users can only call the safe interface:
fn example(buffer: &NetworkBuffer, offset: usize) -> Result<Packet, NetworkError> {
    let packet = buffer.read_packet(offset)?;
    Ok(packet)
}
}
Advantages
-
Audit Surface: In a large codebase, you only need to audit the small amount of
unsafecode, not every function that handles pointers or arrays. -
Compiler Enforcement: Safety isn't dependent on developers catching mistakes in code reviews - the compiler prevents most memory safety bugs from being written in the first place.
-
Safe by Default: New code is safe unless explicitly marked
unsafe, reversing the C model where code is unsafe by default. -
Clear Contracts: Unsafe code must document its safety requirements, and safe wrappers must uphold these contracts. This creates a clear chain of responsibility.
-
Incremental Adoption: You can write safe Rust code that calls into existing C libraries through well-defined unsafe boundaries, gradually improving safety over time. This is important for UEFI firmware given the large amount of pre-existing C code that needs to continue being used during a transition to Rust.
Summary: The C vulnerability in this CVE existed because it used a fixed-size buffer (UINT8 ServerId[256]) and
performed unchecked copying. Rust eliminates this entire vulnerability class by preventing unsafe operations -
you cannot overflow a Vec<u8> because it automatically grows, and you cannot access invalid slice indices because
bounds are checked automatically. The zerocopy approach also ensures that the binary layout exactly matches the C
structures while providing memory safety.
This is why it is important to write a minimum amount of unsafe Rust code that is checked with tools like Miri and then build safe abstractions on top of that unsafe code. The safe abstractions are what prevent entire classes of vulnerabilities from ever occurring in the first place and the Rust compiler ensures that safe code is always safe.
CVE-2023-45229: Out-of-Bounds Read in DHCPv6
- CVE Details: CVE-2023-45229
- CVSS Score: 6.5 (MEDIUM)
- Vulnerability Type: CWE-125 (Out-of-bounds Read)
- Vulnerabilities in EDK2 NetworkPkg IP stack implementation
Issue Description: "EDK2's Network Package is susceptible to an out-of-bounds read vulnerability when processing IA_NA or IA_TA options in DHCPv6 Advertise messages. This vulnerability can be exploited by an attacker to gain unauthorized access and potentially lead to a loss of confidentiality."
C Problem:
There was not sufficient bounds checks when parsing IA (Identity Association) options. Before the fix, the code did not properly validate the option length against the packet boundaries, leading to potential out-of-bounds reads when processing malformed DHCPv6 packets.
// From NetworkPkg/Dhcp6Dxe/Dhcp6Io.c (before fixes)
EFI_STATUS
Dhcp6UpdateIaInfo (
  IN OUT DHCP6_INSTANCE    *Instance,
  IN     EFI_DHCP6_PACKET  *Packet
  )
{
  // ... existing code ...

  // Vulnerable: Option length not properly validated against packet boundaries
  Option = Dhcp6SeekIaOption (
             Packet->Dhcp6.Option,
             OptionLen,  // OptionLen could extend beyond actual packet data
             &Instance->Config->IaDescriptor
             );

  // Vulnerable: No bounds checking when reading IA option fields
  if (Instance->Config->IaDescriptor.Type == Dhcp6OptIana) {
    // Direct memory access without bounds validation
    T1 = NTOHL (ReadUnaligned32 ((UINT32 *)(DHCP6_OFFSET_OF_IA_NA_T1 (Option))));
    T2 = NTOHL (ReadUnaligned32 ((UINT32 *)(DHCP6_OFFSET_OF_IA_NA_T2 (Option))));
  }

  // Seeks inner options without proper bounds checking
  Status = Dhcp6SeekInnerOption (  // Old unsafe function
             Instance->Config->IaDescriptor.Type,
             Option,
             OptionLen,  // Could extend beyond actual option data
             &IaInnerOpt,
             &IaInnerLen
             );
}
Example Rust Design (Prevention by Design):
Rust can leverage its strong memory safety capabilities like zero-copy parsing, strong typing, and ownership to make a safe design available to developers:
#![allow(unused)]
fn main() {
extern crate zerocopy;
extern crate zerocopy_derive;
use std::mem::size_of;
use zerocopy_derive::*;

/// DHCPv6 IA option types - prevents option type confusion
#[derive(Debug, Clone, Copy, PartialEq, Eq)]
#[repr(u16)]
pub enum IaOptionType {
    IaNa = 3,     // Identity Association for Non-temporary Addresses
    IaTa = 4,     // Identity Association for Temporary Addresses
    IaAddr = 5,   // IA Address option
    IaPd = 25,    // Identity Association for Prefix Delegation
}

/// Zero-copy DHCPv6 IA option header matching C structure layout
#[derive(Debug, FromBytes, KnownLayout, Immutable)]
#[repr(C)]
pub struct IaOptionHeader {
    pub option_code: u16,    // Network byte order
    pub option_length: u16,  // Network byte order
    pub iaid: u32,           // Network byte order
    pub t1: u32,             // Network byte order
    pub t2: u32,             // Network byte order
    // Followed by variable-length sub-options
}

/// Type-safe wrapper that owns its slice and guarantees bounds safety
#[derive(Debug)]
pub struct IaOption<'a> {
    header: &'a IaOptionHeader,
    sub_options: &'a [u8],
    option_type: IaOptionType,
}

/// Iterator for IA sub-options with guaranteed memory safety
pub struct IaSubOptionIterator<'a> {
    data: &'a [u8],
    offset: usize,
}

impl<'a> IaOption<'a> {
    /// Safe zero-copy parsing with compile-time layout verification
    pub fn parse(option_data: &'a [u8]) -> Result<Self, Dhcp6ParseError> {
        // Ensure minimum size for complete option (4-byte option header + 12-byte IA data = 16 bytes)
        let (header, _) = <IaOptionHeader as zerocopy::FromBytes>::ref_from_prefix(option_data)
            .map_err(|_| Dhcp6ParseError::InsufficientData {
                needed: size_of::<IaOptionHeader>(),
                available: option_data.len(),
            })?;

        // Convert from network byte order and validate
        let option_code = u16::from_be(header.option_code);
        let option_length = u16::from_be(header.option_length) as usize;

        // Type-safe option code validation
        let option_type = match option_code {
            3 => IaOptionType::IaNa,
            4 => IaOptionType::IaTa,
            25 => IaOptionType::IaPd,
            _ => return Err(Dhcp6ParseError::InvalidOptionType(option_code)),
        };

        // Bounds verification - option_length includes only the payload, not the 4-byte option header
        if option_data.len() < 4 + option_length {
            return Err(Dhcp6ParseError::TruncatedOption {
                declared_length: option_length,
                available: option_data.len().saturating_sub(4),
            });
        }

        // Safe slice extraction for sub-options (starts after 16-byte total header)
        let sub_options_start = size_of::<IaOptionHeader>();
        let sub_options_end = 4 + option_length; // 4-byte option header + declared payload length
        let sub_options = &option_data[sub_options_start..sub_options_end];

        Ok(IaOption {
            header,
            sub_options,
            option_type,
        })
    }

    /// Safe accessor methods with automatic byte order conversion
    pub fn iaid(&self) -> u32 {
        u32::from_be(self.header.iaid)
    }

    pub fn t1(&self) -> u32 {
        u32::from_be(self.header.t1)
    }

    pub fn t2(&self) -> u32 {
        u32::from_be(self.header.t2)
    }

    pub fn option_type(&self) -> IaOptionType {
        self.option_type
    }

    /// Iterator over sub-options with guaranteed bounds safety
    pub fn sub_options(&self) -> IaSubOptionIterator<'a> {
        IaSubOptionIterator {
            data: self.sub_options,
            offset: 0,
        }
    }
}

impl<'a> Iterator for IaSubOptionIterator<'a> {
    type Item = Result<SubOption<'a>, Dhcp6ParseError>;

    fn next(&mut self) -> Option<Self::Item> {
        // Check if we have reached the end of data
        if self.offset >= self.data.len() {
            return None;
        }

        // Ensure we have enough bytes for sub-option header (4 bytes minimum)
        if self.offset + 4 > self.data.len() {
            return Some(Err(Dhcp6ParseError::TruncatedSubOption {
                offset: self.offset,
                remaining: self.data.len() - self.offset,
            }));
        }

        // Safe extraction of sub-option header
        let option_code = u16::from_be_bytes([
            self.data[self.offset],
            self.data[self.offset + 1],
        ]);
        let option_length = u16::from_be_bytes([
            self.data[self.offset + 2],
            self.data[self.offset + 3],
        ]) as usize;

        // Bounds check for sub-option data
        let data_start = self.offset + 4;
        let data_end = match data_start.checked_add(option_length) {
            Some(end) if end <= self.data.len() => end,
            _ => return Some(Err(Dhcp6ParseError::SubOptionTooLong {
                declared_length: option_length,
                available: self.data.len() - data_start,
            })),
        };

        // Safe slice extraction
        let option_data = &self.data[data_start..data_end];

        // Advance iterator position with overflow protection
        self.offset = data_end;

        Some(Ok(SubOption {
            code: option_code,
            data: option_data,
        }))
    }
}

/// Type-safe sub-option representation
#[derive(Debug)]
pub struct SubOption<'a> {
    pub code: u16,
    pub data: &'a [u8],
}

/// More specific error types to facilitate better error handling
#[derive(Debug, Clone, PartialEq, Eq)]
pub enum Dhcp6ParseError {
    InsufficientData { needed: usize, available: usize },
    InvalidOptionType(u16),
    TruncatedOption { declared_length: usize, available: usize },
    TruncatedSubOption { offset: usize, remaining: usize },
    SubOptionTooLong { declared_length: usize, available: usize },
}

// Usage example - out-of-bounds reads are prevented by design:
pub fn process_ia_option(packet_data: &[u8]) -> Result<(), Dhcp6ParseError> {
    let ia_option = IaOption::parse(packet_data)?;

    println!("IA ID: {}, T1: {}, T2: {}",
             ia_option.iaid(), ia_option.t1(), ia_option.t2());

    // Safe iteration over sub-options - bounds checking is automatic
    for sub_option_result in ia_option.sub_options() {
        let sub_option = sub_option_result?;
        println!("Sub-option code: {}, length: {}",
                 sub_option.code, sub_option.data.len());
    }

    Ok(())
}
}
How This Helps (Eliminates Out-of-Bounds Reads):
- Binary Layout Safety: The traits from the
zerocopycrate ensure binary layouts match the C structures - Compile-Time Layout Verification: The
FromBytestrait guarantees safe deserialization from byte arrays - Ownership-Based Bounds: The iterator owns its slice and cannot access memory beyond the slice bounds
- Checked Arithmetic: All size calculations use checked operations preventing integer overflow
- Type-Level Validation: Option types are validated at parse time, preventing developers from confusing types
- Explicit Error Handling: All parsing failures are captured as typed errors rather than memory corruption
Summary: The C vulnerability existed because it performed unchecked pointer arithmetic
(IaInnerOpt += 4 + InnerOptLen) and direct memory access without bounds verification. Rust eliminates this by
preventing unsafe operations. You cannot access invalid slice indices, arithmetic overflow is detected, and the type
system ensures only valid option types are processed.
CVE-2014-8271: Buffer Overflow in Variable Name Processing
- CVE Details: CVE-2014-8271
- CVSS Score: 6.8 (MEDIUM)
- Vulnerability Type: CWE-120: Buffer Copy without Checking Size of Input ('Classic Buffer Overflow')
- Fixed in: 6ebffb67c8
Issue Description: "Buffer overflow in the Reclaim function allows physically proximate attackers to gain privileges via a long variable name."
C Problem:
The primary issue was unbounded iteration through the variable store without proper bounds checking, which could lead to infinite loops, out-of-bounds memory access, and secondary buffer overflows.
// From MdeModulePkg/Universal/Variable/RuntimeDxe/Variable.c
EFI_STATUS
Reclaim (
  IN EFI_PHYSICAL_ADDRESS  VariableBase,
  OUT UINTN               *LastVariableOffset
  )
{
  VARIABLE_HEADER  *Variable;
  CHAR16           VariableName[256];  // Fixed-size buffer vulnerability exists
  UINTN            VariableNameSize;

  Variable = GetStartPointer(VariableBase);

  // Vulnerable: No bounds checking - loop can run forever or access invalid memory
  while (IsValidVariableHeader(Variable)) {
    // If Variable store is corrupted, this loop may:
    // 1. Never terminate (infinite loop)
    // 2. Access memory beyond the variable store (out-of-bounds read)
    // 3. Process corrupted variable names (buffer overflow in CopyMem)

    VariableNameSize = NameSizeOfVariable(Variable);
    CopyMem(VariableName, GetVariableNamePtr(Variable), VariableNameSize);

    Variable = GetNextVariablePtr(Variable);  // May point to invalid memory
  }

  return EFI_SUCCESS;
}
The C Fix Made:
BOOLEAN
IsValidVariableHeader (
  IN  VARIABLE_HEADER       *Variable,
  IN  VARIABLE_HEADER       *VariableStoreEnd  // NEW: End boundary
  )
{
  if ((Variable == NULL) || (Variable >= VariableStoreEnd) || (Variable->StartId != VARIABLE_DATA)) {
    // Variable is NULL or has reached the end of variable store, or the StartId is not correct.
    return FALSE;
  }
  // ... rest of validation
}

// And updated all the while loops:
while (IsValidVariableHeader(Variable, GetEndPointer(VariableStoreHeader))) {
  // Loop now terminates safely when reaching the end of the variable store
  Variable = GetNextVariablePtr(Variable);
}
How Rust Prevents This (Prevention by Design):
Rust eliminates this vulnerability through safe iteration patterns, dynamic memory management, and automatic bounds checking:
#![allow(unused)]
fn main() {
extern crate zerocopy;
extern crate zerocopy_derive;
use std::mem::size_of;
use zerocopy_derive::*;

/// Zero-copy compatible UEFI variable header that matches the C structure layout
#[derive(Debug, FromBytes, KnownLayout, Immutable)]
#[repr(C)]
pub struct VariableHeader {
    pub start_id: u16,           // Variable start marker (0x55AA)
    pub state: u8,               // Variable state flags
    pub reserved: u8,            // Reserved for alignment
    pub attributes: u32,         // Variable attributes bitfield
    pub name_size: u32,          // Size of variable name in bytes
    pub data_size: u32,          // Size of variable data in bytes
    pub vendor_guid: [u8; 16],   // Vendor GUID
    // Followed by: variable name (UTF-16), variable data
}

/// Type-safe variable name that dynamically grows as needed
#[derive(Debug, Clone)]
pub struct VariableName {
    name: String,
}

impl VariableName {
    pub fn from_utf16_bytes(bytes: &[u8]) -> Result<Self, VariableError> {
        // Safe UTF-16 validation and conversion
        let utf16_data: Vec<u16> = bytes
            .chunks_exact(2)
            .map(|chunk| u16::from_le_bytes([chunk[0], chunk[1]]))
            .collect();

        let name = String::from_utf16(&utf16_data)
            .map_err(|_| VariableError::InvalidNameEncoding)?;

        // Reasonable limits prevent DoS, but no arbitrary buffer size
        if name.len() > 1024 {
            return Err(VariableError::NameTooLong { len: name.len() });
        }

        Ok(Self { name })
    }

    pub fn as_str(&self) -> &str {
        &self.name
    }
}

/// Safe iterator with automatic bounds checking and termination
pub struct VariableStoreIterator<'a> {
    data: &'a [u8],
    offset: usize,
}

impl<'a> VariableStoreIterator<'a> {
    pub fn new(store_data: &'a [u8]) -> Self {
        Self { data: store_data, offset: 0 }
    }
}

impl<'a> Iterator for VariableStoreIterator<'a> {
    type Item = Result<VariableName, VariableError>;

    fn next(&mut self) -> Option<Self::Item> {
        // Automatic termination when reaching end of data
        if self.offset + size_of::<VariableHeader>() > self.data.len() {
            return None; // Safe termination - no infinite loop possible
        }

        // Safe zero-copy header parsing
        let header_bytes = &self.data[self.offset..self.offset + size_of::<VariableHeader>()];
        let header = match <VariableHeader as zerocopy::FromBytes>::ref_from_prefix(header_bytes) {
            Ok((h, _)) => h,
            Err(_) => return Some(Err(VariableError::CorruptedHeader)),
        };

        // Validate header before proceeding
        if header.start_id != 0x55AA {
            return Some(Err(VariableError::InvalidStartMarker));
        }

        let name_size = header.name_size as usize;
        let data_size = header.data_size as usize;

        // Checked arithmetic prevents integer overflow
        let total_size = match size_of::<VariableHeader>()
            .checked_add(name_size)
            .and_then(|s| s.checked_add(data_size))
        {
            Some(size) => size,
            None => return Some(Err(VariableError::SizeOverflow)),
        };

        // Bounds check prevents out-of-bounds access
        if self.offset + total_size > self.data.len() {
            return Some(Err(VariableError::TruncatedVariable));
        }

        // Safe slice extraction for variable name
        let name_start = self.offset + size_of::<VariableHeader>();
        let name_bytes = &self.data[name_start..name_start + name_size];
        let variable_name = match VariableName::from_utf16_bytes(name_bytes) {
            Ok(name) => name,
            Err(e) => return Some(Err(e)),
        };

        // Safe advancement to next variable
        self.offset += total_size;
        self.offset = (self.offset + 7) & !7; // 8-byte alignment

        Some(Ok(variable_name))
    }
}

#[derive(Debug, Clone)]
pub enum VariableError {
    CorruptedHeader,
    InvalidStartMarker,
    InvalidNameEncoding,
    NameTooLong { len: usize },
    SizeOverflow,
    TruncatedVariable,
}

// Usage - infinite loops and buffer overflows are prevented:
pub fn reclaim_variables(store_data: &[u8]) -> Result<Vec<VariableName>, VariableError> {
    let mut variables = Vec::new();

    // Iterator automatically terminates safely at end of data
    for variable_result in VariableStoreIterator::new(store_data) {
        let variable_name = variable_result?;
        variables.push(variable_name);
    }

    Ok(variables)
}
}
How This Helps (Eliminates Buffer Overflow):
- Safe Iteration: Iterator pattern with automatic termination prevents infinite loops
- Dynamic Memory Management:
StringandVec<u8>grow as needed, eliminating fixed-size buffers and complicated logic to grow them - Automatic Bounds Checking: All slice access is bounds-checked by the compiler
- Checked Arithmetic: Integer overflow is detected and handled as an error, not silent corruption
- Zero-Copy Parsing:
zerocopytraits ensure safe binary layout parsing without manual pointer arithmetic - Type-Safe Validation: Variable headers and names are validated before use, preventing corruption-based attacks
Summary: The C vulnerability existed because it used unbounded iteration through variable stores without
checking if the iteration had reached the end of valid memory. The primary attack vector was corrupted variable
headers that could cause infinite loops or out-of-bounds memory access during variable store traversal. Rust prevents
this class of vulnerability by preventing invalid accesses in safe code - you cannot access invalid slice
indices, and iterators automatically handle bounds checking. The zerocopy approach also ensures that binary layout
parsing matches C structures while providing memory safety.
CVE-2022-36765: Integer Overflow in CreateHob()
- CVE Details: CVE-2022-36765
- CVSS Score: 7.0 (HIGH)
- Vulnerability Type: CWE-680 (Integer Overflow to Buffer Overflow)
- Integer Overflow in CreateHob() could lead to HOB OOB R/W
The Vulnerability: "EDK2's CreateHob() function was susceptible to integer overflow when calculating HOB
alignment, allowing attackers to trigger buffer overflows."
Attack Scenario: An attacker provides HobLength = 0xFFFA:
HobLength + 0x7 = 0x10001(65537) - overflows UINT16 to0x0001(0x0001) & (~0x7) = 0x0000- aligned length becomes 0- Function allocates 0 bytes but caller expects 65530 bytes
- Subsequent HOB access overflows the HOB buffer
C Problem:
EFI_STATUS
PeiCreateHob (
  IN CONST EFI_PEI_SERVICES  **PeiServices,
  IN UINT16                  Type,
  IN UINT16                  Length,
  IN OUT VOID                **Hob
  )
{
  // Vulnerable: No overflow checking
  HobLength = (UINT16) ((Length + 0x7) & (~0x7));
  // ... buffer overflow when accessing memory beyond allocated size
}
How Rust Prevents This (Quick Defensive Translation):
If a similar function signature were retained in a relatively straightforward port of the C code, the code could be more defensively written as:
#![allow(unused)]
fn main() {
// Note: Begin mock types for compilation
struct HobHeader;
struct HobAllocator {
    free_memory_bottom: u64,
    free_memory_top: u64,
}
enum HobError {
    LengthOverflow,
    OutOfMemory,
}
// Note: End mock types for compilation

impl HobAllocator {
    pub fn create_hob(&mut self, hob_type: u16, length: u16) -> Result<*mut HobHeader, HobError> {
        // Checked arithmetic prevents overflow
        let aligned_length = length
            .checked_add(7)
            .ok_or(HobError::LengthOverflow)?
            & !7;

        // Bounds checking ensures allocation safety
        let total_size = self.free_memory_bottom
            .checked_add(aligned_length as u64)
            .ok_or(HobError::LengthOverflow)?;

        if total_size > self.free_memory_top {
            return Err(HobError::OutOfMemory);
        }

        // Safe allocation with verified bounds
        Ok(todo!())
    }
}
}
Idiomatic Rust Design (Prevention by Design):
However, the goal of writing firmware in Rust is to not write it like C code and litter the implementation with bounds checks and defensive programming bloat. The goal is to write code that is correct by construction (safe to use) and those checks are not needed. A more idiomatic Rust design eliminates the vulnerability entirely through type safety and ownership.
Some sample types in this example can help accomplish this:
HobLength: A type-safe wrapper that guarantees no overflow can occur when creating HOB lengthsHobBuilder<T>: A way to build HOBs that ensures only valid lengths can be usedHobRef<T>: A type-safe reference that owns its memory region, preventing use-after-free
#![allow(unused)]
fn main() {
use std::marker::PhantomData;
use std::ptr::NonNull;
use std::slice;

/// A type-safe HOB length that cannot overflow
#[derive(Debug, Clone, Copy)]
pub struct HobLength {
    // Note: The maximum size of HOB data is 64k
    value: u16,
    aligned: u16,
}

impl HobLength {
    /// Creates a HOB length with safety guaranteed at compile time
    pub const fn new(length: u16) -> Option<Self> {
        // Compile-time overflow detection
        match length.checked_add(7) {
            Some(sum) => Some(Self {
                value: length,
                aligned: sum & !7,
            }),
            None => None,
        }
    }

    pub const fn aligned_value(self) -> u16 {
        self.aligned
    }
}

/// Type-safe HOB builder that owns its memory
pub struct HobBuilder<T> {
    hob_type: u16,
    length: HobLength,
    _phantom: PhantomData<T>,
}

impl<T> HobBuilder<T> {
    /// Creates a HOB with guaranteed valid length
    pub fn new(hob_type: u16, length: HobLength) -> Self {
        Self {
            hob_type,
            length,
            _phantom: PhantomData,
        }
    }

    /// Allocates and initializes HOB with type safety
    pub fn build(self, allocator: &mut HobAllocator) -> Result<HobRef<T>, HobError> {
        // Length is guaranteed valid by type system
        let aligned_length = self.length.aligned_value();

        // Use safe allocation that returns owned memory
        let memory = allocator.allocate_aligned(aligned_length as usize)?;

        // Initialize the HOB header safely
    let hob_ref: HobRef<T> = HobRef::new(memory, self.hob_type)?;

    Ok(hob_ref)
    }
}

/// Type-safe HOB reference that owns its memory region
pub struct HobRef<T> {
    data: NonNull<u8>,
    size: usize,
    _phantom: PhantomData<T>,
}

impl<T> HobRef<T> {
    /// Safe HOB creation with automatic cleanup
    fn new(memory: AlignedMemory, hob_type: u16) -> Result<Self, HobError> {
        let size = memory.size();
        let data = memory.into_raw();

        // Limit unsafe code for initialization so others can create HOBs in safe code
        unsafe {
            let header = data.cast::<HobHeader>();
            header.as_ptr().write(HobHeader {
                hob_type,
                length: size as u16,
            });
        }

        Ok(Self {
            data,
            size,
            _phantom: PhantomData,
        })
    }

    /// Provides safe access to HOB data in a byte slice
    pub fn data(&self) -> &[u8] {
        unsafe {
            slice::from_raw_parts(self.data.as_ptr(), self.size)
        }
    }
}

// Note: Begin mock types for compilation
struct CustomHob;
const HOB_TYPE_CUSTOM: u16 = 0x8000;
#[derive(Debug)]
enum HobError {
    LengthTooLarge,
    OutOfMemory,
    LengthOverflow,
}
struct AlignedMemory {
    data: NonNull<u8>,
    size: usize,
}
impl AlignedMemory {
    fn size(&self) -> usize { self.size }
    fn into_raw(self) -> NonNull<u8> { self.data }
}
struct HobHeader {
    hob_type: u16,
    length: u16,
}
struct HobAllocator;
impl HobAllocator {
    fn allocate_aligned(&mut self, _size: usize) -> Result<AlignedMemory, HobError> {
        Err(HobError::OutOfMemory)
    }
}
// Note: End mock types for compilation

// Usage example - overflow is prevented by design:
fn usage_example() -> Result<(), HobError> {
    let mut allocator = HobAllocator;
    let length = HobLength::new(0xFFFA).ok_or(HobError::LengthTooLarge)?;
    let builder = HobBuilder::<CustomHob>::new(HOB_TYPE_CUSTOM, length);
    let hob: HobRef<CustomHob> = builder.build(&mut allocator)?;
    Ok(())
}
}
How This Helps:
- Compile-Time Overflow Prevention:
HobLength::new()useschecked_add(), preventing overflows - Type-Level Guarantees: The type system ensures only valid lengths can be used to create HOBs
- Ownership-Based Safety:
HobRef<T>owns its memory region, preventing use-after-free
What is PhantomData and Why is it Needed Here?
If you haven't worked in Rust, the use of PhantomData<T>
in the HobBuilder<T> and HobRef<T> structs may be confusing. It is explained within the context of this example in
a bit more detail here to give more insight into Rust type safety.
-
Type Association Without Storage: These structs don't actually store a
Tvalue - they store raw bytes. But we want the type system to track what type of HOB this represents (e.g.,HobRef<CustomHob>vsHobRef<MemoryHob>).Tis a generic type parameter representing the specific HOB type (likeCustomHoborMemoryHob). -
Generic Parameter Usage: Without
PhantomData<T>, the compiler would error because the generic typeTappears in the struct declaration but isn't actually used in any fields. Rust requires all generic parameters to be "used" somehow. -
Drop Check Safety:
PhantomData<T>tells the compiler that this struct "owns" data of typeTfor the purposes of drop checking, even though it's stored as raw bytes. This ensures proper cleanup order ifThas a customDroptrait implementation. -
Auto Trait Behavior: The presence of
PhantomData<T>makes the struct inherit auto traits (likeSend/Sync) based on whetherTimplements them. -
Variance:
PhantomData<T>is invariant overT, which prevents dangerous type coercions that could violate memory safety when dealing with raw pointers.
Example of the Type Safety This Provides:
// Note: Begin mock types for compilation
#[derive(Debug)]
struct HobError;
struct CustomHob;
struct MemoryHob;
struct HobRef<T: 'static>(&'static T);
static CUSTOM: CustomHob = CustomHob;
static MEMORY: MemoryHob = MemoryHob;
impl<T> HobRef<T> {
    fn as_typed(&self) -> Result<&T, HobError> {
        Ok(self.0)
    }
// Note: End mock types for compilation
}
fn create_custom_hob() -> Result<HobRef<CustomHob>, HobError> {
    Ok(HobRef(&CUSTOM))
}
fn create_memory_hob() -> Result<HobRef<MemoryHob>, HobError> {
    Ok(HobRef(&MEMORY))
}
fn main() -> Result<(), HobError> {
let custom_hob: HobRef<CustomHob> = create_custom_hob()?;
let memory_hob: HobRef<MemoryHob> = create_memory_hob()?;

// Compile error - cannot assign different HOB types:
// let bad: HobRef<CustomHob> = memory_hob;  // Type mismatch

// Safe typed access:
let custom_data: &CustomHob = custom_hob.as_typed()?;  // Type-safe
let _ = custom_data;
Ok(())
}
In summary, without PhantomData<T>, we'd lose impportant type safety and end up with untyped HobRef structs that
could be confused with each other, defeating the purpose of the safe abstraction.
Additional CVEs Preventable by Rust's Safety Guarantees
These are additional instances of classes of vulnerabilities that Rust's safety guarantees can help prevent:
CVE-2023-45233: Infinite Loop in IPv6 Parsing
- CVE Details: CVE-2023-45233
- CVSS Score: 7.5 (HIGH)
- Vulnerability Type: CWE-835 (Loop with Unreachable Exit Condition)
CVE-2021-38575: Remote Buffer Overflow in iSCSI
- CVE Details: CVE-2021-38575
- CVSS Score: 8.1 (HIGH)
- Vulnerability Type: CWE-119 (Improper Restriction of Operations within Memory Buffer Bounds)
CVE-2019-14563: Integer Truncation
- CVE Details: CVE-2019-14563
- CVSS Score: 7.8 (HIGH)
- Vulnerability Type: CWE-681 (Incorrect Conversion between Numeric Types)
CVE-2024-1298: Division by Zero from Integer Overflow
- CVE Details: CVE-2024-1298
- CVSS Score: 6.0 (MEDIUM)
- Vulnerability Type: CWE-369 (Divide By Zero)
CVE-2014-4859: Integer Overflow in Capsule Update
- CVE Details: CVE-2014-4859
- CVSS Score: Not specified
- Vulnerability Type: Integer Overflow in DXE Phase
Trait Abstractions
Due to the complex nature of modern system firmware, it is important to design components or libraries with the
necessary abstractions to allow platforms or IHVs the needed customization to account for silicon, hardware or even
just platform differences. In EDK II, LibraryClasses serve as the abstraction point, with the library's header file
as the defined interface. In Rust, Traits are the primary abstraction mechanism.
Depending on your use case, your library or component may re-use an existing, well-known trait, or define its own trait.
Unlike EDK II, we do not use traits for code reuse. Instead, use Rust crates as explained in the Code Reuse section.
Traits are well documented in the Rust ecosystem. Here are some useful links:
Examples
This example will show you how to define a trait, implement a trait, and also create a trait that takes a dependency on another trait being implemented for the same type.
#![allow(unused)]
fn main() {
    pub trait MyTraitInterface {
        fn my_function(&self) -> i32;
    }

    /// MyOtherTraitInterface requires MyTraitInterface to also be implemented
    pub trait MyOtherTraitInterface: MyTraitInterface {
        fn another_function(&self, value: i32) -> bool;
    }

    pub struct MyTraitImplementation(i32);
    impl MyTraitInterface for MyTraitImplementation {
        fn my_function(&self) -> i32 {
            self.0
        }
    }

    impl MyOtherTraitInterface for MyTraitImplementation
    {
        fn another_function(&self, value: i32) -> bool {
            self.my_function() == value
        }
    }
}
Logging Example
In this example, we start with the existing Log
abstraction that works with the log crate for, as you guessed, logging purposes. We create a
generic serial logger implementation that implements this trait, but creates an additional
abstraction point as to the underlying serial write. We use this abstraction point to create
multiple implementations that can perform a serial write, including a uart_16550, uart_pl011, and
a simple stdio writer.
extern crate log;
extern crate core;
extern crate uart_16550;
// The starting abstraction point, the `Log` trait
use log::Log;
use std::io::{Read, Write};

/// Our Abstraction point for implementing different ways to perform a serial write
pub trait SerialIO {
    fn init(&self);
    fn write(&self, buffer: &[u8]);
    fn read(&self) -> u8;
    fn try_read(&self) -> Option<u8>;
}

pub struct SerialLogger<S>
where
    S: SerialIO + Send + Sync,
{
    /// An implementation of the abstraction point
    serial: S,
    /// Will not log messages above this level
    max_level: log::LevelFilter,
}

impl<S> SerialLogger<S>
where
    S: SerialIO + Send + Sync,
{
    pub const fn new(
        serial: S,
        max_level: log::LevelFilter,
    ) -> Self {
        Self { serial, max_level }
    }
}

// Implement Log on our struct. All functions in this are functions that the log trait requires
// be implemented to complete the interface implementation
impl<S> Log for SerialLogger<S>
where
    S: SerialIO + Send + Sync,
{
    fn enabled(&self, metadata: &log::Metadata) -> bool {
        return metadata.level().to_level_filter() <= self.max_level
    }

    fn log(&self, record: &log::Record) {
        let formatted = format!("{} - {}\n", record.level(), record.args());
        // We know our "serial" object must have the "write" function, we just don't know the
        // implementation details, which is fine.
        self.serial.write(&formatted.into_bytes());
    }

    fn flush(&self) {}
}

// Create a few implementations of the SerialIO trait

// An implementation that just reads and writes from the standard input output
struct Terminal;
impl SerialIO for Terminal {
    fn init(&self) {}

    fn write(&self, buffer: &[u8]) {
        std::io::stdout().write_all(buffer).unwrap();
    }

    fn read(&self) -> u8 {
        let buffer = &mut [0u8; 1];
        std::io::stdin().read_exact(buffer).unwrap();
        buffer[0]
    }

    fn try_read(&self) -> Option<u8> {
        let buffer = &mut [0u8; 1];
        match std::io::stdin().read(buffer) {
            Ok(0) => None,
            Ok(_) => Some(buffer[0]),
            Err(_) => None,
        }
    }
}

use uart_16550::MmioSerialPort;
struct Uart16550(usize);

impl Uart16550 {
    fn new(addr: usize) -> Self {
        Self(addr)
    }
}

impl SerialIO for Uart16550 {
    fn init(&self) {
        unsafe { MmioSerialPort::new(self.0).init() };
    }

    fn write(&self, buffer: &[u8]) {
        let mut port = unsafe { MmioSerialPort::new(self.0) };

        for b in buffer {
            port.send(*b);
        }
    }

    fn read(&self) -> u8 {
        let mut port = unsafe { MmioSerialPort::new(self.0) };
        port.receive()
    }

    fn try_read(&self) -> Option<u8> {
        let mut port = unsafe { MmioSerialPort::new(self.0) };
        if let Ok(value) = port.try_receive() {
            Some(value)
        } else {
            None
        }
    }
}

// Now we can initialize them with our implementations
fn main() {
    let terminal_logger = SerialLogger::new(Terminal, log::LevelFilter::Trace);

    let uart16550_logger = SerialLogger::new(Uart16550::new(0x4000), log::LevelFilter::Trace);
}
Architecture Abstractions
Core modules in Patina often require divergent implementations for CPU architecture specific mechanisms. This may be because the implementation requires assembly which cannot be compiled against other architectures, the implementation is only applicable to a given architecture, or both. In these cases, developers are encouraged to ensure that as much common code exists as possible. At the point of architecture abstraction, trait abstraction principles should be used to define the common contract with the architecture specific logic. This same abstraction can then be used for testing of the common logic above/below the abstraction. While there is no one-size-fits-all structure to how this should be done, this page describes some simple and common models that should be applied to handling such abstractions.
Code Structure
Implementations should avoid inlining architecture specific code into common logic as this creates code that is difficult
to read, difficult to test, and is prone to inconsistent contracts between architectures. Architecture specific logic
should be contained to explicit modules, such as x64 or aarch64. The Patina crate provides macros that can be used
to add conditional compilation in a consistent way. If the logic is not compilable on other architectures, the module
should be conditionally compiled for that architecture.
#![allow(unused)]
fn main() {
#[cfg(target_arch = "x86_64")]
mod x64 {
    // A x64 specific module, intended only for platform builds.
}

#[cfg(target_arch = "aarch64")]
mod aarch64 {
    // A x64 specific module, intended only for platform builds.
}
}
It should be noted that using just the architecture does cause some inconsistencies around compilation. In particular this will allow test compilation, but these tests may not actually be compiled/run since this requires that the architecture matches the host system.
Testing & Documenting
In many cases, the code in the architecture abstractions doesn't contain meaningful logic and merely wraps assembly to invoke some CPU functionality not available through rust code. In these cases, there is little to no value in compiling for tests as the contained code cannot be tested in usermode or cross architecture or for documentation (as the abstraction trait should be documented if applicable).
However, when exposing more robust functional logic that is not entirely architecture abstraction it is
preferable that this logic be compiled under test and documentation. An example of this could be architecture
specific devices, which are only applicable to a given architecture but should be documented and has complex logic that
should be tested regardless of the architecture of the test compilation. The test and doc configuration can be
added alongside the target architecture. When using this style, it will be necessary for architecture logic to
be wrapped in test conditionals to avoid breaking host based tests.
#![allow(unused)]
fn main() {
#[cfg(any(target_arch = "aarch64", test, doc))]
pub mod aarch64_device {
    /// Robust public device structure for AArch64 devices with tests and documentation.
    pub struct Aarch64Device {
        base_address: usize,
    }

    impl Aarch64Device {
        fn set_registers() {
            #[cfg(all(not(test), not(doc)))]
            asm!("brk #0"); // Should only be compiled for platform builds
        }
    }
}
}
In rare cases where the code itself cannot be compiled for host targets, the check target_os = "uefi" can be used. This
should be avoided though as it prevents check, test, doc, or any other non-platform build compilation.
Architecture Containment & Rust Analyzer
Rust Analyzer will not always show the status of all architectures when containing code using target_arch = ".."
configurations. The active architecture can be controlled using the rust-analyzer.cargo.target setting in VS Code.
The below settings should be used in the user settings to see the various architectures. Note, only one may be active at
a time.
"rust-analyzer.cargo.target": "aarch64-unknown-uefi""rust-analyzer.cargo.target": "x86_64-unknown-uefi"
Trait Abstraction Example
A common case for architecture abstraction is an interface in which almost all of the code is architecture agnostic, but there exists some low-level architecture specific details.
---
config:
  layout: elk
  look: handDrawn
---
flowchart LR
    pub[Public Interface] --> com
    com[ Generic Logic] --> abs{Architecture Abstraction}
    abs -->|x64| x64
    abs -->|aarch64| aarch64
    abs -->|test| mock
Above the point of abstractions, generics can be used to allow for testing while maintaining a clean external interface. Below is a simplified example of such an abstraction for a interface to reboot the system.
#![allow(unused)]
fn main() {
/// Public interface that is architecture agnostic.
pub trait SystemReboot {
    fn reboot(&self);
}

/// Struct that handles architecture common code.
struct SystemRebootManager<T: SystemRebootArch> {
    arch: T,
}

/// Trait that defines the architecture abstraction.
trait SystemRebootArch {
    fn arch_reboot(&self);
}

impl<T: SystemRebootArch> SystemReboot for SystemRebootManager<T> {
    fn reboot(&self) {
        // Arch common logic. E.g.
        // - Notify callbacks of reboot
        // - Set reboot reason
        // - etc.

        self.arch.arch_reboot();
    }
}
}
The architectures should then be implemented in submodules specific to the architecture. These should normally be named x64, aarch64, etc. to ensure consistent structure. Normally these would be separate files, but are inlined for the sake of this example. The architectures may be wrapped in architecture checks. See the testing & documenting for more details on the specific checks to use.
#![allow(unused)]
fn main() {
mod common {
    trait SystemRebootArch {
        fn arch_reboot(&self);
    }

    #[cfg(target_arch = "x86_64")]
    mod x64 {
        struct SystemRebootX64;
        impl super::SystemRebootArch for SystemRebootX64 {
            fn arch_reboot(&self) {
                // x86_64 reset assembly.
            }
        }
    }

    #[cfg(target_arch = "aarch64")]
    mod aarch64 {
        struct SystemRebootAArch64;
        impl super::SystemRebootArch for SystemRebootAArch64 {
            fn arch_reboot(&self) {
                // aarch64 reset assembly.
            }
        }
    }
}
}
While it seems excessive for this simple scenario, this creates an abstraction that clearly defines architecture specifics, allows for unit and integration testing, and optimizes builds to only compile code relevant to the current architecture. An alternative to this may be to inline the architecture specifics into the common code, with cfg checks for architecture. However, this leads to code that will only increase in complexity with new architectures, potentially divergent expectations between blocks, and code that is difficult to test due to the inlined hardware logic.
How far up the implementation stack the generic goes before being abstracted away is up to the developer and depends on the complexity of the structures, desire for unit vs integration testing, and maintainability.
Using Default Generics
The above trait abstraction is powerful, though when integrating into a system, we do not want the callers to have to carry that generic all the way up the stack. The trait defaults can be very useful in allowing for generics for extensibility and testing, but hiding that from callers.
#![allow(unused)]
fn main() {
mod common {
    pub struct ArchNamer<T = CompiledArch> {
        arch: core::marker::PhantomData<T>,
    }

    impl<T: ArchName> ArchNamer<T> {
        pub fn get_name(&self) -> &'static str {
            T::name()
        }
    }
    pub trait ArchName {
        fn name() -> &'static str;
    }

    #[cfg(target_arch = "x86_64")]
    type CompiledArch = x64::ArchNameX64;
    #[cfg(target_arch = "aarch64")]
    type CompiledArch = aarch64::ArchNameAArch64;

    mod x64 {
        pub struct ArchNameX64;
        impl super::ArchName for ArchNameX64 {
            fn name() -> &'static str {
                "x86_64"
            }
        }
    }

    mod aarch64 {
        pub struct ArchNameAArch64;
        impl super::ArchName for ArchNameAArch64 {
            fn name() -> &'static str {
                "aarch64"
            }
        }
    }
}
}
This allows callers to simply use ArchNamer without having to specify the architecture, but allows for more robust
testing of interfaces that may leverage ArchNamer.
Extending This Model
This model of using trait abstraction for architectures can easily be extended to more complex scenarios. For example, it may be desirable to have a different exposed structure for each architecture but use common code internally. In such a model code reuse can be done through leveraging generics.
---
config:
  layout: elk
  look: handDrawn
---
flowchart LR
    StructX64 -->|StructCommon< x64 >| com
    StructAArch64 -->|StructCommon< aarch64 >| com
    com[ Generic Logic] --> abs{Abstraction}
    abs -->|x64| x64
    abs -->|aarch64| aarch64
Code Organization
Patina contains many constituent parts. This document describes the organization of the overall codebase, including the key dependencies that are shared between the Patina DXE Core and other components. The goal is to provide a high-level overview of these relationships.
---
title: High-Level Repo Layout
displayMode: compact
config:
  layout: elk
  look: handDrawn
gantt:
    useWidth: 400
    compact: true
---
graph TD
  A[Patina Repository] --> B[**core** - Core-specific functionality]
  A --> C[**sdk** - Software Development Kit]
  A --> D[**components** - Feature Components]
  A --> E[**patina_dxe_core** - DXE Core Library]

  B --> G[Debugger]
  B --> H[Section Extractor]
  B --> I[Stacktrace]

  C --> J[**patina** - SDK library]
  J --> K[Common Types and Definitions]
  J --> L[Boot Services]
  J --> M[Runtime Services]
  J --> N[Component Infrastructure]
  J --> O[Logging and Serial Support]

  D --> P[Advanced Logger]
  D --> Q[Management Mode Support]
  D --> R[Performance Measurement Support]
  D --> S[Component Samples]

  E --> T[Examples and Core Functionality]
This is meant to be a living document, and as the codebase evolves, this document should be updated to reflect the current state.
General Principles
As we build the elements necessary for a functional UEFI firmware, many supporting systems must necessarily be created along the way. In the end, a set of largely independent software entities are integrated to ultimately fulfill the dependencies necessary for functional firmware. The fact that code was conceived to support UEFI firmware does not always mean it is intrinsically coupled with UEFI firmware.
The principles described here are not meant to be more detailed or complex than necessary. Their goal is to support the organization of Rust code developed in this project in a consistent manner. It is not a goal to describe anything beyond what is necessary to organize the code per the guidelines given.
Code Cohesion and Coupling
Cohesion is a popular software concept described in many places including Wikipedia.
When speaking of cohesion generally, it is a degree to which the elements inside a software container belong together. In different languages and environments, what is a “container” might vary. But we know that containers with high cohesion are easier to understand, use, and maintain.
Coupling is another concept commonly covered including its own page on Wikipedia. This definition is taken directly from there:
"In software engineering, coupling is the degree of interdependence between software modules, a measure of how closely connected two routines or modules are, and the strength of the relationships between modules. Coupling is not binary but multi-dimensional."
Understanding coupling is easy. Minimizing coupling in practice is hard. Coupling is a key driver of technical debt in code. Having unrelated subsystems tightly coupled will only worsen over time. Developers will use the smallest amount of coupling as a precedent for further coupling, creating a self-perpetuating cycle. This is a major factor in poor software design over time. Tight coupling results in:
- Systems that are difficult to understand and maintain – If you want to understand how one thing works that is coupled, you must now understand how everything else coupled to it works. They are coupled into one system.
- Systems that are difficult to refactor – To refactor coupled systems, you must refactor all coupled systems.
- Systems that are difficult to version – If something is changed in a multi-coupled system, the whole system’s version is revised and published. That does not reflect the actual degree of change in the individual elements of the system.
- Systems that are more difficult to test – A coupled system requires testing layers, dependencies, and interfaces irrelevant the interface initially being tested.
This essentially forms "spaghetti code". Spaghetti code is relatively easy to identify in existing code. Spaghetti code often begins because of a slip in coupling in one part of the system that starts the cycle. In the end, no one is quite sure who is responsible for the spaghetti code and how it got that way, but it did. Now it's a huge mess to clean up and many parts of the system must be impacted to do so. Depending on the complexity of the system, now tests, documentation, repo organization, and public APIs all must change. This is the "ripple" effect coupling has where the ripple grows larger based on the degree of coupling and size of the system.
Code in the Patina DXE Core should strive to achieve high cohesion and low coupling in the various layers of "containers". This results in higher quality software.
SOLID
Certain SOLID principles apply more broadly outside of pure object-oriented design than others.
Single Responsibility Principle
The single responsibility principle applies in many situations. When designing a set of code, we should ask, “What is the responsibility of this code? Does it make sense that someone here for one responsibility cares about the other responsibilities?”
Given that we are thinking about responsibility more broadly than individual classes, we will take on multiple responsibilities at a certain level. For example, a trait might focus on a single responsibility for its interface but a module that contains that trait might not. It is not so important to literally apply a single responsibility to each layer of code when thinking about organization, but it is helpful to consider responsibilities and how they relate to the overall cohesion and coupling of what is being defined.
Interface Segregation
Another SOLID principle that has utility outside designing classes is the interface segregation principle, which states that “no code should be forced to depend on methods it does not use”. That exact definition applies more precisely to granular interfaces like traits, but the idea is useful to consider in the larger composition of software as well as it affects the cohesion and coupling of components. We should try to reduce the extraneous detail and functionality in code, when possible, to make the code more portable, testable, and maintainable.
Organizational Elements: Crates and Modules
A package is a bundle of one or more crates. A crate is the smallest amount of code the Rust compiler considers at a time. Code is organized in crates with modules. All of these serve a purpose and must be considered.
For example, modules allow similar code to be grouped, control the visibility of code, and the path of items in the module hierarchy. Crates support code reuse across projects – ours and others. Crates can be independently versioned. Crates are published as standalone entities to crates.io. Crates allow us to clearly see external dependencies for the code in the crate. Packages can be used to build multiple crates in a repo where that makes sense like a library crate that is available outside the project but also used to build a binary in the package.
When we think about code organization at a high-level, we generally think about crates because those are the units of reusability across projects. That’s the level where we can clearly see what functionality is being produced and consumed by a specific set of code. Modules can fall into place within crates as needed.
Therefore, it is recommended to think about organization at the crate level.
- What is the cohesion of the code within this reusable unit of software?
- If a project depends upon this crate for one interface it exposes, is it likely that project will need the other interfaces?
- Are the external dependencies (i.e. crate dependencies, feature dependencies) of this crate appropriate for its purpose?
- Is the crate easy to understand? Are the interfaces and their purpose well documented? If someone wants to understand the core purpose of this crate, is that easy? Is there unrelated content in the way?
Repo and Packages
All Patina code is placed into the patina repo unless it has been carefully designed to be independent of Patina and
serve a Rust audience beyond UEFI.
Code Organization Guidelines
These guidelines consider the placement and organization of code to support long-term maintenance and usability. In addition, the goal is to employ the software principles described in the previous section to publish crates to the wider community.
Note: These categories are an initial proposal based on code trends that have developed over time in our work and subject to change based on review.
- Core Specific Crate (
core)- Functionality exclusively used in core environment like DXE Core, MM Core, and PEI Core.
- Examples: DXE Core, Event infrastructure, GCD, memory allocator
- Components (
components)- Functionality for features provided using the Patina component model.
- Module Development (SDK) Crate (
sdk)- Functionality necessary to build UEFI modules.
- Can be used by core or individual driver components.
- Examples:
- Boot Services & Runtime Services
- Device Path services
- Logging related (for modules to write to logs; not the adv logger protocol producer code for example)
- GUID services
- Performance services
- TPL services
- Functionality necessary to build UEFI modules.
If a more generic location for crates is needed, a misc directory made be created in the patina workspace.
This document does not intend to define exact mappings of current code to crates, that is out of scope. Its goal is to define the guidelines for managing crates.
Crate Dependencies
The matrix below shows allowed dependencies for each class of crate defined in the previous section.
| Core | SDK | Components | Feature | Generic | |
|---|---|---|---|---|---|
| Core | x | Y | N | N | Y |
| SDK | N | x | N | N | Y |
| Components | N | Y | x | N | Y |
Key: Y = Allowed, N = Not Allowed, x = Self-dependencies within category
Separating out generic code is beneficial because it allows the code to be reused in the greatest number of places including outside the UEFI environment in host unit tests.
Code Reuse
In EDK II, code reuse was done using LibraryClasses. In Rust, we do not use Rust Traits for code-reuse.
Instead we use Rust crates. See some of the generic reading here:
When creating crates that are being published, you should do your best to make your crates dependency versions at least
specific as possible. What this means is that if possible, do not do crate_dependency == "1.42.8". Instead do
crate_dependency == "1.*" if any version between 1 and two is expected to work. crate_dependency == "1" is
equivalent if you do not want to use wildcards. See
Version Requirement Syntax
for specifics.
Cargo will do its best to resolve dependency requirements down to a single version of each crate. However, if it can't, it will simply download and compile multiple versions of the same crate. This has a couple of issues:
- It increases compile time
- It can bloat the size
- It can cause API expectations to break resulting in compilation failures
What (3) means is that TraitA in Crate1 version 1.0.0 will be treated as a completely different trait than
TraitA in Crate1 version 1.0.1. You'll end up seeing compilation errors such as the following, when it worked
previously.
^^^^^^^ the trait `XXXXX` is not implemented for `YYYYYYY`
Dependency Management
The Patina DXE Core is designed to be a monolithic binary, meaning that diverse sets of Rust functionality and the core are compiled together. This allows for more checks to be performed directly against the overall dependency graph that composes the Patina DXE Core but also leads to a relatively larger number of dependencies in that graph. This document describes some of the best practices in place for managing these dependencies.
Dependency Linting
cargo-deny (repo) is a
cargo plugin that lints the dependencies of a Rust project. It can be used to enforce policies on dependencies, such as
banning certain crates or versions, or ensuring that all dependencies are up-to-date. The Patina DXE Core uses
cargo-deny to enforce the following policies:
- Allowed Licenses: Only certain licenses are allowed to be used in the Patina DXE Core and its dependencies. This is done to ensure that the project remains free of dependencies that have been deemed unsuitable.
- Allowed Sources: Only crates from expected sources are allowed to be used in the Patina DXE Core.
- Banned crates: Certain crates are banned from being used in the Patina DXE Core. This is done to ensure that the project remains free of dependencies that have been deemed unsuitable. Crates may be banned only for certain versions or for all versions.
- Security Advisories: All crates and their respective versions must not have any security advisories. This is currently checked against the RustSec advisory database.
cargo-deny is run in CI and can also be run locally with the cargo make deny command. This command will encapsulate
any flags that are required to run cargo-deny with the correct configuration for the Patina DXE Core.
The configuration for cargo-deny is stored in the deny.toml file in the root of the repository.
Managing Dependencies in Practice
Choosing Dependencies
When selecting dependencies for Patina components:
---
config:
  layout: elk
  look: handDrawn
---
graph TD
    A[Evaluating New Dependency] --> B{License Compatible?}
    B -->|No| C[Find Alternative]
    B -->|Yes| D{Security Advisory Free?}
    D -->|No| E[Check if Fixed Version Available]
    D -->|Yes| F{Actively Maintained?}
    F -->|No| G[Consider Maintenance Burden]
    F -->|Yes| H{Minimal Dependencies?}
    H -->|No| I[Evaluate Transitive Dependencies]
    H -->|Yes| J[Approved for Use]
    E --> K{Update Available?}
    K -->|Yes| J
    K -->|No| C
    G --> L{Critical for Functionality?}
    L -->|Yes| M[Document Risk & Monitor]
    L -->|No| C
    I --> N{Dependencies Acceptable?}
    N -->|Yes| J
    N -->|No| C
- License compatibility: Ensure the license is compatible with Patina's licensing requirements
- Security posture: Check for known vulnerabilities and active maintenance
- Dependency footprint: Prefer crates with minimal transitive dependencies
- Maintenance status: Favor actively maintained crates with recent updates
- Community trust: Consider the reputation and reliability of the crate maintainers
Version Management
Patina uses workspace-level dependency management to:
- Ensure consistent versions across all components
- Reduce duplicate dependencies in the final binary
- Simplify dependency updates across the entire project
- Facilitate security patch deployment
References
deny.toml- Patina's cargo-deny configuration- cargo-deny documentation
- RustSec Advisory Database
- Cargo Workspace Documentation
Error Handling
---
config:
  layout: elk
  look: handDrawn
---
graph TD
    A[Error Occurs] --> B{Can be handled locally?}
    B -->|Yes| C[Handle and Continue]
    B -->|No| D{Use Result/Option?}
    D -->|Yes| E[Propagate Error Up Stack]
    D -->|No| F{Panic Necessary?}
    F -->|No| G[Find Alternative Approach]
    F -->|Yes| H[Use expect with detailed message]
    E --> I[Caller Handles Error]
    C --> J[Execution Continues]
    H --> K[Application Terminates]
    G --> L[Return to safer approach]
Avoiding Panics
Due to the difficulty of recovering from panics in firmware, it is almost always preferable to return and propagate an error up the call stack rather than panic.
In order of most to least safe, code should:
- Propagate errors using
ResultorOptionwhenever possible. - For panics guarded by existing code (for example, an
is_nullcheck before a.as_ref()call), provide a detailed message on how the existing code should prevent panics. Useexpect,log, ordebug_assertfor such cases. - For genuinely unrecoverable errors, ensure a detailed error message is provided, usually through
expect. Code should avoidunwrapexcept in test scenarios.
Example
Consider the following example involving the adv_logger. Since the logger is not necessarily required to boot drivers
or continue normal execution, we can attempt to continue even if it is not properly initialized.
This code which unwraps on logger initialization panics unnecessarily:
#![allow(unused)]
fn main() {
extern crate patina_adv_logger;
extern crate log;
extern crate patina;
let hob_list = std::ptr::null();
use patina_adv_logger::{component::AdvancedLoggerComponent, logger::AdvancedLogger};
use log::LevelFilter;
use patina::{
    log::Format,
    serial::uart::UartNull,
};

static LOGGER: AdvancedLogger<UartNull> = AdvancedLogger::new(
    Format::Standard,
    &[],
    LevelFilter::Debug,
    UartNull {}
);

unsafe { LOGGER.init(hob_list).unwrap() };
let mut component = AdvancedLoggerComponent::new(&LOGGER);
}
Consider replacing it with match and returning a Result:
#![allow(unused)]
fn main() {
extern crate patina_adv_logger;
extern crate log;
extern crate patina;
let hob_list = std::ptr::null();
use patina_adv_logger::{component::AdvancedLoggerComponent, logger::AdvancedLogger};
use log::LevelFilter;
use patina::{
    log::Format,
    serial::uart::UartNull,
};
static LOGGER: AdvancedLogger<UartNull> = AdvancedLogger::new(
    Format::Standard,
    &[],
    LevelFilter::Debug,
    UartNull {}
);
match unsafe { LOGGER.init(hob_list) } {
    Ok(()) => {},
    Err(e) => log::error!("Failed to init advanced logger: {e:?}"),
}
let mut component = AdvancedLoggerComponent::new(&LOGGER);
}
efi::Status vs. Rust Errors
---
config:
  layout: elk
  look: handDrawn
---
graph LR
    A[Error Type Decision] --> B{UEFI Interface?}
    B -->|Yes| C[Use efi::Status]
    B -->|No| D[Use Custom Rust Error]
    C --> E[Called by UEFI code]
    C --> F[Propagates UEFI errors]
    D --> G[UEFI-agnostic code]
    D --> H[Domain-specific errors]
We mostly use two kinds of errors in Results: efi::Status and Rust custom errors. Use efi::Status when errors
occur in UEFI interfaces (anything that's expected to be called by code across the UEFI spec defined ABI) to propagate
any errors occurring in UEFI internal code. Otherwise, use custom Rust errors in all UEFI-agnostic code. These can be
handled in UEFI interfaces, but should return errors specific to their functionality rather than a general status code.
Examples
For example, the following excerpt is part of an extern "efiapi" function that is called by UEFI code. As such, it
returns an EFI status code, where the status is specific to the error state encountered.
#![allow(unused)]
fn main() {
extern crate r_efi;
use r_efi::efi;

extern "efiapi" fn get_memory_map(
    memory_map_size: *mut usize,
    memory_map: *mut efi::MemoryDescriptor,
    map_key: *mut usize,
    descriptor_size: *mut usize,
    descriptor_version: *mut u32,
) -> efi::Status {
    if memory_map_size.is_null() {
        return efi::Status::INVALID_PARAMETER;
    }

    let map_size = unsafe { memory_map_size.read_unaligned() };

    // ...

    let required_map_size = 50usize;
    if map_size < required_map_size {
        return efi::Status::BUFFER_TOO_SMALL;
    }

    // ...

    return efi::Status::SUCCESS;
}
}
In contrast, lets take a look at the patina_internal_core::collections module. This module provides red-black tree and
binary search tree implementations. These implementations have no concept of any other code, so a custom error
type was created to clearly describe errors that occur if mis-using the module.
Due to having a custom error type, consumers of patina_internal_core::collections (such as the GCD) can handle the granular
errors how it needs, while converting other errors to a higher level error type to be handled by the callers of the
GCD. This approach allows for detailed logging of issues and handling of more specific errors while also bubbling up
more generic errors up the chain.
In the example below, we see the chain of errors from a patina_internal_core::collections::Error -> Gcd::Error ->
EfiError. At each level, the caller can either handle the specific error, or convert it and pass it up to the
caller.
#![allow(unused)]
fn main() {
extern crate patina_internal_core;
extern crate patina;
use patina_internal_core::collections::Error as PicError;
use patina::error::EfiError;

// An error type for working with the GCD
pub enum Error {
    NotInitialized,
    InvalidParameter,
    OutOfResources,
    Unsupported,
    AccessDenied,
    NotFound,
}

// The GCD relies on `patina_internal_core::collections` for allocations, so lets make it easy to convert
// `patina_internal_core::collections` errors to our GCD error type.
impl From<PicError> for Error {
    fn from(value: PicError) -> Self {
        match value {
            PicError::OutOfSpace => Error::OutOfResources,
            PicError::NotFound => Error::NotFound,
            PicError::AlreadyExists => Error::Unsupported,
            PicError::NotSorted => Error::InvalidParameter,
        }
    }
}

// The GCD eventually bubbles up to external EFIAPI functions, so lets also make it easy to convert the `Error` type
// to `patina::error::EfiError`
impl From<Error> for EfiError {
    fn from(value: Error) -> EfiError {
        match value {
            Error::NotInitialized => EfiError::NotReady,
            Error::InvalidParameter => EfiError::InvalidParameter,
            Error::OutOfResources => EfiError::OutOfResources,
            Error::Unsupported => EfiError::Unsupported,
            Error::AccessDenied => EfiError::AccessDenied,
            Error::NotFound => EfiError::NotFound
        }
    }
}

// We can handle certain error types ourselves and coonvert / bubble any others up
fn handle_result_example(result: Result<(), PicError>) -> Result<(), Error> {
    match result {
        Ok(()) => Ok(()),
        Err(PicError::OutOfSpace) => /* Custom handle */ Ok(()),
        Err(err) => Err(err.into())
    }
}

// We can convert and bubble up all errors
fn handle_result_example2(result: Result<u32, PicError>) -> Result<u32, Error> {
    let inner = result.map_err(|err| Into::<Error>::into(err))?;
    Ok(inner * 2)
}
}
Error Handling Best Practices in Patina
Custom Error Types
For Patina components, define domain-specific error enums:
#![allow(unused)]
fn main() {
extern crate core;
#[derive(Debug, Clone)]
pub enum ComponentError {
    NotInitialized,
    InvalidConfiguration(String),
    ServiceUnavailable,
    HardwareFault { device_id: u32, code: u16 },
    MemoryAllocation,
}

impl core::fmt::Display for ComponentError {
    fn fmt(&self, f: &mut core::fmt::Formatter<'_>) -> core::fmt::Result {
        match self {
            ComponentError::NotInitialized => write!(f, "Component not initialized"),
            ComponentError::InvalidConfiguration(msg) => write!(f, "Invalid configuration: {}", msg),
            ComponentError::ServiceUnavailable => write!(f, "Required service is unavailable"),
            ComponentError::HardwareFault { device_id, code } => {
                write!(f, "Hardware fault on device {}: error code {}", device_id, code)
            }
            ComponentError::MemoryAllocation => write!(f, "Memory allocation failed"),
        }
    }
}

impl core::error::Error for ComponentError {}
}
Error Conversion Between Layers
When errors cross architectural boundaries in Patina:
- Component → UEFI ABI: Convert custom errors to
efi::Status - UEFI ABI → Component: Wrap
efi::Statusin domain-specific errors - Service → Component: Use specific error types, not generic ones
References
FFI Authoring
Patina exposes C FFIs for interoperability with C based drivers. This documentation gives guidance on how to write these FFIs with patina specific guidance. For general guidance, view the Rust FFI docs.
Patina Specific Considerations
EFIAPI
All FFI functions must be marked with extern "efiapi" in order to use the EFIAPI ABI. Failure to include this
will cause undefined behavior.
Note:: The one exception to this, temporarily, is for variadic functions. Rust only contains support for these through the unstable c_variadics feature. This feature only supports variadics for
extern "C". The UEFI spec has some variadic functions that are required. As such, these functions useextern "C"for now. This issue tracks adding support forextern "efiapi".
va_list
AARCH64 defines the AAPCS64 ABI as the single ABI for AARCH64. However, MSVC (and clang's aarch64-unknown-windows-msvc target to align to it) has broken this ABI in some places, resulting in an MS ABI for AARCH64 as well.
The aarch64-unknown-uefi target used by Patina uses the MS ABI because that is what LLVM supports for building PE/COFF images, which are required for UEFI. Within Patina and Rust build code, this is immaterial, as long as the target is the same. However, it affects interoperability with C based code built by gcc and clang's aarch64-linux-gnu target.
In most cases, the MS ABI aligns with the AAPCS64 ABI. However, an exception is the va_list type. In order to keep using the aarch64-unknown-uefi target and maintain compatibility with C based code, Patina does not allow using the va_list type in FFIs. In practice, this has been seen very little.
Note: This does not affect using variadic functions that take
...as a parameter. Those are supported across C FFIs. It is only the va_list type itself that cannot be passed by value or by reference.
Pointer Alignment
Raw pointers received across an extern "efiapi" (or extern "C") boundary must be treated as potentially
unaligned. C callers are not required to honor Rust's alignment invariants for *mut T / *const T, and the UEFI
specification often passes out-pointers whose alignment cannot be statically guaranteed (e.g. fields embedded in packed
C structures and addresses computed from byte offsets).
A misaligned read or write through a normal Rust dereference is undefined behavior even on architectures that
tolerate it in hardware. The compiler is also free to assume the pointer is aligned and reorder or coalesce accesses
based on that assumption. So, when working with caller-supplied pointers across an FFI boundary, you must use the
unaligned access intrinsics read_unaligned() and write_unaligned() or a safe abstraction like zerocopy.
Rules
- Prefer
zerocopyfor structured reads. When pulling a typed value out of a caller-supplied byte buffer,zerocopy::FromBytesprovides a safe, alignment-agnostic alternative to manualread_unaligned()of a casted pointer. - Read FFI pointers with
read_unaligned(). Do not use methods that assume alignment, such as*ptr,ptr::read,&*ptr,(*ptr).field, or(*(ptr as *const T)).clone()on a caller-supplied pointer. - Write FFI pointers with
write_unaligned(). Do not use*ptr = valueorptr::write. - Be consistent within a function. Mixing aligned and unaligned access on the same pointer is a code smell and risks UB if the pointer is in fact misaligned.
- Null-check before every unaligned access.
read_unaligned()andwrite_unaligned()only relax the alignment requirement. The pointer must still be non-null and valid for the access. A null check should be the first operation performed on an untrusted caller-supplied pointer before any other dereference or access, including unaligned ones.
Zerocopy example
The following example shows an extern "efiapi" function that receives an untrusted, potentially unaligned byte
buffer from a C caller and parses a fixed-layout header out of it using zerocopy.
Note that there are no raw-pointer casts, no read_unaligned() calls, and no unsafe blocks needed for the parse
itself: FromBytes::ref_from_prefix validates the length and returns a &PacketHeader borrowed directly from the
caller's buffer, regardless of its alignment.
extern crate zerocopy;
extern crate zerocopy_derive;
use std::slice;
use zerocopy_derive::{FromBytes, Immutable, KnownLayout, Unaligned};

// This is a stand-in for `r_efi::efi::Status` so the example is self-contained
// and runnable on the Rust Playground (which does not have `r_efi`).
#[repr(transparent)]
#[derive(Copy, Clone, PartialEq, Eq, Debug)]
struct Status(usize);

impl Status {
    const SUCCESS: Self = Self(0);
    const INVALID_PARAMETER: Self = Self(0x8000_0000_0000_0002);
}

// `#[repr(C, packed)]` plus `Unaligned` means this type has no alignment requirement,
// so `zerocopy` will reinterpret an arbitrary byte slice as `&PacketHeader`.
#[repr(C, packed)]
#[derive(Copy, Clone, Debug, FromBytes, Immutable, KnownLayout, Unaligned)]
struct PacketHeader {
    version: u16,
    flags: u16,
    payload_len: u32,
}

/// Parses the header of a caller-supplied buffer and writes the payload length back through
/// `out_payload_len`. Returns `INVALID_PARAMETER` if any pointer is null or the buffer is
/// too small to contain a `PacketHeader`.
///
/// # Safety
///
/// Although this function is not marked `unsafe` (it is invoked across the EFIAPI C boundary
/// with the UEFI ABI), the caller must still uphold the following invariants:
///
/// - If `buffer` is non-null, it points to at least `buffer_len` consecutive, initialized,
///   readable bytes.
/// - If `out_payload_len` is non-null, it points to a writable `u32`.
/// - Both regions remain valid and are not mutated by another thread for the duration of
///   the call.
///
/// Violating any of these is undefined behavior. Null pointers and a `buffer_len` smaller
/// than `size_of::<PacketHeader>()` are handled safely and return `INVALID_PARAMETER`.
pub extern "efiapi" fn parse_packet_header(
    buffer: *const u8,
    buffer_len: usize,
    out_payload_len: *mut u32,
) -> Status {
    if buffer.is_null() || out_payload_len.is_null() {
        return Status::INVALID_PARAMETER;
    }

    // SAFETY: Per the function's safety contract, when `buffer` is non-null it points to
    // `buffer_len` readable, initialized bytes in a single allocation. `from_raw_parts::<u8>()`
    // only requires `align_of::<u8>() == 1`, so any non-null `buffer` is sufficiently aligned.
    // The resulting `[u8]` is only handed to `zerocopy::FromBytes::ref_from_prefix()`, which
    // (thanks to `PacketHeader: Unaligned`) imposes no further alignment requirement.
    let bytes = unsafe { slice::from_raw_parts(buffer, buffer_len) };

    let Ok((header, _rest)) = <PacketHeader as zerocopy::FromBytes>::ref_from_prefix(bytes) else {
        return Status::INVALID_PARAMETER;
    };

    // Copy the packed field into a local to avoid taking a reference to an unaligned field.
    let payload_len = header.payload_len;

    // SAFETY: Per the function's safety contract, when `out_payload_len` is non-null it
    // points to a writable `u32`. `write_unaligned` removes the alignment requirement, so
    // any alignment the caller supplied is sound.
    unsafe { out_payload_len.write_unaligned(payload_len) };
    Status::SUCCESS
}

// You would not normally include a `main()` function in an FFI module, this is just done
// for demonstration purposes so the code can run on the Rust Playground.
fn main() {
    // Simulate a buffer handed to us by a C caller: a `PacketHeader` followed by
    // four extra trailing bytes. The buffer is intentionally larger than the header
    // to show that `ref_from_prefix` only consumes what it needs.
    let buffer: [u8; 12] = [
        0x01, 0x00,             // version       = 1
        0x02, 0x00,             // flags         = 2
        0x34, 0x12, 0x00, 0x00, // payload_len   = 0x1234
        0xAA, 0xBB, 0xCC, 0xDD, // trailing data (ignored by the header parse)
    ];

    let mut payload_len: u32 = 0;
    let status = parse_packet_header(buffer.as_ptr(), buffer.len(), &mut payload_len);

    assert_eq!(status, Status::SUCCESS);
    println!("payload_len = 0x{:x}", payload_len);
}
Running the example will print:
payload_len = 0x1234
Key points:
- Null checks come first, before any dereference or slice construction.
- The parse itself is safe Rust. The only
unsafeblocks are the unavoidable FFI primitives:- Constructing the slice from the caller's
(ptr, len)pair - Writing through the out-pointer.
- Constructing the slice from the caller's
UnalignedonPacketHeaderletszerocopyborrow directly from any byte alignment. Without it,ref_from_prefix()would only succeed on a properly aligned buffer.ref_from_prefix()performs the length check, so a manualbuffer_len >= size_of::<PacketHeader>()comparison is not required.
When direct dereference is acceptable
Direct dereference (*ptr, &*ptr, &mut *ptr) is sound when the pointer's provenance guarantees alignment. In
Patina, this is typically the case for:
- Pointers obtained from
Box::leak,Vec, or other Rust allocators (where alignment is guaranteed by construction). - The
thispointer of an internally-produced protocol struct that Patina itself installed viaBox::leak. The layout of#[repr(C)]protocol structs is well-defined and Patina-allocated instances are aligned. - Pointers derived from
&T/&mut Treferences obtained earlier in the same function.
When in doubt, prefer the unaligned variants as they have very little to no measurable cost on properly aligned pointers on the targets Patina supports.
Anti-pattern examples
// WRONG: direct write through a caller-supplied out-pointer.
unsafe { *handle = installed_handle };

// WRONG: aligned read of a caller-supplied integer.
let n = unsafe { *num_bytes };

// WRONG: aligned struct read out of an arbitrary byte buffer.
let header = unsafe { (*(buffer as *const Header)).clone() };

// WRONG: inconsistent as the same pointer is read aligned and is written unaligned.
let n = unsafe { *num_bytes };
// ...
unsafe { num_bytes.write_unaligned(actual) };
Replace each with the corresponding read_unaligned() / write_unaligned() form (and, for the struct case, a
core::ptr::read_unaligned()::<Header>(buffer.cast()) or a zerocopy::FromBytes parse).
Unsafe Guidance
Unsafe code in Rust is a necessity for systems programming environments such as Patina. This document details guidance in how and when to write unsafe code in Patina.
This document is intended to build upon the official Rust guidance on unsafe and detailed rust-lang discussion with Patina specific principles and applications.
This document expects the reader has a general understanding of the unsafe keyword in Rust and how the compiler
enforces it. The above documentation and the
UEFI Memory Safety Case Studies provide good starting points.
Unsafe Philosophy
As a general principle, Patina splits the idea of safety into two categories: software safety and hardware safety.
| Software Safety | Hardware Safety | |
|---|---|---|
| Compiler Enforced | ✅ | ❌ |
| Preconditions | ✅ | ✅ |
| Postconditions | ✅ | ✅ |
| Invariants | ✅ | ❌ |
Software safety is the set of things the compiler can verify and/or the programmer can verify in a pure software environment. Hardware safety is the set of things that the compiler cannot verify, the programmer may be able to verify, and that interacts with hardware in a direct way.
Patina splits the idea of safety into these two categories to delineate usage of the unsafe keyword: the general Rust guidance can be applied for software safety, but hardware safety expands beyond the bounds of what software can enforce.
Below are the breakdowns of the different unsafe usages and how we view software vs hardware safety here.
Unsafe Code Blocks
Unsafe code blocks are not given much discussion here because the compiler will enforce what operations require the unsafe block and cargo-clippy will enforce that unsafe code blocks are only used in cases where the compiler enforces it. As general guidance: write as few unsafe operations as possible, constrain them underneath safe abstractions, and document the preconditions, postconditions, and invariants, as applicable.
There is no distinction between hardware and software safety here.
Unsafe Functions
Unsafe functions are the programmer's choice on whether to declare a given function as unsafe. An unsafe function has a set of preconditions, postconditions, and/or invariants that must be met in order to use the function safely. The presence of unsafe code blocks inside a function does not mean that the function must be declared unsafe; only if the function cannot guarantee the safety of the unsafe code blocks within it without a contract with the caller should a function be marked as unsafe.
For software safety, all of the above holds true. If software must guarantee a pre/postcondition or an invariant in order to safely use a function, e.g.
#![allow(unused)]
fn main() {
/// Returns a reference to the element at the specified index without performing bounds checking.
///
/// # Parameters
/// - `index`: The position of the element to retrieve.
///
/// # Returns
/// A reference to the element at the given index.
///
/// # Safety
/// Calling this function with an out-of-bounds index is undefined behavior.
/// The caller must ensure that `index` is within the bounds of the collection.
unsafe fn get_element_unchecked<T>(slice: &[T], index: usize) -> &T {
  // SAFETY: Caller must ensure that index < slice.len()
  unsafe { slice.get_unchecked(index) }
}
}
In this case, the invariant is that index is within the bounds of slice. It is up to the programmer to decide how
this interface should be defined and whether the function is unsafe. For example, the function could have been written
as:
#![allow(unused)]
fn main() {
/// Returns an Option containing a reference to the element at the specified index without performing bounds checking.
///
/// # Parameters
/// - `index`: The position of the element to retrieve.
///
/// # Returns
/// An Option containing a reference to the element at the given index.
///
/// # Safety
/// Calling this function with an out-of-bounds index is undefined behavior.
/// The caller must ensure that `index` is within the bounds of the collection.
fn get_element_unchecked<T>(slice: &[T], index: usize) -> Option<&T> {
  if index >= slice.len() {
    return None;
  }
  // SAFETY: Caller must ensure that index < slice.len()
  unsafe { Some(slice.get_unchecked(index)) }
}
}
In this version, the function is no longer unsafe, despite containing an unsafe code block within it, because it no longer has an invariant; the function itself is able to manage whether its inputs are valid.
Whenever possible, programmers should write safe functions that validate all preconditions, postconditions, and invariants. Of course, this is not always possible, in which case unsafe functions are called for.
For hardware safety, we don't have invariants, necessarily. For example, in writing a system register, there is no invariant that must hold true for that operation. There may be preconditions or postconditions, but not an invariant.
One simple example of hardware safety is the invalidate cache instruction on x86_64 that invalidates caches without writing them back. This operation can be very dangerous if not called at a proper time, but nothing about the software can change that. In Patina, this is hardware safety and does not warrant an unsafe function.
We may define a wrapper function for it as:
#![allow(unused)]
fn main() {
use std::arch::asm;
fn invalidate_caches() {
  // SAFETY: This is an architecturally defined way to invalidate caches
  unsafe { asm!("invld") }
}
}
The concept of software safety could come into play, say in the below unsafe example:
#![allow(unused)]
fn main() {
use std::arch::asm;
/// Invalidates the cache without writing them back. Also set a memory region to 4.
///
/// # Parameters
/// - `ptr`: The pointer to the memory region to set to 4.
///
/// # Safety
/// The caller must ensure `ptr` points to a valid memory region
unsafe fn invalidate_caches_and_set_ptr_to_4(ptr: *mut u8) {
  // SAFETY: This is an architecturally defined way to invalidate caches
  unsafe { asm!("invld"); }

  // Better set this ptr to 4!
  // SAFETY: See function comment, caller assumes responsibility
  unsafe { ptr.write(4); }
}
}
However, the function could be made safe again by using the standard library to validate assumptions (or validating the assumptions ourselves):
#![allow(unused)]
fn main() {
use std::arch::asm;
fn invalidate_caches_and_set_ptr_to_4(mut ptr: Box<u8>) {
  // SAFETY: This is an architecturally defined way to invalidate caches
  unsafe { asm!("invld"); }

  // Better set this ptr to 4!
  *ptr = 4;
}
}
A more complex example, is writing the CR3 register on x64 systems.
#![allow(unused)]
fn main() {
use std::arch::asm;
/// Installs a page table.
///
/// # Parameters
/// - `cr3`: The address of the page table root to install.
///
/// # Safety
/// The caller must ensure `cr3` is the address of a valid page table
unsafe fn install_page_table(cr3: u64) {
  // SAFETY: This is an architecturally defined operation to write the page table root.
  unsafe {
      asm!("mov cr3, {0}", in(reg) cr3)
  }
}
}
There is a precondition here that cr3 must be a u64 that is the address of a valid page table. This operation is
unsafe because all assembly is unsafe in Rust. This is more complicated than the previous example because we are taking
a u64 that the hardware will treat as a pointer. However, software never dereferences this. So it falls into the
category of hardware safety. The software cannot validate that the hardware will accept this as a valid page table, no
matter what the software has done to validate it on its end. The software also does not dereference this u64 as a
pointer, the hardware does. The u64 does not have to be mapped (as it is the address providing the mappings to the
hardware). So Rust's memory safety cannot be violated by this operation. Certainly the system can become unusable,
if this did not point to a page table the hardware understands or if the mappings are incorrect. But that is the
hardware safety aspect. When viewed through this lens, the function can be a safe function, because all a caller could
do is provide the following safety comment:
// SAFETY: Hopefully this works!
unsafe { install_page_table(cr3);}
However, when viewed from the lifetime lens, this does become a software safety issue. The caller must guarantee that this u64 provided, when treated as a pointer, will live for the lifetime of the time it is written to CR3. If this gets reallocated, we have just violated both software and hardware safety. As such, the function is marked unsafe and should be given the appropriate function comment describing the caller expectations.
There are other assumptions the software can validate to make this more likely to succeed, even if it cannot predict exactly how the hardware will process this write.
This function could also be written to have a safe abstraction over it, e.g.:
#![allow(unused)]
fn main() {
use std::arch::asm;
type PageTableRoot = u64;

enum PageTableInstallError {
  /// The CR3 address is not 4KB-aligned
  NotAligned,
  /// The CR3 address exceeds the maximum physical address width
  ExceedsMaxPhysAddr,
  /// Reserved bits are set in CR3
  ReservedBitsSet,
  /// PCIDE bit set but CR4.PCIDE is not enabled
  PcidWithoutCr4Support,
}

struct PageTableOptions {
  /// Page-level cache disable (CR3 bit 4)
  pub cache_disable: bool,
  /// Page-level write-through (CR3 bit 3)
  pub write_through: bool,
  /// Preserve PCID TLB entries (CR3 bit 63, requires CR4.PCIDE=1)
  pub preserve_pcid: bool,
  /// PCID value (CR3 bits 11:0 when CR4.PCIDE=1)
  pub pcid: Option<u16>,
}

/// Installs a page table.
///
/// # Parameters
/// - `cr3`: The address of the page table root to install.
///
/// # Safety
/// The caller must ensure `cr3` is the address of a valid page table and lives for the lifetime of being written in
/// CR3.
unsafe fn write_cr3(cr3: u64) {
  // SAFETY: This is an architecturally defined operation to write the page table root.
  unsafe {
      asm!("mov cr3, {0}", in(reg) cr3)
  }
}

fn not_aligned(cr3: &PageTableRoot) -> bool { false }
fn exceeds_maximum_addr_width (cr3: &PageTableRoot) -> bool { false }

fn install_page_table(cr3: &'static PageTableRoot, options: PageTableOptions) -> Result<(), PageTableInstallError> {
  if not_aligned(cr3) {
    return Err(PageTableInstallError::NotAligned);
  }

  if exceeds_maximum_addr_width(cr3) {
    return Err(PageTableInstallError::ExceedsMaxPhysAddr);
  }

  // additional checks such as if any reserved bits are set, if CR4 is configured correctly, etc.

  // Parse options, apply them in CR4, etc, ensure they are self consistent

  // SAFETY: We have ensured the lifetime is static, that the reference is valid, and we have done our best to ensure
  // this is a valid page table
  unsafe { write_cr3(*cr3 as u64); }

  Ok(())
}
}
You can take this example a step farther and refactor write_cr3 to use a safe write_reg macro. This macro is
declared as safe in Patina because writing a system register in and of itself is not necessarily unsafe. It falls into
the hardware safety. For a given case, say the CR3 case, we may create an unsafe abstraction on top that declares this
particular register write has memory safety implications that the caller must guarantee.
#![allow(unused)]
fn main() {
use std::arch::asm;
macro_rules! write_sysreg {
  ($dest:ident, $value:expr) => {
    // SAFETY: We have a compile time guarantee that this is a valid register to write to
    unsafe {
      asm!(concat!("mov ", stringify!($dest), ", {value:x}"),
      value = in(reg) $value)
    }
  }
}

type PageTableRoot = u64;

enum PageTableInstallError {
    /// The CR3 address is not 4KB-aligned
    NotAligned,
    /// The CR3 address exceeds the maximum physical address width
    ExceedsMaxPhysAddr,
    /// Reserved bits are set in CR3
    ReservedBitsSet,
    /// PCIDE bit set but CR4.PCIDE is not enabled
    PcidWithoutCr4Support,
}

struct PageTableOptions {
  /// Page-level cache disable (CR3 bit 4)
  pub cache_disable: bool,
  /// Page-level write-through (CR3 bit 3)
  pub write_through: bool,
  /// Preserve PCID TLB entries (CR3 bit 63, requires CR4.PCIDE=1)
  pub preserve_pcid: bool,
  /// PCID value (CR3 bits 11:0 when CR4.PCIDE=1)
  pub pcid: Option<u16>,
}

/// Installs a page table.
///
/// # Parameters
/// - `cr3`: The address of the page table root to install.
///
/// # Safety
/// The caller must ensure `cr3` is the address of a valid page table and lives for the lifetime of being written in
/// CR3.
unsafe fn write_cr3(cr3_reg: u64) {
  // SAFETY: This is an architecturally defined operation to write the page table root.
  write_sysreg!(cr3, cr3_reg)
}

fn not_aligned(cr3: &PageTableRoot) -> bool { false }
fn exceeds_maximum_addr_width (cr3: &PageTableRoot) -> bool { false }

fn install_page_table(cr3: &'static PageTableRoot, options: PageTableOptions) -> Result<(), PageTableInstallError> {
  if not_aligned(cr3) {
    return Err(PageTableInstallError::NotAligned);
  }

  if exceeds_maximum_addr_width(cr3) {
    return Err(PageTableInstallError::ExceedsMaxPhysAddr);
  }

  // additional checks such as if any reserved bits are set, if CR4 is configured correctly, etc.

  // Parse options, apply them in CR4, etc, ensure they are self consistent

  // SAFETY: We have ensured the lifetime is static, that the reference is valid, and we have done our best to ensure
  // this is a valid page table
  unsafe { write_cr3(*cr3 as u64); }

  Ok(())
}
}
Unsafe Traits and Impls
Patina follows the general guidance from Rust on unsafe traits and trait impls. As above, hardware safety should be considered here: if a trait or trait impl would only be marked unsafe because it touches hardware directly, that need not create an unsafe trait/impl. It is up to the programmer to determine whether the hardware access would violate software safety and if so, list them as unsafe and document preconditions, postconditions, and invariants.
Summary
The main distinction between software safety and hardware safety is that software safety is complex and has many possible safe paths that can be validated by the compiler or a programmer. In hardware safety, there is only one safe path: interacting with the hardware as architecturally defined. Pragmatically speaking, it does not add value to propagate unsafe higher than the code block level when dealing with hardware safety unless it intersects with software safety.
Code First Process
The code first process allows Patina source code to be developed alongside draft specification changes (e.g. UEFI Forum ECRs). Implementation and testing happen in parallel with specification drafting so that design decisions are validated through working code before being finalized in a published specification.
This page is intended to provide a high-level overview of the code first process to supplement the formal definition in RFC 0027 - Code First. Once you have a good understanding of the process from this page, refer to the RFC for more details.
When to Use Code First
Use this process when a Patina change depends on a specification modification that has not yet been brought to the attention of the relevant specification working group. Common scenarios include:
- Implementing a new UEFI/PI protocol or interface.
- Modifying behavior governed by an existing specification clause that is being revised.
- Proposing a new specification feature where Patina serves as the reference implementation.
If the specification change is already published, the standard contribution workflow applies and code first is not required.
Key Principles
- Open source first - The tracking issue and pull request in Patina must exist before any ECR submission to working-group engagement. This ordering keeps the work public and avoids NDA constraints.
- Specification draft included in-tree - Every code first PR carries a markdown file in
docs/src/code_first/(using the Code First Template) that captures the proposed specification text. One file per impacted specification. This ensures Patina developers can see key specification details even if they don't have access to the ECR or working group discussions. - Working-group review on the PR - Specification reviewers participate directly on the GitHub pull request. The PR cannot merge until working-group approval is obtained.
- Tracking issue stays open - The code first tracking issue is closed only after the specification change is
published and all related code is merged to
main.
Key Steps
| Step | Location | Purpose |
|---|---|---|
| Tracking issue | GitHub Issues (type:code-first label) | Tracks the lifecycle from draft through publication |
| Specification draft | docs/src/code_first/<issue_number>-<description>.md | Proposed specification text using the template |
| Code first PR | GitHub Pull Requests (type:code-first label) | Contains the implementation and specification draft |
Other Resources
- RFC 0027 - Code First - Full process definition and rationale.
- Code First Template - Template for specification draft files.
Code First: <Title>
Template instruction lines begin with
>. Delete these lines when filling out the template.
Status: [Status]
[Status] must be one of the following:
- Draft
- Submitted to industry standard forum
- Accepted by industry standard forum
- Accepted by industry standard forum with modifications
- Rejected by industry standard forum
Change Log
This text can be modified over time. Add a change log entry for every change made to the code first change.
- YYYY-MM-DD: Initial code first change created.
- YYYY-MM-DD: Updated code first change (x) based on feedback from the community.
Submitter: Open Device Partnership
Replace the submitter information above with the name of the individual or organization submitting the code first change if different from the Open Device Partnership.
Summary of the Change
Required Section
Benefits of the Change
Required Section
Impact of the Change
Required Section
Specification Changes
Show exactly what is updated in specification text.
Acceptable formats include:
- A link to a pull request in a specification repository showing the exact text changes to the specification(s) impacted by the change.
- A markdown table showing the exact text changes to the specification(s) impacted by the change.
- A "diff" block in this section showing the exact text changes to the specification(s) impacted by the change.
- Before and after text blocks in this section showing the exact text changes to the specification(s) impacted by the change.
Special Instructions
Optional Section
License
The contents of the specification text are: SPDX-License-Identifier: CC-BY-4.0
Creative Commons Attribution 4.0 International
Unstable Feature
Unstable features are a way of adding new functionality where the API is not guaranteed to be stable. This includes:
- A new feature with a transition period to gather additional feedback.
- A working feature that still has some unresolved questions.
- A proof of concept.
How to Create an Unstable Feature
- Create a GitHub issue titled
Tracking unstable feature issuefor the new feature. - Link this issue to every pull request (PR) related to the feature.
- Add a feature flag to the
Cargo.tomlto gate the new feature, following the naming convention:unstable-<feature-name>. - Link the tracking issue to every task that contributes to the feature's stabilization.
Note: Feature gating ensures that unstable features are only enabled when explicitly requested, reducing the risk of accidental use in production.
Stabilization of an Unstable Feature
- Remove the feature gate from the code and
Cargo.tomlonce the feature is stable. - Close the tracking issue with the pull request that removes the feature gate.
- Increment the crate's minor version to reflect the new stable feature.
Debugging
-
For more information about the Patina Debugger, see its README.
-
For design details, see the debugging theory of operation page.
Core Reload
Debugger core reload is an experimental feature that allows a new Patina core to be loaded and executed from the initial breakpoint of the existing core. This is intended to be used for rapid development where flashing the device is time consuming or logistically difficult.
Enabling Core Reload
To enable core reload, the debugger must first be set up and enabled. Additionally, the debugger_reload feature must
be enabled for the patina_dxe_core crate. When both of these prerequisites are true, core reload is functional
at the initial breakpoint.
Reloading the Core
Reloading the core should be done using a debugger extension. Currently this is only supported in WinDbg using the
UefiExt extension. When the extension is installed,
the feature is enabled, and the debugger is broken in on the initial breakpoint, then you can use the !uefiext.loadcore
command to load the new core.
kd> !uefiext.loadcore D:\patina-dxe-core-qemu\target\x86_64-unknown-uefi\debug\qemu_q35_dxe_core.efi
Loading image of size 1982464 bytes from D:\patina-dxe-core-qemu\target\x86_64-unknown-uefi\debug\qemu_q35_dxe_core.efi
Compressed image size: 738544 bytes
Transferred 738544 / 738544 bytes (100%) in 20 seconds (288 kbps)...
Image loaded successfully.
... symbols reload prints ...
Executing new core...
If the debugger is enabled in the new core, you will see a new break-in on the initial breakpoint. Otherwise it will
continue execution. The /nogo option provides the ability to load the new core but not begin execution. This can be
useful for early core debugging, though caution should be used as debugger exception handler transitions may be unstable.
UART Considerations
The core reload feature requires a large amount of rapid data transfer between the host and the device. Depending on the
UART implementation and support for flow control, this has the potential to overflow hardware FIFO.
ComToTcpServer.py
has some artificial rate limiting to attempt to prevent this, but it may not work for all devices. If the FIFO fills and
bits are dropped, this can cause corrupted packets or worse hard-hangs as the GDB stub awaits more data that was dropped.
If these occur, consider changing the settings in ComToTcpServer.py (if used) and/or implementing flow control.
How It Works
The reload occurs in several steps coordinated via the debugger monitor command between the debugger (specifically UefiExt) and the DXE core. The steps are as follows:
- The debug extension will load the specified file and compress it for faster transfer.
- The extension uses core reload monitor commands to allocate a buffer in the DXE core of the required size to hold the compressed image. The address of this buffer is returned to the debugger.
- The extension writes the image into the allocated buffer via memory write commands.
- The extension issues the load command to the DXE core, passing the address and size of the new image.
- The DXE core decompresses the image using the uefi decompress algorithm.
- The DXE core parses the image, performs relocations, rebuilds the HOB list, and then provides the context (IP, SP, arg0) needed to start execution of the new image back to the debugger.
- The debugger will change the exception context to point to the new image entry point and HOB list and resume execution.
Debugging Example
This page is intended to show and example of a simple debugging session for reference.
Debugging a component
First, I will connect to the session. The steps to do this are detailed in Connection Windbg.
After connecting, I will run !uefiext.init to initialize and load symbols. Additionally,
because I built the image locally, I also see source being resolved.
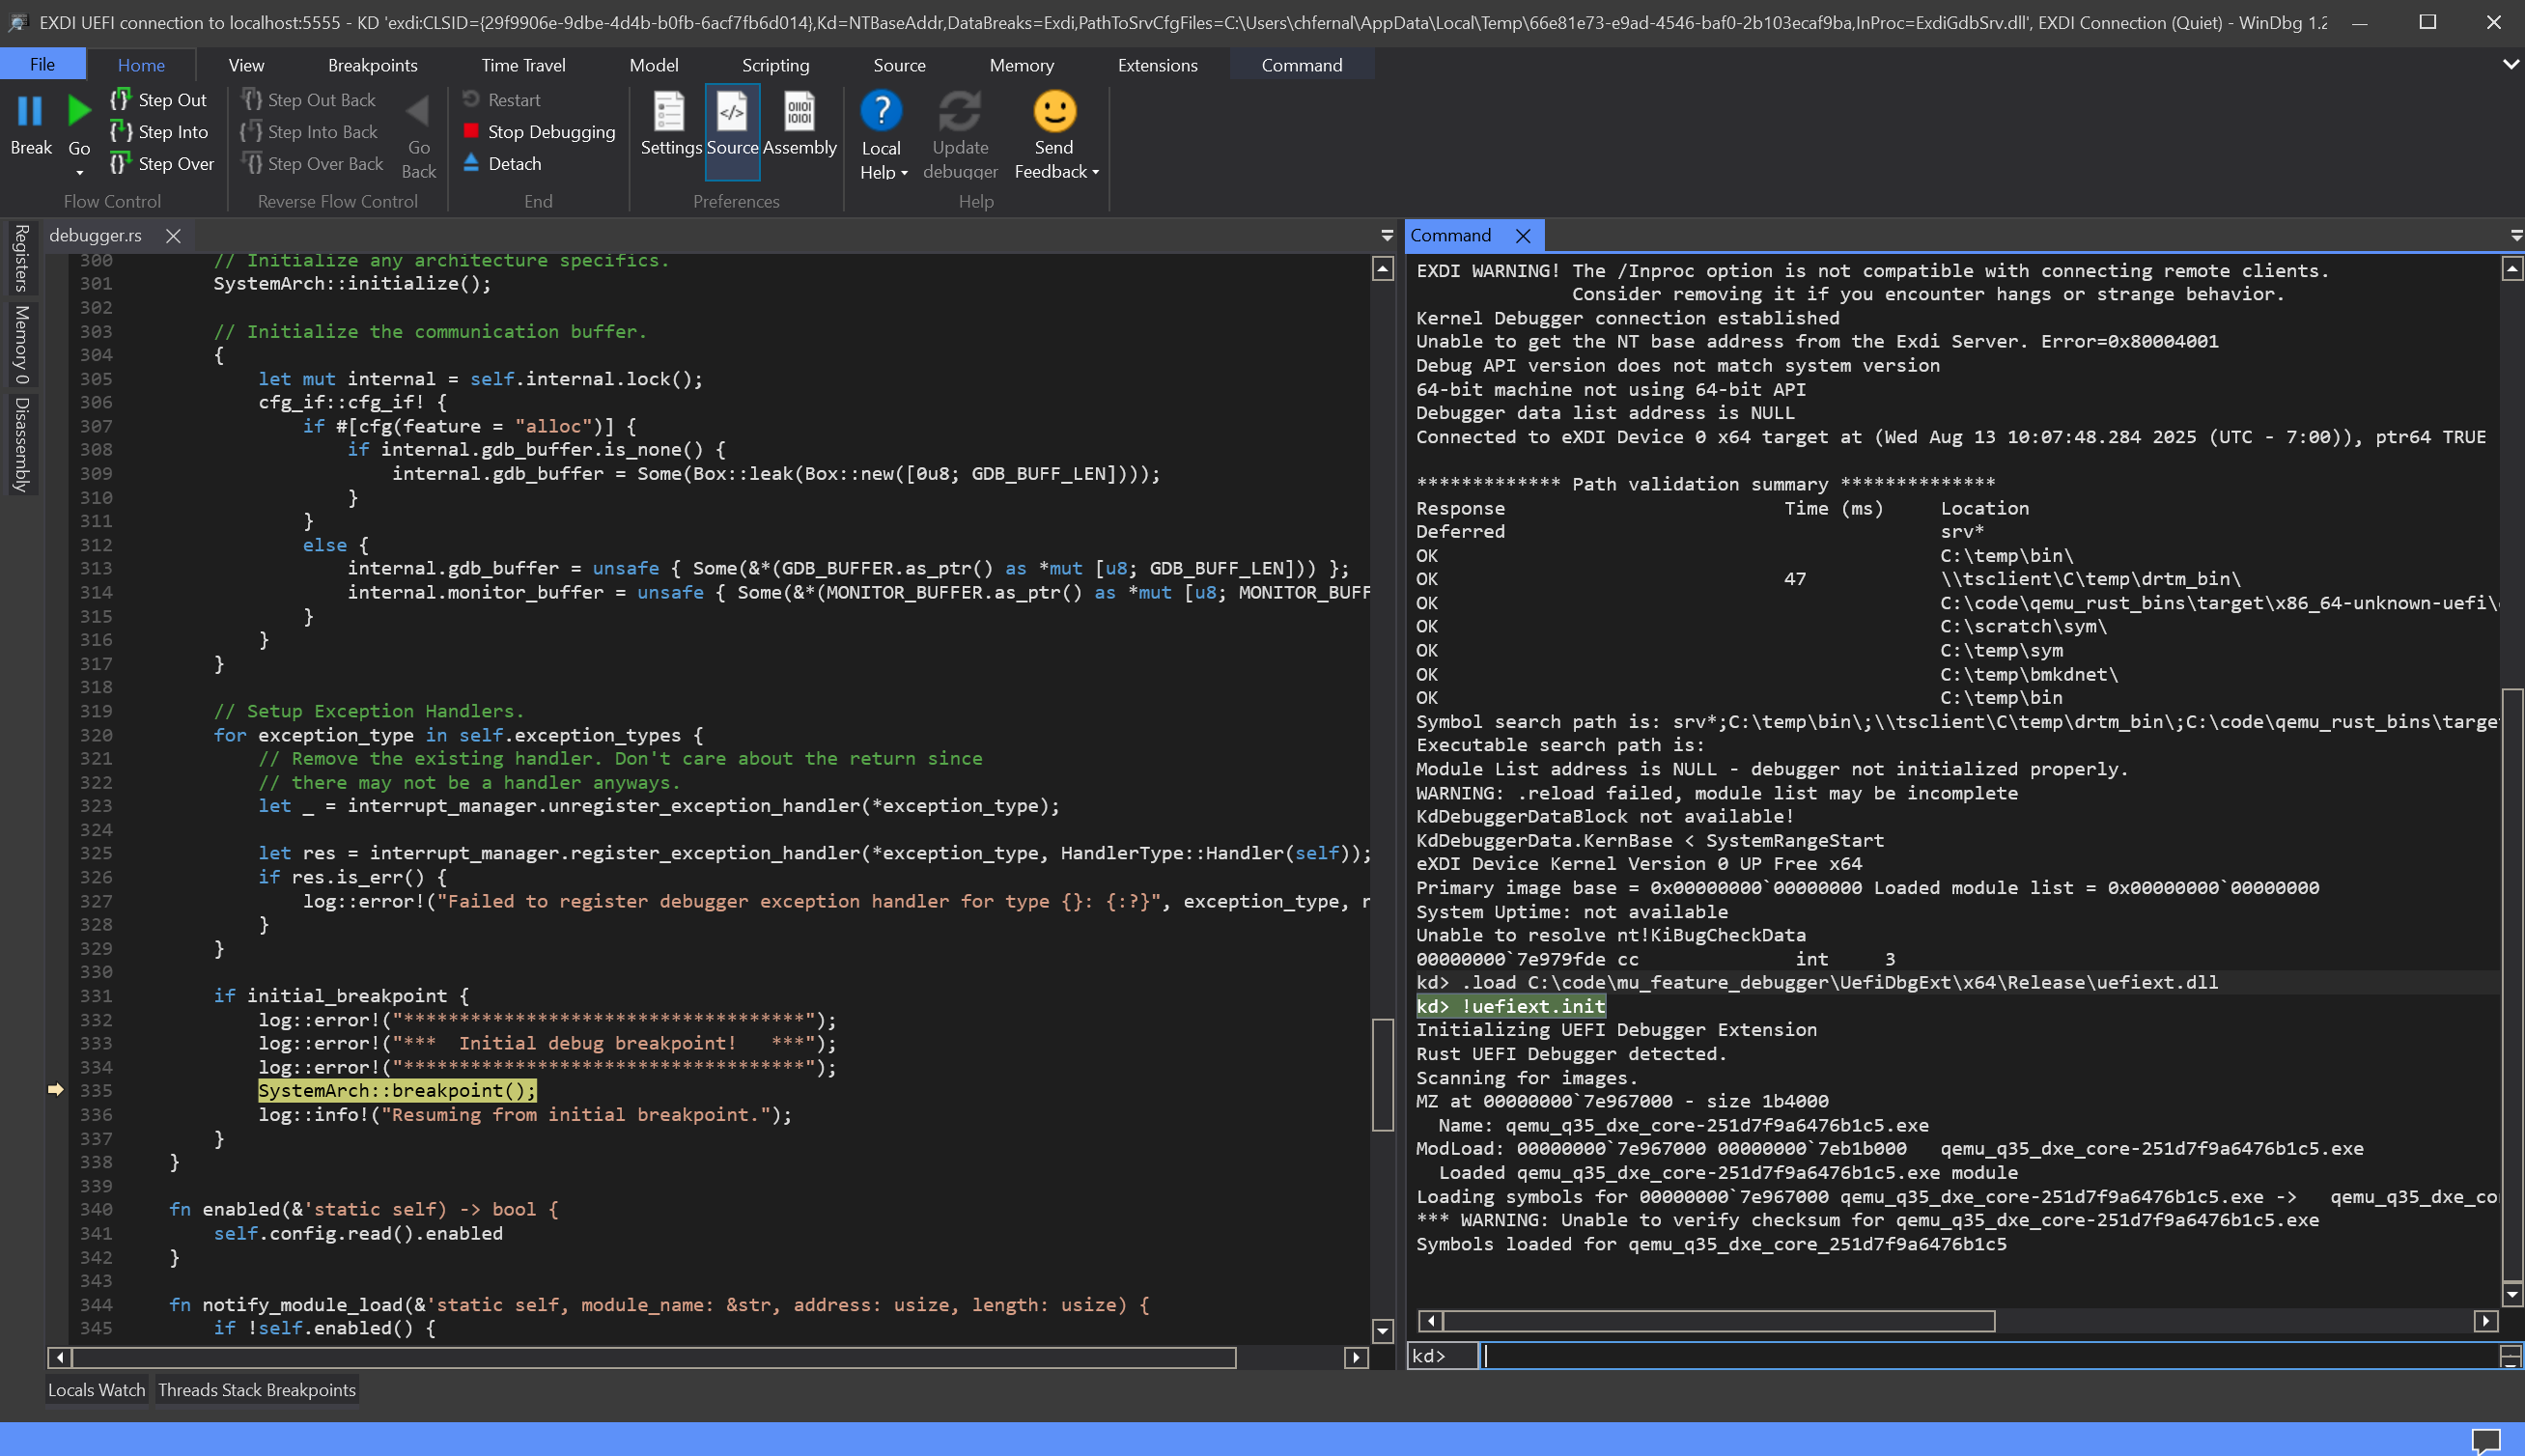
I want to debug the HelloStruct component, but I don't know the exact symbol name.
I use a fuzzy search of symbols to find the entry point using x *!*HelloStruct*entry*.
kd> x *!*HelloStruct*entry*
00000000`7e9831f0 qemu_q35_dxe_core_251d7f9a6476b1c5!patina_samples::struct_component::HelloStruct::entry_point (void)
00000000`7e974fe0 qemu_q35_dxe_core_251d7f9a6476b1c5!ZN4core3ptr383drop_in_place$LT$patina_sdk..component..(...)
This returns a couple of results, one of which is the entry point. I can then right
click on that routine and set a breakpoint, or copy the name and manually run bp <symbol>
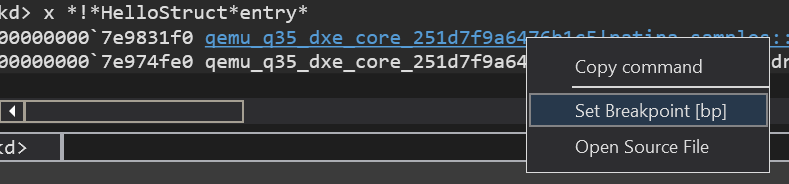
After setting the breakpoint, I run g to continue execution. After resuming
the debugger will break back in when the breakpoint is hit.
kd> g
Breakpoint 0 hit
qemu_q35_dxe_core_251d7f9a6476b1c5!patina_samples::struct_component::HelloStruct::entry_point:
00000000`7e9831f0 4157            push    r15
Now that i'm in the function I want to debug, I can set further breakpoint using the UI
or bp, inspect locals with dv, check the stack using k, inspect globals using
x and dx, and step using the UI or p.
Debugging a EFI binary
Now, i've changed my mind and now want to debug PcdDxe.efi instead. Because this
is a separate module that has not yet been loaded I cannot set breakpoints on it.
Instead, I must first setup a module break to wait for the module to be loaded.
to do this, I run !modulebreak pcddxe
kd> !modulebreak pcddxe
Module breakpoints:
    pcddxe
Now, I can continue execution with g. On the logging output (if available) I see
ERROR - MODULE BREAKPOINT! PcdDxe.efi - 0x7eb2c000 - 0xc000
and the debugger breaks in. However, if I run lm, I don't see PcdDxe.
kd> lm
start             end                 module name
00000000`7e967000 00000000`7eb1b000   qemu_q35_dxe_core_251d7f9a6476b1c5 C (private pdb symbols)  C:\ProgramData\Dbg\sym\qemu_q35_dxe_core-251d7f9a6476b1c5.pdb\6601E03A44AB383E4C4C44205044422E1\qemu_q35_dxe_core-251d7f9a6476b1c5.pdb
To find symbols that have loaded since the initial break, run !findall. Now running
lm again shows the PcdDxe module.
kd> !findall
Already loaded module at 7e967000
Symbols already loaded for qemu_q35_dxe_core_251d7f9a6476b1c5
Module at 7e967000 is already loaded
Loading module at 7eb2c000
MZ at 00000000`7eb2c000 - size c000
    Name: PcdDxe.dll
ModLoad: 00000000`7eb2c000 00000000`7eb38000   PcdDxe.dll
    Loaded PcdDxe.dll module
kd> lm
start             end                 module name
00000000`7e967000 00000000`7eb1b000   qemu_q35_dxe_core_251d7f9a6476b1c5 C (private pdb symbols)  C:\ProgramData\Dbg\sym\qemu_q35_dxe_core-251d7f9a6476b1c5.pdb\6601E03A44AB383E4C4C44205044422E1\qemu_q35_dxe_core-251d7f9a6476b1c5.pdb
00000000`7eb2c000 00000000`7eb38000   PcdDxe     (deferred)
Now that the module is loaded, I can set a breakpoint on it's entrypoint.
kd> bp PcdDxeInit
kd> g
Breakpoint 0 hit
PcdDxe!PcdDxeInit:
00000000`7eb302f8 4c8bdc          mov     r11,rsp
From here I can inspect the state of the binary, set breakpoints on other routines or step through the functions.
Windbg Debugging
Windbg is the primary debugging software recommended for use in Patina. While other debugging environments such as GDB do work, Windbg provides native support for PDB symbols, Patina aware functionality with the UEFI Extention, and a robust bare-metal debugging experience. For this reason, the Patina team has invested heavily in this solution, so it has the most robust tooling.
More information and downloads can be found on the Windbg learn page, or Windbg can be installed using the following winget command:
winget install Microsoft.WinDbg
It is recommended to use Windbg version >= 1.2507 for full support. There are known issues with older versions.
Serial Port Forwarding
Windbg currently only supports connecting to the TCP-based GDB server. To support COM and named pipe-based transports, use the forwarding script ComToTcpServer.py to forward traffic between a serial device and a TCP server. This can also be useful if you want to debug from a different machine than the one connected to the device.
Before running the script, install the following pip modules:
pip install pyserial pywin32
Examples of common usages are provided below. For details on full use, run
python3 ComToTcpServer.py --help.
# Forwards a device running on COM5 at baud rate 115200 to TCP port 5555
Python3 ComToTcpServer.py -c COM5 -b 115200 -p 5555

# Forwards a named pipe device to TCP port 5555
Python3 ComToTcpServer.py -n \\.\pipe\patina -p 5555
After the script has started, you can connect the debugger to the forwarded port.
Connecting Windbg
Windbg GDB remote support is provided through the EXDI interface. To connect through
the UI, navigate to Start debugging, select Attach to kernel, and go to EXDI.
This can be done faster using the Ctrl+K shortcut. From the EXDI tab, select the
UEFI target type, your correct architecture, and the address:port you want to
connect to, such as localhost:5555 or 192.168.0.42:5555.
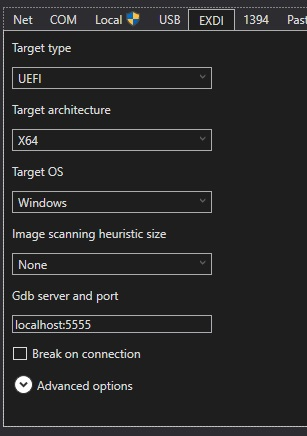
The Target OS and Image scanning fields do not matter, and even the architecture will normally be automatically determined if it is inaccurate.
Diagnosing Connection Issues
There could be several reasons for the connection failing. Below are a few diagnostic steps that can be taken:
-
Check the TCP port. If connected with Putty (or similar), you should be able to connect (without Windbg running) and see
$T05thread:01;#07printed on boot. -
Check for GDB traffic. When connecting, you can select
advanced optionsandshow communication packet logto see the traffic log during connection.
UEFI Extension
The UEFI extension is a critical part of debugging Patina in Windbg. It provides essential tools without which debugging will be substantially harder. This extension adds a suite of UEFI & Patina related commands to windbg.
The most common commands are:
| Command | Description |
|---|---|
!uefiext.init | Initializes the extension, detects the debugger state, and finds modules for symbol resolution. This should always be run on initial connection. |
!uefiext.findall | Finds all loaded modules; can be used at any time. |
!uefiext.info | Prints information about the system, such as the Patina version and the reason for the current exception. |
!uefiext.monitor | Invokes monitor commands on the target. See the monitor commands for more details. |
!uefiext.help | Prints the full list of commands. |
Once the extension has been loaded, you can call !command instead of typing
!uefiext.command each time. So after !uefiext.init, the rest of the calls do
not need to specify the extension.
If you frequently debug Patina, add !uefiext.init to the startup commands. This is
found in File->Settings->Debugging settings->Startup. This will cause modules and
symbols to be automatically resolved on connection.
Installing the Extension
To install the extension, download it from the most recent uefi_debug_tools release and add it to the extension path for the debugger. This can be done using the PowerShell commands below. Note that the architecture is the architecture of the host machine running Windbg, not the device being debugged.
Installing for X64 Host
Invoke-WebRequest -Uri "https://github.com/microsoft/uefi_debug_tools/releases/latest/download/uefiext_x64.zip" -OutFile "$env:TEMP\uefiext.zip"; Expand-Archive "$env:TEMP\uefiext.zip" -DestinationPath "$env:TEMP\uefiext" -Force; Copy-Item "$env:TEMP\uefiext\*" -Destination "C:\Users\$Env:UserName\AppData\Local\DBG\EngineExtensions\"
Installing for AArch64 Host
Invoke-WebRequest -Uri "https://github.com/microsoft/uefi_debug_tools/releases/latest/download/uefiext_arm64.zip" -OutFile "$env:TEMP\uefiext.zip"; Expand-Archive "$env:TEMP\uefiext.zip" -DestinationPath "$env:TEMP\uefiext" -Force; Copy-Item "$env:TEMP\uefiext\*" -Destination "C:\Users\$Env:UserName\AppData\Local\DBG\EngineExtensions\"
Symbols
Once running !uefiext.init, symbols will often resolve automatically, but there
can be several reasons why this doesn't happen. Symbol resolution can take two
paths: local symbol resolution or system server resolution.
Local Symbols
Symbols can automatically resolve because the PE header of the image contains the
path to the associated PDB file. This will be something like
E:\patina-dxe-core-qemu\target\x86_64-unknown-uefi\debug\deps\qemu_q35_dxe_core-251d7f9a6476b1c5.pdb
Windbg will then try to load this file to match the current image in memory.
A few reasons why this may not match are:
- The device running the debugger is not the same as the device that built the binary.
- The binary has been rebuilt, so the PDB no longer matches.
- The binary does not have the fully qualified path, e.g.
qemu_q35_dxe_core-251d7f9a6476b1c5.pdb
If you can locate the symbol files, inform Windbg of their location by adding their
directory to the symbol path. This can be done by running .sympath+ <path to sym dir>.
To see the full symbol path, run .sympath.
If issues persist, !sym noisy will enable noisy logging for symbol discovery to
better understand why it is unable to find the correct symbols.
Symbol Server
Setting up a symbol server might be the correct choice for official build systems, however, this is not detailed here. For more information, see the Symbol Server and Symbol Stores learn page.
Windbg Command Cheatsheet
For more details, see the Local Help in Windbg, but the following are some commonly used commands.
| Command | Description |
|---|---|
k | Display stack backtrace |
g | Resume execution |
p | Single step |
t | Step in |
gu | Step out |
dv | Display local variables |
dx | Display object, used for globals |
d[b/d/q] | Display bytes/dword/qword at provided address |
e[b/d/q] | Edit bytes/dword/qword at provided address |
r | Display registers. Can also edit registers. |
bp | Set a breakpoint at a provided address or symbol |
bl | List current breakpoints |
ba | Set an access breakpoint |
lm | List loaded modules |
x <module>!* | Display symbols for the provided module |
.sympath | Show symbol path. .sympath+ to add to symbol path |
Inline Code Documentation
This chapter lays out the standards of practice for inline Rust documentation for generating Rust docs. It also provides templates that should be followed when creating documentation for these items. You can review the Templates and Quick Reference, however if this is your first time seeing this document, please read it in its entirety.
The most important items to document are those marked with the pub keyword, as they will have
automatic documentation generated for them. When adding new code, the developer should always run
cargo doc --open and review the documentation for their code.
Common Sections
All sections are described as ## <section_name> inside inline doc comments. These are a
common set of sections used below, however do not hesitate to create a custom section if it
is appropriate.
Examples
The examples section is used to provide example usage to a user using the inline code markdown
functionality e.g. ```. The great thing about writing examples is that cargo test will
run these examples and fail if they are incorrect. This ensures your examples are always up to date!
There are situations where you may expect the example to not compile, fail, panic, etc. To support
this, you can pass attributes to the inline code examples, to tell Rust what to expect. Some
supported attributes are should_panic, no_run, compile_fail, and ignore.
Including #[doc(html_playground_url = "https://playground.example.com/")] will allow examples to
be runnable in the documentation.
#![allow(unused)]
fn main() {
/// ## Examples
///
/// optional description
///
/// ``` <attribute>
/// <code></code>
/// ```
}
Errors
The errors section documents the expected error values when the output of a function is a Result.
This section should be an exhaustive list of expected errors, but not an exhaustive list of the
error enum values (unless all are possible). You should always contain the error type as a linked
reference and the reason why the error would be returned.
#![allow(unused)]
fn main() {
/// ## Errors
///
/// Returns [ErrorName1](crate::module::ErrorEnum::Error1) when <this> happens
/// Returns [ErrorName2](crate::module::ErrorEnum::Error2) when <this> happens
///
}
Safety
The safety section must be provided for any function that is marked as unsafe and is used to
document (1) what makes this function unsafe and (2) the expected scenario in which this function
will operate safely and as expected. A safety section should also be bubbled up to the struct
(if applicable) and the module if any function is unsafe.
It is common (but not required) to see pre-condition checks in the function that validates these
conditions, and panic if they fail. One common example is slice::from_raw_parts which will panic
with the statement:
unsafe precondition(s) violated: slice::from_raw_parts requires the pointer
to be aligned and non-null, and the total size of the slice not to exceed `isize::MAX`
#![allow(unused)]
fn main() {
/// ## Safety
///
/// <comments>
}
Panics
Provide general description and comments on any functions that use .unwrap(), debug_assert!,
etc. that would result in a panic. Typically only used when describing functions.
Lifetimes
Provide a general description and comments on any types that have lifetimes more complex than a single lifetime (explicit or implicit). Assume that the developer understands lifetimes; focus on why the lifetime was modeled a certain way rather than describing why it was needed to make the compiler happy! Typically only used when describing types.
---
config:
  layout: elk
  look: handDrawn
---
graph TD
    A[Complex Lifetimes] --> B[Multiple Parameters]
    A --> C[Unusual Relationships]
    A --> D[Design Decisions]
    B --> E[**Document Why**]
    C --> E
    D --> E
Style Guides
The goal is to create documentation that provides developers with a clear and concise description
on how to use a crate, module, type, or function while keeping it clean when auto-generating
documentation with cargo doc. As alluded to, it is the responsibility of the developer to ensure
that each library crate, public module, public type, and public function is well documented. Below
are the expectations for each. If a common section is not applicable to the documented item, do not
include it.
Crate Style Guide
Crate documentation should be located at the top of the lib.rs or main.rs file. The intent is to
describe the purpose of the crate, providing any setup instructions and examples. This is also the
place to describe any common misconceptions or "gotchas". Doc comments here use //! specifying we
are documenting the parent item (the crate).
#![allow(unused)]
fn main() {
//! PE32 Management
//!
//! This library provides high-level functionality for operating on and representing PE32 images.
//!
//! ## Examples and Usage
//!
//! ```
//! let file: File = File::open(test_collateral!("test_image.pe32"))
//!   .expect("failed to open test file.");
//!
//! let mut buffer: Vec<u8> = Vec::new();
//! file.read_to_end(&mut buffer).expect("Failed to read test file");
//!
//! let image_info: Pe32ImageInfo = pe32_get_image_info(buffer).unwrap();
//!
//! let mut loaded_image: Vec<u8> = vec![0; image_info.size_of_image as usize];
//! pe32_load_image(&image, &mut loaded_image).unwrap();
//! ```
//!
//! ## License
//!
//! Copyright (C) Microsoft Corporation. All rights reserved.
//!
//! SPDX-License-Identifier: Apache-2.0
//!
}
Module Style Guide
Module documentation should be placed at the top of a module, whether that be a mod.rs file or the
module itself if contained to a single file. If a crate only consists of a single module, the crate
style guide should be used. Submodules should be avoided if possible, as they cause confusion. The
goal is to describe the types found in this module and their interactions with the rest of the
crate. Doc comments here use //! specifying we are documenting the parent item (the module).
#![allow(unused)]
fn main() {
//! PE32 Management
//!
//! This module provides high-level functionality for operating on and representing PE32 images.
//!
//! ## License
//!
//! Copyright (C) Microsoft Corporation. All rights reserved.
//!
//! SPDX-License-Identifier: Apache-2.0
//!
}
Type Style Guide
Type documentation should be available for all public types such as enums, structs, etc.
The focus should be on the construction of the type (when / how), destruction of the type if a
custom Drop trait is implemented, and any performance concerns. Doc comments here use ///
specifying we are documenting the item directly below it (the type or member of the type).
Document traits, not trait implementations!
#![allow(unused)]
fn main() {
extern crate goblin;
/// Type for describing errors that result from working with PE32 images.
#[derive(Debug)]
pub enum Pe32Error {
    /// Goblin failed to parse the PE32 image.
    ///
    /// See the enclosed goblin error for a reason why the parsing failed.
    ParseError(goblin::error::Error),
    /// The parsed PE32 image does not contain an Optional Header.
    NoOptionalHeader,
    /// Failed to load the PE32 image into the provided memory buffer.
    LoadError,
    /// Failed to relocate the loaded image to the destination.
    RelocationError,
}

/// Type containing information about a PE32 image.
#[derive(PartialEq, Debug)]
pub struct Pe32ImageInfo {
    /// The offset of the entry point relative to the start address of the PE32 image.
    pub entry_point_offset: usize,
    /// The subsystem type (IMAGE_SUBSYSTEM_EFI_BOOT_SERVICE_DRIVER [0xB], etc.).
    pub image_type: u16,
    /// The total length of the image.
    pub size_of_image: u32,
    /// The size of an individual section in a power of 2 (4K [0x1000], etc.).
    pub section_alignment: u32,
    /// The ascii string representation of a file (<filename>.efi).
    pub filename: Option<String>,
}
}
Function Style Guide
Function documentation should be available for functions of a public type (associated functions), and any public functions. At least one example is required for each function in addition to the other sections mentioned below.
An "arguments and "return" section should only be provided in circumstances where it clarifies ambiguity in the function signature. In most cases, the code should be written in such a way that normal Rust conventions make the arguments and return type self-evident so that the documentation can focus on describing the behavior of the function and any non-obvious details.
#![allow(unused)]
fn main() {
extern crate goblin;
enum Error { ParseError, NoOptionalHeader };
struct UefiPeInfo;
/// Attempts to parse a PE32 image and return information about the image.
///
/// Parses the bytes buffer containing a PE32 image and generates a [UefiPeInfo] struct
/// containing general information about the image otherwise an error.
///
/// ## Errors
///
/// Returns [`ParseError`](Error::ParseError) if parsing the PE32 image failed. Contains the
/// exact parsing [`Error`](goblin::error::Error).
///
/// Returns [`NoOptionalHeader`](Error::NoOptionalHeader) if the parsed PE32 image does not
/// contain the OptionalHeader necessary to provide information about the image.
///
/// ## Examples
///
/// ```rust
/// extern crate std;
///
/// use std::{fs::File, io::Read};
/// use uefi_pe32_lib::pe32_get_image_info;
///
/// let mut file: File = File::open(concat!(env!("CARGO_MANIFEST_DIR"), "/resources/test/","test_image.pe32"))
///   .expect("failed to open test file.");
///
/// let mut buffer: Vec<u8> = Vec::new();
/// file.read_to_end(&mut buffer).expect("Failed to read test file");
///
/// let image_info = pe32_get_image_info(&buffer).unwrap();
/// ```
pub fn pe32_get_image_info(image: &[u8]) -> Result<UefiPeInfo, Error> {
  todo!()
}
}
Quick Reference
///Documents the item following the comment//!Documents the parent item#[doc(html_playground_url = "https://playground.example.com/")]to add a Run button to examples#[doc(hidden)]to hide items#[doc(alias = "alias")]to make items easier to find via the search index[Bar],[bar](Bar), is supported for linking items (i.e.[String](std::string::String))- Markdown is supported including sections (
#), footnotes ([^note]), tables, tasks, punctuation - Keep documentation lines to 100 characters
- Codeblock attributes (```[attribute]) options:
should_panic,no_run,compile_fail
Templates
These are templates and do not necessarily need to be followed exactly. The goal is to provide great, easy-to-read, and understandable documentation.
Crate Template
#![allow(unused)]
fn main() {
//! Summary Line -> what this is
//!
//! Longer description and use of the crate
//!
//! ## Getting Started
//!
//! <any non-code requirements for this library to work (installations, etc.)>
//!
//! ## Examples and Usage
//!
//! <Short examples of using this library or links to where examples can be found>
//! <can use links [`String`](std::string::String) to other places in the library>
//!
//! ## Features
//!
//! <Add this section if this library defines features that can be enabled / disabled>
//!
//! ## <Custom sections>
//!
//! <Common additional sections are described in the Common Sections section or other custom
//! sections>
//!
//! ## License
//!
//! <Add the license type here>
//!
}
Module Template
#![allow(unused)]
fn main() {
//! Summary Line -> what this is
//!
//! Longer description and use of the module.
//!
//! ## <Custom sections>
//!
//! <Common additional sections are described in the Common Sections section or other custom
//! sections>
//!
}
Type Template
#![allow(unused)]
fn main() {
/// Summary line -> what this is
///
/// <Optional> longer description and semantics regarding the type. (e.g. how to construct and deconstruct)
///
/// ## <Custom sections>
///
/// <Common additional sections are described in the Common Sections section or other custom
/// sections>
///
/// <for each attribute in the type>
/// A short description of the attribute
///
}
Function Template
#![allow(unused)]
fn main() {
/// Summary line -> what this is
///
/// <Optional> longer description of what is returned
///
/// ## Errors
///
/// <list of possible raised errors and why. Use doc links>
/// Returns [`NoOptionalHeader`](Pe32Error::NoOptionalHeader) if the optional header is missing
/// in the PE32 image.
///
/// ## Examples
///
/// ```
/// <some-rust-code></some-rust-code>
/// ```
///
/// <Common additional sections are described in the Common Sections section or other custom
/// sections>
///
}
Documentation Best Practices
---
config:
  layout: elk
  look: handDrawn
---
graph TD
    A[Documentation Best Practices] --> B[Be Consistent]
    A --> C[Use Active Voice]
    A --> D[Provide Examples]
    A --> E[Document Errors and Panics]
    A --> F[Link Related Items]
    B --> G[Follow Templates]
    C --> H[Improves Readability]
    D --> I[Shows Usage Patterns]
    E --> J[Ensures Safe Usage]
    F --> K[Creates Documentation Web]
General Guidelines
- Be comprehensive: Document all public items, even if their function seems obvious
- Use examples: Provide concrete examples for complex functions and types
- Document safety: Always document unsafe functions with clear safety requirements
- Cross-reference: Link to related items using
[Item]syntax - Stay up-to-date: Update documentation when code changes
- Consider the user: Write documentation from the user's perspective
Common Pitfalls to Avoid
- Undocumented assumptions: Make requirements and preconditions explicit
- Outdated examples: Ensure examples still compile and work as expected
- Focusing on implementation: Focus on how to use the item, not how it works internally
- Forgetting edge cases: Document unusual behaviors and error conditions
Code Formatting
Formatting is made easy with Rust! We rely on cargo fmt and cargo clippy to apply formatting changes.
cargo fmt will format your code by following default rules and allows for
customization via a rustfmt.toml file at the root of a repository. This tool makes no code functionality changes and
is safe to use.
cargo clippy is a more comprehensive linting tool that requires careful
consideration. Unlike cargo fmt, which automatically applies formatting changes, cargo clippy provides suggestions
for improving code quality and adherence to Rust idioms. These recommendations may involve modifications to code logic
and structure. While these changes typically enhance code quality by promoting idiomatic Rust patterns, they should be
reviewed carefully as they may not be appropriate for all use cases. Configuration options are available through a
clippy.toml configuration file for customizing the tool's behavior.
If a change is not applicable, you will need to tell clippy to ignore that bit of code.
cargo fmt and cargo clippy should always be run as part of CI and are run in the cargo make all command.
Hardware Access
Patina components access hardware through several mechanisms, each with Rust-specific safety considerations that differ from traditional C firmware. This section covers the supported access methods, the crates Patina uses for each, and the pitfalls to avoid.
Architectural Interfaces
Various parts of Patina need to access architectural interfaces, e.g. I/O Ports on x86 or reading system registers on AArch64. Patina has consolidated generally applicable functions in the Patina SDK's arch module. Developers should prefer using interfaces from there and adding new ones as needed. However, if the architectural interface is not widely applicable, it should be contained within the module that uses it.
The goal is to limit the use of inline assembly code, particularly around interfaces that need very specific patterns to operate correctly. Instead, well used and tested interfaces provided by the SDK should be used so that safety invariants can be maintained.
Memory-Mapped I/O (MMIO)
This page explains the soundness problems with naive MMIO access in Rust and why Patina uses the
safe-mmio crate.
The patina crate re-exports safe-mmio through a patina::mmio wrapper module. All Patina code should
import from patina::mmio rather than depending on safe-mmio directly. This:
- Allows consumers to use the crate without adding
safe-mmioas a direct dependency. - Reduces the likelihood of the same crate being compiled multiple times with different versions.
Crates that already depend on patina should not add safe-mmio to their own Cargo.toml.
The Problem with References to MMIO Space
In C, casting an address to a pointer and performing volatile reads/writes is the standard way to access device
registers. In Rust, it might seem natural to create a reference (&T or &mut T) to a #[repr(C)] struct
laid out over the register block. However, creating a Rust reference to MMIO space is unsound.
The Rust compiler is free to insert additional reads through any &T reference at any time. For normal memory this
is harmless, but for MMIO registers an extra read can clear an interrupt status, pop a byte from a FIFO, or trigger
other device side-effects. More details are documented
and tracked by the Rust Embedded Working Group.
Because this is part of Rust's reference semantics, MMIO must be accessed exclusively through raw pointers combined with volatile operations.
Why safe-mmio
Patina uses the safe-mmio crate because it directly addresses the following
concerns:
-
No references to MMIO space.
UniqueMmioPointer<T>is a unique owned pointer to the registers of some MMIO device. It never creates a&Tto device memory, eliminating potential for undefined behavior. -
Read side-effect distinction. The crate separates read-with-side-effects (
ReadOnlyandReadWriterequires&mut UniqueMmioPointer) from pure reads (ReadPureandReadPureWriteallows&UniqueMmioPointeror&SharedMmioPointer). This encodes at the type level whether a read is safe to perform. -
Correct codegen on AArch64. On AArch64,
read_volatile/write_volatilecan emit instructions that cannot be virtualized.safe-mmioworks around this by using inline assembly to emit the correct MMIO instructions on AArch64.
Field Wrapper Types
The below table is provided for quick Patina developer reference. See the safe-mmio documentation for full API details.
| Wrapper | Read | Write | Read Requires &mut | Notes |
|---|---|---|---|---|
ReadPure<T> | yes | no | no | Pure read, no device side-effects |
ReadOnly<T> | yes | no | yes | Read has device side-effects |
WriteOnly<T> | no | yes | n/a | Write-only register |
ReadWrite<T> | yes | yes | yes | Read has side-effects |
ReadPureWrite<T> | yes | yes | no (for read) | Read is pure, write allowed |
See safe-mmio usage instructions for examples of how to define register blocks and access registers.
Further Reading
safe-mmioREADME — full API overview and comparison with other MMIO cratessafe-mmiodocs.rs — API reference
Other Resources
Below is a currated list of resources to help get you started with Rust development and firmware development in Rust.
Websites
| Link | Description |
|---|---|
| crates.io | All open source crates that have been published. |
| docs.rs | Documentation for all open source crates on crates.io. Documentation links are typically found on crates.io, but link here. |
| bookshelf.rs | A curated list of great Rust books. |
| lib.rs | An opinionated version of crates.io. |
| blessed.rs | A curated list of crates for common use-cases. |
Books
Great books to read to get started with developing bare metal code using Rust!
| Book | Description |
|---|---|
| Rust Book | The Rust maintained book for beginners. |
| Writing an OS in rust | A great example and tutorial for bare-metal programming. The Rust UEFI DXE Core project got started following this book. |
| The embedded rust book | General Getting started guide for embedded Rust development. |
| Rust API Guidelines | Recommendations on how to design and present APIs. |
Use of Unstable Rust Features in Patina
Patina takes a pragmatic approach to using unstable Rust features. These features are allowed under specific circumstances, balancing the benefits of new capabilities with maintainability.
The general guidance is to avoid using unstable Rust or Cargo features. Unstable features may not become stable or may change in significant and unpredictable ways, potentially impacting public APIs and critical portions of the codebase. However, since Patina is firmware code, it has some properties that lead to features being in a proposed and unstable state, such as: being largely no-std, implementing and using its own allocator, and frequent low-level and unsafe operations. Below are the guiding principles and practices for working with unstable Rust features in Patina.
All active rustc feature usage is tracked with the state:rustc-feature-gate
label.
How Patina Enables Unstable Features
Patina builds against a pinned stable Rust toolchain rather than nightly (see
Rust and Toolchain Version Update Process). A stable rustc normally rejects
#![feature(...)] gates, so the build sets RUSTC_BOOTSTRAP=1 so they are accepted by the stable toolchain.
To constrain the set of unstable features allowed, the build also passes -Z allow-features=<list> through rustflags
(in .cargo/config.toml).
When the feature process below adds or removes a feature, update the -Z allow-features list in every rustflags block
of .cargo/config.toml. A feature that is gated with #![feature(...)] but missing from this list will fail to build.
When Unstable Rust Features May Be Used
Common scenarios for using unstable features:
- No alternative: Certain functionalities provided by unstable features may not have stable equivalents.
- Essential capabilities: If an unstable feature provides essential capabilities, the project may choose to
incorporate it to evaluate its suitability for long-term adoption and to provide feedback to the feature owner.
- The Patina team should carefully consider the value and risks of using the unstable feature and document these in the GitHub issue proposing its use.
Handling the Risks of Instability
Since unstable features come with the risk of API changes or possible removal, maintainers should be ready to perform the following tasks to mitigate risk:
- Monitor stability updates: When an unstable API transitions to stable, the new version of Rust provides warnings. The team should use these warnings as cues to update the codebase, aligning it with the stable API. These warnings should be addressed when updating the Rust toolchain.
- Replace code: If an unstable API is removed, the code must be promptly replaced with functionally equivalent stable code.
Unstable Feature Proposal Process
Below is the flow for introducing unstable rustc features to this codebase. You can review each step in the sections below. Please note that if you propose the usage of an unstable rustc feature, you become responsible for the entire process outlined below.
---
config:
  layout: elk
  look: handDrawn
---
flowchart LR
    A["Create a <br> Tracking Issue"] --> B["Create RFC"]
    B --> C{"Accepted?"}
    C -- Yes --> D["Create and Merge <br> Implementation"]
    D --> E["Stabilize or Remove <br> Feature"]
    E --> Z["Close Tracking Issue"]
    C -- No --> Z
Create a Tracking Issue
The first step to the unstable rustc feature usage proposal process is to create a tracking issue in patina using the rustc feature gate issue template. This will provide some general information regarding the proposal, but most importantly, it will always reflect the current status of the feature usage.
The tracking issue should be updated at each step in this processes. It should remain open throughout this entire process and should only to be closed if the RFC proposal is rejected, or the usage of the unstable rustc feature is removed (either by stabilization, or due to using an alternative).
Create the RFC
The next step is to create the RFC. This will expand on the general information provided in the tracking issue, including more in-depth reasoning as to why usage of this feature is needed. Ensure that the following information is provided:
- Tracking Issue: A link to the GitHub tracking issue for the feature.
- Feature Name: The unstable feature name.
- Reason: The reason for using the unstable feature.
- Alternatives: What else could be used instead of the feature, and the tradeoffs for different choices.
- Constraints: Any scenarios in which the feature should not be used in the project.
- Risks: Any special risks the project may incur due to use of this feature.
Once created, the community will review and comment on the RFC, following the RFC process. The RFC will eventually either be accepted or denied and then merged.
Create and Merge Implementation
If the RFC is merged, it is now your responsibility to implement it's usage and create a pull-request for review. The
pull-request should reference that this is the implementation for your accepted RFC. Add the feature name to the
-Z allow-features list in every rustflags block of .cargo/config.toml. Once merged, you must continue to monitor
the stability of the feature. Notably, if any changes to the feature's API occur, you will be responsible for adjusting
the usage of the feature in the codebase.
Stabilization
The final step of the process is stabilization (or removal, either from our codebase or from rustc) of the feature. If
the feature is stabilized, then this step is short. The #![feature(...)] must be removed on the next rustc version
update in this project that includes the feature stabilization. If any final changes need to be made, they will be made
here.
Stabilization of a feature also requires an update to the workspace Cargo.toml's rust-version value. This is the
declaration of the minimum supported rust version.
The other possibility is that feature was removed from rustc, or an alternative is available that better meets the needs of the project. In this scenario, the project must update all usage of the feature to an alternative.
Finally, once all is said and done, and the #![feature(...)] has been removed, remove the feature name from the
-Z allow-features list in .cargo/config.toml and the tracking issue can be closed.
The Request For Comments (RFC) Lifecycle
Typically small to medium changes such as bugfixes, existing implementation improvements, and documentation are handled via pull requests. Depending on the size they may also have an associated github issue or discussion. These are expected to be simple changes without much controversy.
The RFC process comes into play when a particular change becomes large, introduces new features, or breaks existing interfaces. In these scenarios, the developer is expected to follow the RFC process outlined below to ensure not only proper involvement from maintainers, but also from the community as a whole. The goal is to reach a community consensus before introducing large changes as described above.
As a developer, you should use your best judgement to determine if an RFC is required or not. Maintainers have the right to ask that an RFC is created for a submitted pull-request, or an RFC is converted directly to a pull-request, depending on the proposal.
The complete RFC process is:
- Create a new branch for your RFC.
- Copy the template from
docs/src/rfc/template.mdIto a new file in thedocs/src/rfc/textdirectory named0000-<feature-name>.mdwhere0000is a placeholder until the RFC is accepted (so use0000in your PR) and<feature-name>is a short name for the feature. - Fill out the RFC template with your proposal.
- Submit a pull request (PR) with your RFC.
- The PR will be discussed, reviewed, and may be iteratively updated.
- Once there is consensus, one of the following will occur:
- If approved, the RFC will be merged and assigned an official number.
- If rejected, the RFC will be merged to the rejected directory and assigned an official number.
The RFC Life Cycle
Each RFC goes through these stages:
- Draft: The initial state when a PR is opened. The community and relevant teams provide feedback.
- Final Comment Period (FCP): Once there is rough consensus, an FCP of 7–10 days starts. During this time, final objections can be raised.
- Merged: After FCP with no blocking concerns, the RFC is merged and becomes official.
- Postponed: RFCs may be deferred due to lack of clarity, priority, or readiness.
- Rejected: With strong reasoning and community consensus, RFCs can be declined.
---
config:
  layout: elk
  look: handDrawn
---
graph TD;
    Draft --> FCP --> Merged;
    Draft --> Postponed;
    Draft --> Rejected;
Implementing and Maintaining an RFC
Once accepted:
- The implementation is tracked through linked issues or repositories.
- Any changes during implementation that deviate from the RFC must go through a follow-up RFC or an amendment process.
- An RFC can be revised in-place via a new RFC that supersedes or modifies the previous one.
Rejected RFCs
Due to community feedback, some RFCs may be rejected. In order to track these and be able to reference back to them,
these RFCs are maintained in the Patina repo as files in docs/src/rfc/rejected. Each merged RFC in Patina will have
a unique number to reference it by, whether it was merged to the text (approved) or rejected directories; that is
RFC numbers shall be unique in Patina regardless of whether the RFC was approved or rejected.
Rejected RFCs must contain a new section that summarizes the community's decision to reject the RFC. The PR remains the source of the full community discussion.
Following the rejection of an RFC, that RFC may be raised to the community again at some point in the future. In this case, a new RFC should be created that points back to the original RFC and explains what is different about the new proposal or why the original proposal is appropriate to bring back to the community.
RFC: <Title>
One paragraph description of the RFC.
Change Log
This text can be modified over time. Add a change log entry for every change made to the RFC.
- YYYY-MM-DD: Initial RFC created.
- YYYY-MM-DD: Updated RFC item (x) based on feedback from the community.
Motivation
Why are we doing this? What use cases does it support? What is the expected outcome?
Technology Background
Explain and provide references to technologies that are relevant to the proposal. In particular, an explanation of how hardware or existing technologies influence the design of the proposal. This section should be written for a technical audience and should not assume that the reader is familiar with the technology.
Goals
Succinct ordered list of the goals for this feature. It should be easy to associate design choices with goals.
Requirements
Succinct ordered list of the requirements for this feature. It should be easy to associate design choices with requirements. This does not need to be exhaustive, but should cover the most important requirements that influenced design decisions.
Unresolved Questions
- What parts of the design do you expect to resolve through the RFC process before this gets merged?
- What related issues do you consider out of scope for this RFC that could be addressed in the future independently of the solution that comes out of this RFC?
Prior Art (Existing PI C Implementation)
Briefly describe and/or link to existing documentation about the same functionality in existing code (e.g. C PI codebase). This only needs to be present if such functionality exists and it was particularly influential in the design of this RFC or this RFC deviates in a significant way from the existing implementation that feature users should be aware of.
Alternatives
- Why is this design the best in the space of possible designs?
- What other designs have been considered and what is the rationale for not choosing them?
Rust Code Design
Include diagrams, code snippets, and other design artifacts that are relevant to the proposal. All public facing APIs should be included in this section. Rationale for the interfaces chosen should be included here as relevant.
Guide-Level Explanation
Explain the proposal as if it was already included in code documentation and you were teaching it to another Rust programmer. That generally means:
- Introducing new named concepts.
- Explaining the feature largely in terms of examples.
- Explaining how Rust programmers should think about the feature, and how it should impact the way they interact with this feature. It should explain the impact as concretely as possible.
- If applicable, describe the differences between teaching this to existing firmware programmers and those learning the feature the first time in the Rust codebase.
Patina Rust and Toolchain Version Update Process
- Cadence: Update at least once per quarter. Do not jump to a new stable release the day it ships.
- Toolchain are specified in:
rust-toolchain.toml(stable channel) and therust-versionfield in each crate'sCargo.toml. - Stable selection: Pin the explicit stable release version (for example,
channel = "1.95.0") inrust-toolchain.toml. - Unstable features: The pinned stable toolchain builds the unstable feature gates Patina uses via
RUSTC_BOOTSTRAP=1, set in the[env]table of.cargo/config.toml. See Use of Unstable Rust Features in Patina. - MSRV verification: The
MSRV Checkworkflow builds the workspace against the toolchain in the[msrv]table ofrust-toolchain.toml. Keep that table in sync with therust-versionfield. - Review: Open the PR against
main, add theOpenDevicePartnership/patina-contributorsteam, and leave it open for at least three full business days.
Rust is released on a regular six week cadence. The Rust project maintains a site with dates for upcoming releases. While there is no hard requirement to update the Rust version used by Patina in a given timeframe, it is recommended to do so at least once per quarter. Updates to the latest stable version should not happen immediately after the stable version release as Patina consumers may need time to update their internal toolchains to migrate to the latest stable version.
A pull request that updates the Rust version should always be created against the main branch. The pull request should
include the OpenDevicePartnership/patina-contributors team as reviewers and remain open for at least three full
business days to ensure that stakeholders have an opportunity to review and provide feedback.
Updating the Minimum Supported Rust Version
The Rust toolchain used in this repo is specified in rust-toolchain.toml. The minimum supported Rust version for the
crates in the workspace is specified in the rust-version field of each crate's Cargo.toml file. When updating the
Rust toolchain version, the minimum supported Rust version should be evaluated to determine if it also needs to be
updated.
A non-exhaustive list of reasons the minimum version might need to change includes:
- An unstable feature has been stabilized and the corresponding
#![feature(...)]has been removed - A feature introduced in the release is immediately being used in the repository
If the minimum supported Rust version does need to change, please add a comment explaining why. Note that formatting and linting changes to satisfy tools like rustfmt or clippy do not alone necessitate a minimum Rust version change.
A quick way to check if the minimum supported Rust version needs to change is to keep the changes made for the new release in your workspace and then revert the Rust toolchain to the previous version. If the project fails to build, then the minimum supported Rust version needs to be updated.
Automated MSRV Verification
The minimum supported Rust version is also verified automatically by the MSRV Check workflow
(.github/workflows/msrv-check.yml). This workflow builds and tests the workspace against the toolchain declared in the
[msrv] table of rust-toolchain.toml (rather than the primary [toolchain] channel used for day-to-day development).
The [msrv] table pins the stable release that corresponds to the rust-version declared in the crates' Cargo.toml
files:
[msrv]
channel = "1.89.0"   # matches rust-version = "1.89"
The workflow runs on a daily schedule and on any pull request that modifies rust-toolchain.toml. This catches cases
where a change unintentionally relies on functionality newer than the declared minimum. When you raise the minimum
supported Rust version, update the [msrv] table's channel to the stable release that matches the new rust-version.
Choosing a Stable Version
Patina builds against a pinned stable Rust release. The small number of unstable features the project still depends on
are compiled by setting RUSTC_BOOTSTRAP=1 in the [env] table of .cargo/config.toml, which lets the stable
toolchain accept #![feature(...)] gates. See Use of Unstable Rust Features in Patina for the
feature policy and the -Z allow-features list that restricts which gates are permitted.
Pin the explicit stable release in rust-toolchain.toml:
[toolchain]
channel = "1.95.0"
Use an explicit version rather than the floating stable channel so builds stay reproducible and each toolchain move is
an intentional, reviewable change. Available stable releases are listed on releases.rs
and the Rust release schedule.
Writing Tests
One of the benefits of Rust is that testing is "baked-in" and made easy. There is extensive documentation regarding testing in Rust, so if you are unfamiliar with Rust testing, start with the official documentation and return here for project-specific details.
Testing in Rust can be broken up into four core categories:
- Unit Testing: The developer has access to the internal, private state of the module to ensure the internals work as expected.
- Integration Testing: Tests are written outside of the module and test the code from an external interface standpoint.
- Platform Testing: Tests that run on the platform, physical or virtual.
- Doc Testing: Code snippets in inline
documentation can be compiled and executed. See
- See also: Rust Documentation Tests.
In addition, pull requests are automatically validated on QEMU virtual platforms to catch integration regressions before merge. See QEMU PR Validation for details.
For more, see Rust Book: Testing.
Choosing a Testing Strategy
When writing tests, consider the following questions to help choose a testing strategy:
- What am I trying to test?
- Internal logic -> Unit tests (nearly all logic should have associated unit tests)
- Public interfaces -> Integration tests
- Platform-specific behavior -> Platform tests
- What level of isolation do I need?
- Unit tests provide isolation from other modules, while integration tests may involve multiple modules working together.
- Platform tests may require specific hardware or software environments or test scenarios under actual platform conditions.
- What dependencies are involved?
- Unit tests focus on the exact unit being tested and may need to make extensive use of mocks and stubs.
- Integration tests may also need extensive mocks and stubs but use these to test more complex scenarios between different modules with the emphasis on those interactions.
- How Simple Should Debugging Be?
- Unit tests are generally easier to debug due to their isolation and execution as a host-based application.
- Integration tests serve a similar role allowing complex interactions to be tested and debugged in a fast and accessible host environment.
- Platform tests can be the most challenging to debug due to the involvement of hardware or specific platform
conditions.
- The patina_debugger crate can help with source debugging platform tests.
Ideally, code should be built utilizing all available strategies. Unit and integration tests are very fast and run frequently during development, so they assist with verifying basic functionality, are especially useful for finding regressions during development, and support a rich debug environment with minimal setup to execute the test on a host system.
Unit and integration tests greatly improve the overall agility of code changes and refactoring. Code design should consider testability from the start so the code being written can be exercised with maximum effectiveness on the host system. This might include writing small functions so they are easier to test and accounting for dependency conditions via test doubles (e.g. mocking) that would exercise cases very difficult or time consuming to reproduce on real hardware.
Platform tests, while slower and more complex to set up, are essential for validating code behavior in real-world scenarios. They help ensure that the code works correctly on the target platform, accounting for hardware-specific behavior and performance impact under actual operating conditions. Platform tests are typically run less frequently, as they necessitate integrating the Patina library code into a platform binary and executing that binary on a platform.
Patina builds a DXE Core binary for the QEMU virtual platform in the patina-dxe-core-qemu repository. This build can then be used to run platform tests on QEMU in the patina-qemu repository.
Development Dependencies
Rust supports dev-dependencies in a crate's Cargo.toml file. These dependencies are only used for writing and
running tests, and are only downloaded and compiled for test execution. One common example is pretty_assertions,
which extends standard assertions to create a colorful diff.
Benchmarks
Benchmarking is another way to write tests. Instead of caring about code passing for failing certain requirements, you are instead investigating the performance of certain regions of code. Patina uses the criterion crate for benchmarking, so one should follow its documentation when writing benchmarks. Multiple crates (including the patina and patina_internal_core crates) also have some benchmark examples to follow.
Benchmark results are shown on the command line, but graphics are available in the target/criterion folder.
Note: Benchmarks are not run during testing, nor is performance data tracked over time. Benchmarks are there purely to help developers track local performance changes when making changes during the development lifecycle.
Code Coverage
Unit tests and code coverage are an important aspect of our project. It is a simple-to-consume statistic that gives us some limited confidence in the reliability of newly added code. Even more importantly is that it gives us some peace of mind that future changes will not cause unexpected regressions or breaking changes, as unit tests that exist to uphold certain interface expectations would begin to fail.
Needing to change a test's output expectation is a good indication that your change will either impact functionality or be a breaking change. Any submitted PR should be marked as such.
Patina's goal is to keep code coverage over 80%. This gives some leniency for code that cannot be tested (e.g. a error
return after a debug assert), or code that does not need to be tested (e.g. Debug implementations, wrappers, etc).
If the code is testable, it should have tests. Importantly, however, unit tests should not be written with the intent
to satisfy the 80% rule. They should be written to meaningfully cover critical logic and edge cases.
Having a hard target of code coverage (e.g. 80%) can lead to tests being written purely to bump up code coverage. If
this is happening, consider disabling code coverage for that section of code (#[coverage(off)]) with valid
justification as to why no code coverage is needed.
We use cargo-llvm-cov as our code coverage reporting tool, as it works well with Windows and Linux, and can generate different report types. All of our repositories have CI that calculates and uploads code coverage results to codecov with an expected patch coverage of at least 80%.
Submitting a PR with less than 80% of changed code covered by tests will result in the check failing. This is a
required check in Patina that will prevent PRs from being merged. If you believe that your code is truly not suitable
to be covered with a unit test, then you can use the #[coverage(off)] attribute to disable coverage for that code
section. Provide justification in the PR description as to why the code cannot be tested and add a comment in the code
if it is helpful for other developers to understand why the decision was made.
The #[coverage(off)] attribute is unstable and tracked here
in Patina.
For local development, we provide a cargo make command (cargo make coverage) to generate code coverage data. This
command produces two types of output. The first is a viewable HTML report (target/coverage/html) while the second is
a lcov report (target/lcov.info) which can be easily consumed by various processing tools like
Coverage Gutters
---
config:
  layout: elk
  look: handDrawn
---
graph TD
    A[Write Tests] --> B[Run Tests]
    B --> C[Check Coverage]
    C --> D{Coverage >= 80%?}
    D -- Yes --> E[Pass CI]
    D -- No --> F[Fail CI]
Integration Testing
Integration testing is very similar to unit testing; however, each test is placed in a tests/* folder at the same
directory level as src/*. When writing tests of this type, the developer does not have access to the internal
state of the module—only the external interfaces are being tested. Cargo will detect and run these tests with
the same command as for unit tests.
See the Cargo Book entry on Integration Testing.
Here is an example file structure for a crate that contains integration tests:
├── src
│   └── main.rs
├── tests
│   ├── integration_test1.rs
│   └── integration_test2.rs
├── .gitignore
└── Cargo.toml
Note: Integration tests are ideal for verifying the public API and behavior of your crate as a whole.
Mocking
Mocking is supported through the mockall crate. This crate provides multiple
ways to mock throughout your crate, including:
Note: This documentation does not cover the specifics of each approach, as the
mockallcrate itself has extensive documentation and examples for different types of mocking.
Platform Testing
Platform testing is supported through the patina_test crate, which provides a testing framework similar to
the typical Rust testing framework. The key difference is that instead of tests being collected and executed on the
host system, they are collected and executed via a component (patina_test::component::TestRunner) provided by the
same crate. The platform must register this component with the Patina DXE Core, which will then dispatch the component
to run all registered tests.
Note: The most up-to-date documentation on the
patina_testcrate can be found on crates.io. For convenience, some high-level concepts are summarized below.
Writing On-Platform Tests
Writing a test to be run on-platform is as simple as setting the patina_test attribute on a function with the
following interface, where ... can be any number of parameters that implement the Param trait from
patina::component::*:
#![allow(unused)]
fn main() {
extern crate patina_test;
use patina_test::{error::Result, patina_test};

#[patina_test]
fn my_test(/* args */) -> Result { todo!() }
}
On-platform tests are not just for component testing; they can also be used for testing general-purpose code on a
platform. Any function tagged with #[patina_test] will be collected and executed on a platform. The test runner
can filter out tests, but you should also be conscious of when tests should run. Using cfg_attr paired with the
skip attribute is a great way to have tests ignored for reasons like host architecture or feature flags.
Note:
patina_test::error::Resultis simplycore::result::Result<(), &'static str>, and you can use that instead.
This example shows how to use the skip attribute paired with cfg_attr to skip a test.
#![allow(unused)]
fn main() {
extern crate patina_test;
extern crate patina;
use patina::boot_services::StandardBootServices;
use patina_test::{error::Result, patina_test};

#[patina_test]
#[cfg_attr(target_arch = "aarch64", skip)]
fn my_test(bs: StandardBootServices) -> Result { todo!() }
}
Next is the should_fail attribute, which allows you to specify that a test should fail. It can also specify the
expected failure message.
#![allow(unused)]
fn main() {
extern crate patina_test;
use patina_test::{error::Result, patina_test};

#[patina_test]
#[should_fail]
fn my_test1() -> Result { todo!() }

#[patina_test]
#[should_fail = "Failed for this reason"]
fn my_test2() -> Result { todo!() }
}
Test Triggers
There are three supported trigger types for patina_test tests.
Immediate
These tests are executed immediately on the TestRunner component being dispatched. They are only executed once. This
is the default trigger.
Event
These tests are triggered when a given event group GUID is signalled. A separate on attribute is used to indicate
this, e.g.:
#![allow(unused)]
fn main() {
extern crate patina;
extern crate patina_test;
use patina_test::{error::Result, patina_test};

#[patina_test]
#[on(event = patina::guids::EVENT_GROUP_END_OF_DXE)]
fn my_test() -> Result { todo!() }
}
These tests will be executed every time the event group is signalled.
Timer
These tests are executed every specified time interval (in units of 100ns, i.e. timer ticks). The on attribute is
also used to indicate this, e.g.:
#![allow(unused)]
fn main() {
extern crate patina_test;
use patina_test::{error::Result, patina_test};

#[patina_test]
#[on(timer = 1_000_000)] // run every 100 ms
fn my_test() -> Result { todo!() }
}
These tests will continue to execute after the specified time interval for the length of UEFI boot.
Running On-Platform Tests
Running all these tests on a platform is as easy as instantiating the test runner component and registering it with the Patina DXE Core:
#![allow(unused)]
fn main() {
extern crate patina_test;
extern crate patina_dxe_core;
use patina_test::component::TestRunner;
use patina_dxe_core::*;

struct ExamplePlatform;

impl ComponentInfo for ExamplePlatform {
    fn components(mut add: Add<Component>) {
        add.component(TestRunner::default());
    }
}
}
This will execute all tests marked with the patina_test attribute across all crates used to compile this binary.
Due to this fact, we have some configuration options with the test component. The most important customization is
the with_filter function, which allows you to filter down the tests to run. The logic behind this is similar to
the filtering provided by cargo test. That is to say, if you pass it a filter of X64, it will only run tests
with X64 in their name. The function name is <module_path>::<name>. You can call with_filter multiple times.
The next customization is debug_mode which enables logging during test execution (false by default). The final
customization is fail_fast which will immediately exit the test harness as soon as a single test fails (false by
default). These two customizations can only be called once. Subsequent calls will overwrite the previous value.
#![allow(unused)]
fn main() {
extern crate patina_test;
extern crate patina_dxe_core;
use patina_test::component::TestRunner;
use patina_dxe_core::*;

struct ExamplePlatform;

impl ComponentInfo for ExamplePlatform {
    fn components(mut add: Add<Component>) {
        add.component(TestRunner::default()
            .debug_mode(true)
        );
    }
}
}
---
config:
  layout: elk
  look: handDrawn
---
graph TD
    A[Register TestRunner Component] --> B[DXE Core Dispatches TestRunner]
    B --> C[Collect and Run Tests]
    C --> D[Report Results]
QEMU PR Validation
Pull requests to the patina repository are automatically validated against QEMU-based virtual machine platforms to
ensure that incoming Rust changes compile and boot correctly on supported targets. This workflow runs after CI completes
and posts the results directly to the pull request as a comment.
This documentation is intended for those more interested in the details behind this process. Otherwise, you do not need to understand the inner workings of the workflow, it simply runs automatically on every PR and provides feedback in a PR comment.
Overview
Patina repositories are designed to optimize the developer experience. While the QEMU PR validation workflow directly supports this goal by providing boot results on every push to a Patina pull request, this capability is enabled by leveraging the existing developer facilities available across Patina repositories.
Dependencies
The workflow relies on several repositories and components:
- patina — The main Patina development repository.
- Contains the lightweight caller workflow files that trigger QEMU validation on pull requests.
- Depends on: GitHub workflow files (callers), patina source code, and incoming PR changes
- patina-devops — Reusable workflows and composite actions
that implement the overall workflow and validation logic.
- Depends on: GitHub workflow files (callees) and GitHub actions
- patina-fw-patcher — Tools used to patch the Patina DXE
Core binary into the pre-compiled firmware ROM.
- Depends on: The Patina patching script (
patch.py)- Note: This script can patch a Patina binary into a firmware ROM on physical and virtual platforms to prevent rebuilding the rest of the ROM image.
- Depends on: The Patina patching script (
- patina-dxe-core-qemu — An integration repository for
building the Patina DXE Core for QEMU platforms, combining Patina code with platform customizations.
- Relevant Inputs: Rust library crates (such as the
patinacrate), platform customizations, and build configuration. - Relevant Output: Patina DXE Core EFI binaries built for QEMU platforms.
- Depends on: The
patina-dxe-core-qemusource code
- Relevant Inputs: Rust library crates (such as the
- patina-qemu — Hosts the actual UEFI firmware code that is
built into a ROM image and run as the firmware on QEMU virtual machines.
- Relevant Inputs: Patina DXE Core EFI binary and QEMU platform UEFI code.
- Relevant Output: Firmware ROM binaries built with the Patina DXE Core that can be booted on QEMU.
- Depends on: The latest ROM image made available as release asset in
patina-qemuGitHub releases
Supported Platforms
| Platform | Host Operating System | Architecture |
|---|---|---|
| Q35 | Linux | x86_64 |
| SBSA | Linux | aarch64 |
| Q35 | Windows | x86_64 |
At any given time, a subset of these platforms may be disabled due to known issues or maintenance work. The PR comment will indicate which platforms were actually validated on each run.
Workflow Lifecycle
The QEMU PR validation workflow builds the patina-dxe-core-qemu integration repository with the PR's changes patched in, then boots the resulting firmware on QEMU for each supported platform and operating system combination. Results are posted back to the PR as a single comment that is updated on each subsequent push.
The workflow maintains a state machine to track the progress and outcome of each run. Those states are reflected in the comments posted in the pull request. The main states include:
-
Transient states:
- Pending — The workflow is waiting for CI to complete. This state is set immediately when a PR is opened or updated. If CI fails, the workflow will not leave this state as no further validation will be attempted.
- In Progress — The workflow has started running on the latest commit.
-
Terminal states:
- Preflight results:
- Version Mismatch — The major version of
patinain the PR does not match the major version currently used inpatina-dxe-core-qemu. The integration repository must be updated before validation can run. Any patina member that sees this state, should update thepatina-dxe-core-qemurepository to depend on the new major version. - Assets Not Ready — The latest
patina-qemurelease does not yet have the firmware ROM assets available. This can occur immediately after a newpatina-qemurelease is created and assets are still being uploaded. Any patina member that sees this state, should verify that the latestpatina-qemurelease is in progress and wait for it to complete before rerunning the workflow.
- Version Mismatch — The major version of
- Build and runtime results:
- Success — The firmware built and booted successfully on all validated platforms.
- Build Failure — The firmware failed to build for at least one platform. The comment includes details about
which platforms failed and links to the build logs.
- It is possible that a
patinaPR has changes that will break thepatina-dxe-core-qemubuild. In this case, a repository admin or PR reviewer can override the status check to allow the PR to merge. A note in the comment posted also provides this guidance. The integration repository should be updated as soon as possible to restore validation for future PRs.
- It is possible that a
- Runtime Failure — The firmware built successfully but failed to boot on at least one platform. The comment includes details about which platforms failed and links to the execution logs.
- Preflight results:
flowchart TD
    A["PR opened / updated"] --> B["Pending Notification"]
    B --> C["CI Workflow"]
    C -->|CI fails| Z["No QEMU validation"]
    C -->|CI succeeds| D["QEMU PR Validation"]
    D --> E["Preflight Checks"]
    E -->|Version mismatch| F["Post mismatch comment"]
    E -->|Assets not ready| G["Post assets-not-ready comment"]
    E -->|Ready| H["Build & Run on QEMU"]
    H --> I["Emit PR Metadata (Transfer State)"]
    I --> J["Post-Processing Workflow"]
    J --> K["Post results comment on PR"]
Phase 1: Pending Notification
When a pull request is opened, synchronized, or reopened, a lightweight workflow immediately posts (or updates) a comment on the PR indicating that QEMU validation is pending. This prevents stale results from a previous push from being visible while CI is still running.
Phase 2: CI Gate
QEMU validation only runs after the CI workflow completes successfully. If CI fails, QEMU validation is skipped entirely. This avoids wasting compute resources on code that does not pass basic checks.
Phase 3: QEMU PR Validation
This is the main workflow. It is triggered after CI succeeds for a pull request. Concurrent runs for the same PR branch are automatically cancelled so only the latest push is validated.
The workflow is organized into the following jobs:
flowchart TD
    N["Post In-Progress Notification Comment"] --> P["Preflight Checks"]
    P -->|Ready| L["Validate QEMU (Linux): Q35 + SBSA"]
    P -->|Ready| W["Validate QEMU (Windows): Q35"]
    L --> M["Emit PR Metadata (Transfer State)"]
    W --> M
    M --> Post["Post-Processing Workflow"]
The Linux and Windows jobs run in parallel. Additionally, a matrix is used within the Linux job to further parallelize validation across the Q35 and SBSA platforms.
While full support is available for building and running on Linux and Windows hosts, there is not a significant advantage for doing so from a Patina firmware validation perspective. It may be decided to focus on Linux hosts in the future to reduce maintenance overhead, however, the code for both should always be kept up to date and runnable to preserve the option for Windows validation in the future if desired.
In-Progress Notification
The existing PR comment is updated to indicate that a QEMU validation run has started. It is noted in the comment that previous results are preserved in the comment's edit history.
Preflight Checks
Before building or running anything, the preflight job verifies that the environment is ready:
-
Version compatibility — The major version of the
patinacrate in the PR is compared against the major version expected bypatina-dxe-core-qemu. If there is a major version mismatch, validation cannot proceed and a comment is posted explaining the situation. -
Firmware asset availability — Pre-compiled firmware binaries are published as release assets in patina-qemu. The preflight job confirms that firmware zip files for all platforms exist in the latest release. If they are still being uploaded (e.g., immediately after a new release is created), validation is deferred. This is needed because the workflow only patches the PR's Patina DXE Core into existing patina-qemu releases, it does not rebuild the rest of the firmware image.
-
Caching — The GitHub cache is used to reduce GitHub API callouts across runs. Cache keys are derived from release tags and commit hashes so they automatically invalidate when upstream repositories change.
Platform Validation
Once preflight checks pass, parallel jobs build and run the firmware on each platform/OS combination.
Each validation job performs the following steps:
- Checkout the
patinarepository at the PR's head commit. - Clone dependencies —
patina-dxe-core-qemu,patina-fw-patcher, andpatina-qemuare cloned and set up.- Note:
patina-qemuis sparse cloned to only fetch the firmware assets and build script, skipping the full QEMU source code to save time and space.
- Note:
- Build —
patina-dxe-core-qemuis built with a crate patch pointing to the PR'spatinasource. This replaces the releasedpatinacrate with the PR's version so the build and execution include the proposed changes. - Download firmware — Pre-compiled firmware ROM files are downloaded from the latest
patina-qemurelease (cached when possible). - Run QEMU — The firmware is booted on QEMU in headless mode. QEMU is configured to shut down after the boot
completes so the job can verify that the boot succeeded.
- Currently, only boot to EFI shell is verified in this workflow.
- Upload logs — Build and execution logs are uploaded as workflow artifacts.
The build and run phases are separated so that build failures and runtime failures can be clearly distinguished in the results.
Metadata Emission
After all platform validation jobs complete (regardless of success or failure), a final job collects the outcomes from each job and writes a metadata JSON artifact. This artifact is consumed by the post-processing workflow. This step simply exists to transfer data in a clean, auditable way between workflows.
Phase 4: Post-Processing
The post-processing workflow is triggered after the QEMU PR Validation workflow completes. This workflow downloads the metadata and log artifacts from the validation run, then posts (or updates) a comment on the PR with the results.
PR Comment Behavior
All QEMU validation feedback is consolidated into a single comment on the PR. The comment is created on the first run and updated in place on subsequent pushes. The edit history of the comment preserves results from previous runs.
The comment content varies depending on the outcome:
| Outcome | Comment Content |
|---|---|
| Pending | Indicates QEMU validation is waiting for CI to complete. |
| In Progress | Indicates a validation run has started. |
| Success | Lists all jobs as passed. Includes a boot time summary table. |
| Build Failure | Highlights which jobs had build failures. Includes extracted compiler error snippets and links to log artifacts. |
| Runtime Failure | Shows a job result table with error details extracted from execution logs. |
| Version Mismatch | Explains that patina-dxe-core-qemu needs to be updated for the new major version. |
| Assets Not Ready | Explains that firmware binaries are not yet available in the latest patina-qemu release. |
Comment Examples
Success
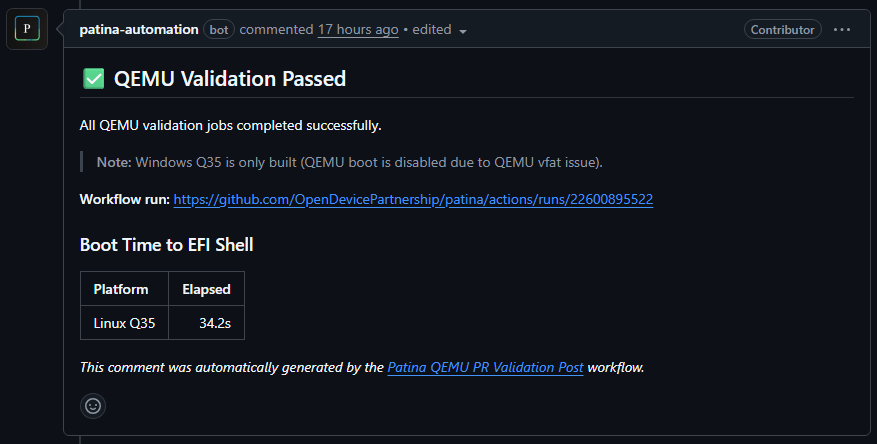
Pending
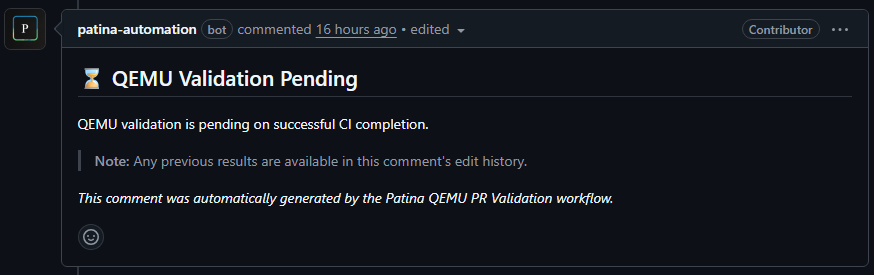
In Progress
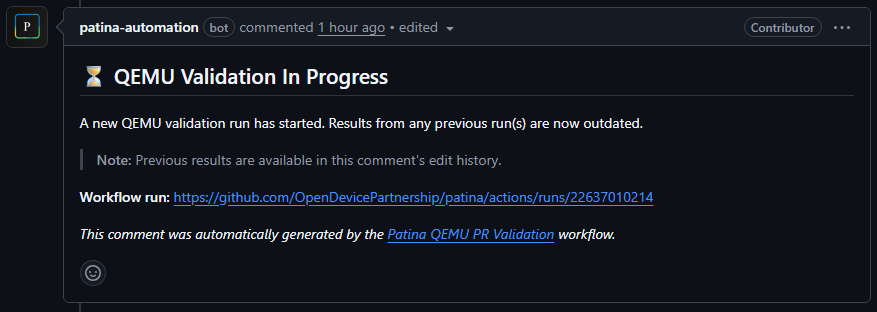
Build Failure
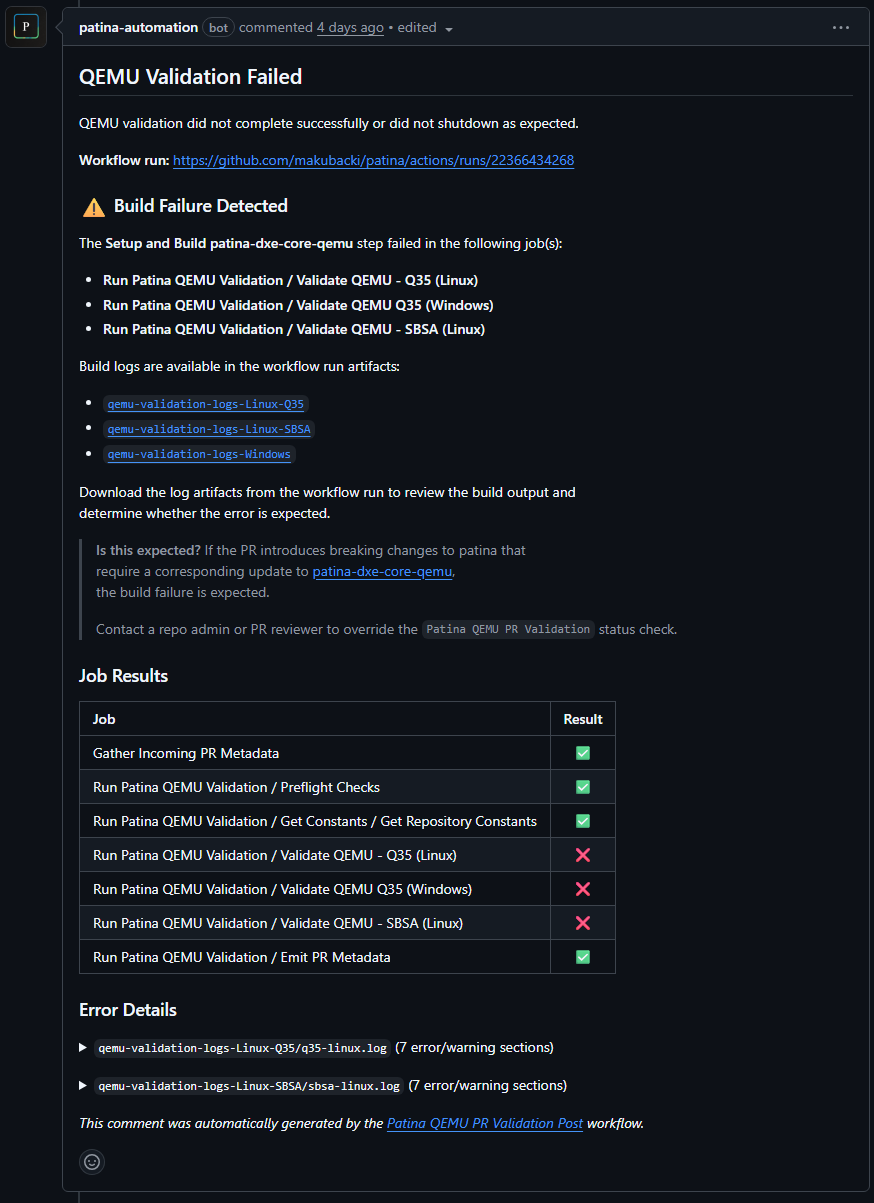
Build Failure Details
Dropping into the details of a build failure, the comment includes snippets of compiler errors extracted from the logs to help developers quickly understand the root cause without having to dig through logs. Links to the full logs are also provided for deeper investigation.
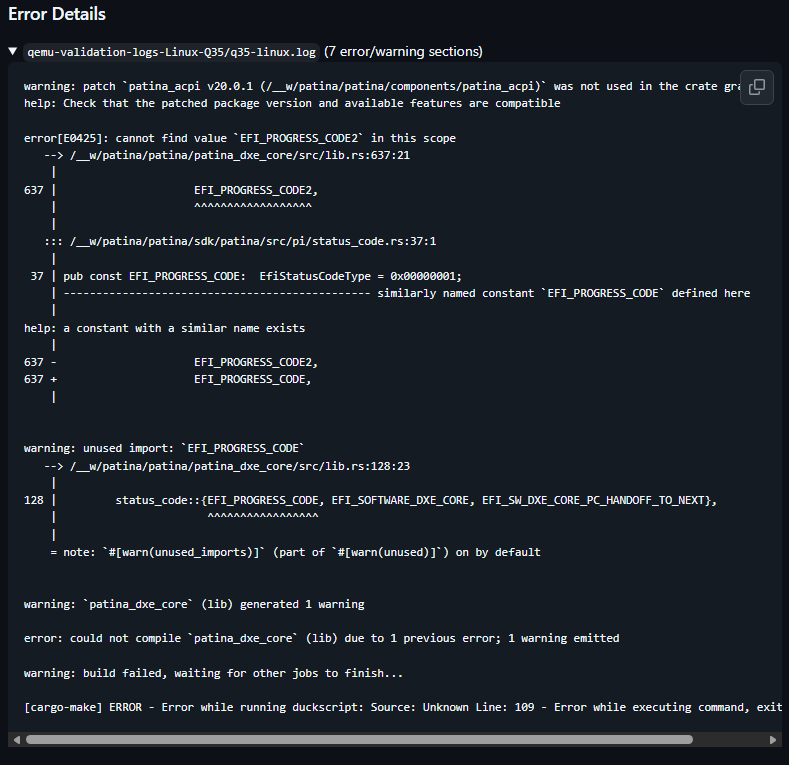
Runtime Failure
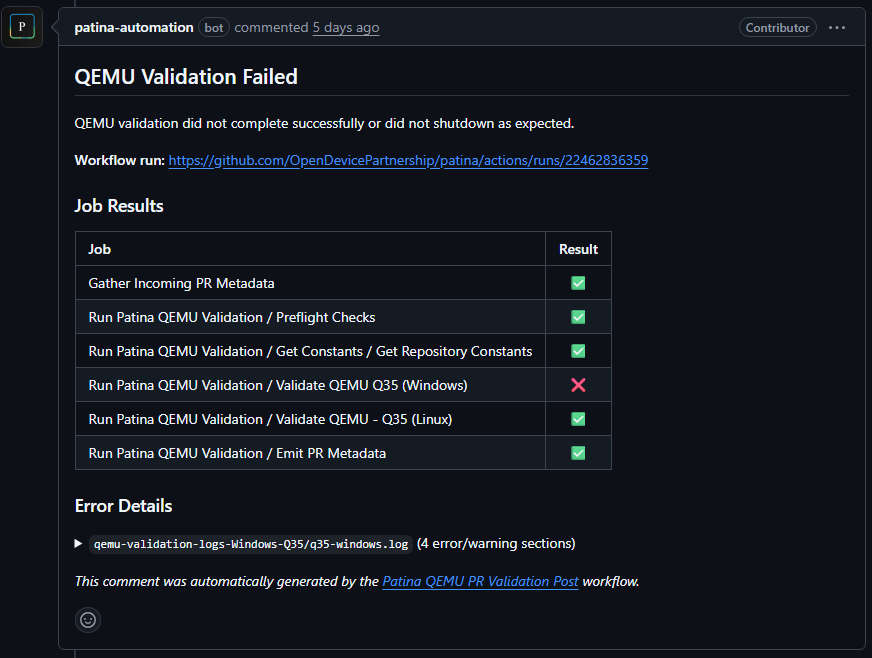
Overall Architecture
The following diagram shows the relationship between the repositories and workflows involved in the validation process.
flowchart LR
    subgraph patina ["patina repository"]
        direction TB
        W1["patina-qemu-pr-validation-pending.yml"]
        W2["patina-qemu-pr-validation.yml"]
        W3["patina-qemu-pr-validation-post.yml"]
    end

    subgraph devops ["patina-devops repository"]
        direction TB
        RW1["PatinaQemuPrValidationPending.yml"]
        RW2["PatinaQemuPrValidation.yml"]
        RW3["PatinaQemuPrValidationPost.yml"]
        A1["setup-patina-qemu-validation"]
        A2["run-patina-qemu-validation"]
        A3["extract-build-errors"]
    end

    subgraph deps ["Dependency Repositories"]
        direction TB
        DXE["patina-dxe-core-qemu"]
        QEMU["patina-qemu"]
        FW["patina-fw-patcher"]
    end

    W1 -->|"calls"| RW1
    W2 -->|"calls"| RW2
    W3 -->|"calls"| RW3

    RW2 -->|"uses"| A1
    RW2 -->|"uses"| A2
    RW3 -->|"uses"| A3

    A1 -->|"clones & builds"| DXE
    A1 -->|"clones"| FW
    A1 -->|"sparse clones"| QEMU
    A2 -->|"downloads firmware"| QEMU
There are a few reasons why the workflow is separated this way:
- Triggers - The initial workflow files in the
patinarepository are responsible for responding to GitHub events (e.g., PR opened, PR updated). These events are only available to workflows that reside in that repo. - Secrets - The CI workflow runs with a
pull_requesttrigger type. This trigger type does not have access to secrets for PRs from forks by default. However, the QEMU validation workflow needs access to secrets to make authenticated GitHub API calls and write access to post comments. The trigger for these workflows is configured to separate responsibilities from the CI workflow and allow secrets in a workflow that is independent of the initial PR event trigger. - Dependencies - Workflows depend on actions. Having workflow logic in
patina-devopsmeans those actions do not have to be duplicated across repositories that might share a workflow/action with other repositories. It also means updates to those actions are consolidated in one repo focused on devops and don't thrash the review focus and history of other repos.
Handling Expected Failures
There are cases where a QEMU validation failure is expected:
-
Breaking changes — If a PR introduces breaking API changes to
patinathat require a corresponding update topatina-dxe-core-qemu, the build step will fail because the integration repository has not yet been updated. In this case, a repository admin or PR reviewer can override the status check. -
Major version bumps — If the major version of
patinain the PR does not match whatpatina-dxe-core-qemuexpects, the preflight check will fail and report the mismatch. The integration repository must be updated before QEMU validation can run.
Troubleshooting
Viewing Full Logs
Build and execution logs are uploaded as workflow artifacts on every run. To access them:
- Navigate to the workflow run linked in the PR comment.
- Scroll to the Artifacts section at the bottom of the run summary.
- Download the
qemu-validation-logs-*artifacts for the relevant platform.
Unit Testing
As mentioned in Testing, unit tests are written in the same file as the code being tested. Tests
are placed in a conditionally compiled sub-module, and each test should be tagged with #[test].
#![allow(unused)]
fn main() {
#![feature(coverage_attribute)]
#[cfg(test)]
#[coverage(off)]
mod tests {
    #[test]
    fn test_my_functionality() {
        assert!(true);
    }
}
}
Since this conditionally compiled module is a sub-module of the module you are writing, it has access to all private data in the module, allowing you to test public and private functions, modules, state, etc.
Unit Testing and UEFI
Due to the nature of UEFI, there tend to be a large number of statics that exist for the lifetime of execution (such as the GCD in the Patina DXE Core). This can make unit testing complex, as unit tests run in parallel, but if there exists some global static, it will be touched and manipulated by multiple tests, which can lead to deadlocks or the static data being in a state that the current test is not expecting. You can choose any pattern to combat this, but the most common is to create a global test lock.
Global Test Lock
The easiest way to control test execution—allowing parallel execution for tests that do not require global state, while forcing all others to run one-by-one—is to create a global state lock. The flow is: acquire the global state lock, reset global state, then run the test. It is up to the test writer to reset the state for the test. Here is a typical example used in the Patina DXE Core:
#![allow(unused)]
fn main() {
#![feature(coverage_attribute)]
#[coverage(off)]
mod test_support {
    static GLOBAL_STATE_TEST_LOCK: std::sync::Mutex<()> = std::sync::Mutex::new(());

    pub fn with_global_lock(f: impl Fn()) {
        let _guard = GLOBAL_STATE_TEST_LOCK.lock().unwrap();
        f();
    }
}

#[cfg(test)]
#[coverage(off)]
mod tests {
    use test_support::with_global_lock;
    fn with_reset_state(f: impl Fn()) {
        with_global_lock(|| {
            // Reset the necessary global state here
            f();
        });
    }

    #[test]
    fn run_my_test() {
        with_reset_state(|| {
            // Test code here
        });
    }
}
}
---
config:
  layout: elk
  look: handDrawn
---
graph TD
    A[Acquire Global Test Lock] --> B[Reset Global State]
    B --> C[Run Test]
    C --> D[Release Lock]
Address Sanitizer (ASan)
When running unit tests, you can enable Address Sanitizer (ASan) to help detect memory errors. This is available on Linux and Windows X64 hosts.
To run unit tests with Address Sanitizer enabled, use the following command:
cargo make test-asan
Advanced Usage: Debugging ASan Test Executables Directly
On Windows, the tests executables built with ASan enabled have a dependency on the ASan DLL, which is not in the system
path by default. The test-asan task discovers the ASan DLL path on your system and sets it in the environment when
running tests, but if you want to run the test executable directly, you will need to set the environment variable
yourself.
You can find the ASan DLL path by running:
cargo make test-asan --print-dll-path
This will include surrounding cargo make output. You can script the call to just get the path to facilitate setting
the environment variable.
For example, in PowerShell:
$asanPath = (cargo make test-asan --print-dll-path) -match '^[A-Z]:\\' | Select-Object -Last 1
$env:PATH = "$asanPath;$env:PATH"
Toolchain Configuration
Patina relies on platform bin repos copying its .cargo/config.toml to properly set toolchain configuration. This
document focuses on the process to update and maintain Patina's toolchain configuration.
Background
Patina must recommend a set of toolchain configuration options for platforms to use to have the best experience. With
different options, various features may not work as intended (e.g. if -C force-unwind-tables is not used, the
stack walk in a debugger will be truncated), performance or binary size may be worse, or failures could occur.
EDK II achieves this same goal by maintaining custom build tools. One of Patina's philosophies is to use existing
tools wherever possible. In pursuit of this goal, Patina has a .cargo/config.toml file that is used when building
Patina in CI. It is recommended that platforms
copy this .cargo/config.toml to match Patina's toolchain configuration exactly. Patina enforces the same version
is being used in a build.rs file.
Note: Platforms still have the flexibility to change toolchain configuration as needed in this setup, they just need to ensure the config version is the same as what Patina is expecting. Platforms choosing to diverge from the known good Patina config accept the risk of unexpected behavior stemming from these modifications.
Updating Configuration
There are some simple rules that must be followed when updating Patina's configuration.
- Consider the change. Is is appropriate for all platforms? All architectures?
- Add (or remove) the configuration option to
patina/.cargo/config.toml. See the rules. - Add a comment (multiline okay) above the option describing what this option does and why.
- Increase
PATINA_CONFIG_VERSIONby one. All config updates, no matter how trivial, must update the version. - Update the
PATINA_CONFIG_VERSIONdefined inpatina/patina_dxe_core/build.rsby one. This must match thePATINA_CONFIG_VERSIONupdated in step 4.
Configuration Adding Rules
The following is a set of rules to follow when adding new toolchain configuration options.
Prefer Cargo Options
Per Rust documentation all RUSTFLAGS that
Cargo itself manages in profile settings (e.g. lto, debug, etc.) should be set in the relevant profile
section, not directly in RUSTFLAGS. See the profile docs
for which settings are managed there.
Put RUSTFLAGS in target.<triple>.rustflags Section
Per Rust documentation, there are four mutually exclusive ways to pass RUSTFLAGS:
1. CARGO_ENCODED_RUSTFLAGS environment variable.
2. RUSTFLAGS environment variable.
3. All matching target.<triple>.rustflags and target.<cfg>.rustflags config entries joined together.
4. build.rustflags config value.
Patina only uses the third option. We do not directly set environment variables as this is brittle and can conflict
with many different scenarios. We prefer using the target triple sections because they have precedence over general
[Build] sections. Do not put RUSTFLAGS in a [Build] section, it will be unused.
Component Crate Requirements
Cargo crates are used to bundle like-minded functionality together; this concept also extends to Patina components.
It is common for a "feature" or "bundle" of functionality to utilize multiple components, configurations, services, etc. to fully define certain functionality while keeping the different areas of concern segregated. The Patina team found that due to this complexity, these features can become confusing / burdensome for platforms to integrate, because each feature had its own crate layout which can be difficult to navigate if not documented properly. Due to this, the Patina team introduced RFC #9 to partially standardize a Patina component crate's layout, providing consistency, predictability, and cleanliness for any Patina component crates that a platform may consume.
---
config:
  layout: elk
  look: handDrawn
---
graph TD
    A[Feature/Bundle] --> B[Multiple Components]
    A --> C[Configurations]
    A --> D[Services]
    B --> E[Standardized Crate Layout]
    C --> E
    D --> E
    E --> F[Platform Integration]
    F --> G[Easier Navigation]
    F --> H[Better Documentation]
    F --> I[Consistent Structure]
Documentation
Patina requires that all public modules, types, traits, etc. must be documented at a minimum. Documentation must meet the same requirements as specified in Documenting. It is suggested that you set the docs lint missing_docs to error.
---
config:
  layout: elk
  look: handDrawn
---
graph LR
    A[Public Module] --> B[Documentation Required]
    C[Public Type] --> B
    D[Public Trait] --> B
    B --> E[Meets Documenting Standards]
    E --> F[missing_docs Lint]
    F --> G[Error Level Recommended]
Naming Standards
Crate naming
It is required that any Patina-owned and maintained crate published to crates.io (or other registry) that produces one
or more components must be prefixed with patina_ to allow them to be easily identifiable and locatable via normal
searches. Should you maintain crates not meant for public consumption, they should be prefixed with patina_internal_.
The one exception are macro crates, which should contain a suffix of _macro instead
(e.g. patina_my_crate and patina_my_crate_macro).
Crates owned and maintained by other entities should not prefix their crate with patina_, but should, at a minimum,
add patina to the list of keywords for their crate in the Cargo.toml file.
[package]
keywords = ["patina"]
---
config:
  layout: elk
  look: handDrawn
---
graph TD
    A[Patina-owned Crates] --> B[patina_ prefix]
    A --> C[Public Registry]
    D[Internal Crates] --> E[patina_internal_ prefix]
    F[Macro Crates] --> G[_macro suffix]
    H[Third-party Crates] --> I[No patina_ prefix]
    H --> J[Add 'patina' keyword]
    B --> K[Easy Identification]
    E --> K
    G --> K
    J --> K
Test Naming
Test naming should be prefixed depending on what is being tested, to allow for easy filtering of tests on the platform.
If testing a component, the test name should be prefixed with test_<component_name>_. If testing a service interface,
the test name should be prefixed with test_<service_name>_. In both cases, CamelCase should be converted to snake_case.
Additionally, if the specific functionality being tested is architecture specific, the cfg_attr attribute should
be used as seen below:
#![allow(unused)]
fn main() {
extern crate patina;
extern crate patina_test;
use patina::{
   error::Result,
   component::component,
};
use patina_test::patina_test;

pub struct MyComponent(u32);

#[component]
impl MyComponent {
   fn entry_point(self) -> Result<()> {
      Ok(())
   }
}

trait MyService {
   fn do_something(&self) -> u32;
}

#[patina_test]
fn test_my_component_name_for_test() -> patina_test::error::Result {
   Ok(())
}

#[patina_test]
fn test_my_service_name_for_test() -> patina_test::error::Result {
   Ok(())
}
}
Crate Layout Standards
---
config:
  layout: elk
  look: handDrawn
---
graph TD
    A[Crate Root] --> B[component module]
    A --> C[config module - optional]
    A --> D[error module - optional]
    A --> E[hob module - optional]
    A --> F[service module - optional]
    B --> G[Required - Contains components]
    C --> H[If config data needed]
    D --> I[If custom service errors]
    E --> J[If guided HOBs defined]
    F --> K[If services produced]
The below is a list of requirements for the crate, but it does not prevent additional modules from existing.
- No public definitions are accessible via the top level lib.rs (or equivalent) module, only public modules.
componentmodule: This module may optionally exist if the crate produces a component. It must contain the publicly importable component(s) for the crate.configmodule: This module may optionally exist if the component consumes configuration data that is registered with the platform via.with_configand this config is not accessible via thepatinacrate or elsewhere.errormodule: This module may optionally exist if aservicemodule is present and the public Service's interface contains custom errors.hobmodule: This module may optionally exist if a new guided HOB type has been created for this component. The HOB module and associated guided HOB(s) should be made public such that it can be consumed by others if the need arises. Any common or spec defined HOBs should be added to the associated crates (such aspatina) rather than this crate. HOBs may become a common interface and should thus be moved to the appropriate crate. If the HOB type already exists elsewhere, the crate should consume that definition instead of making their own.servicemodule: This module may optionally exist if the crate produces a service implementation that can be directly instantiated and passed to the core with the.with_servicemethod. If the service trait defintion is not accessible viapatinaor another crate, then the public defintion should also be defined in this module.
Note: Type re-exports are allowed, and can be re-exported in the same locations as would a public new type for your crate.
Below is an example repository that contains all modules defined above, and also contains submodules for each module.
src
├── component/*
├── config/*
├── hob/*
├── service/*
├── component.rs
├── config.rs
├── error.rs
├── hob.rs
├── lib.rs
├── service.rs
The lib.rs file would look similar to this:
//! Module Documentation
pub mod component;
pub mod config;
pub mod error;
pub mod hob;
pub mod service;
Monolithically Compiled Components
There is no standard entry point for a monolithically compiled component that is dispatched by the Patina DXE Core.
Where the EDK II DXE Core dispatcher expects a well-defined entry point of
EFI_HANDLE ImageHandle, EFI_SYSTEM_TABLE *SystemTable, the Patina DXE Core uses
Dependency Injection to allow a component to define an interface
that specifies all dependencies needed to properly execute. Due to this, dependency expressions are no longer
necessary, as the function interface serves as the dependency expression. What this means is that instead of evaluating
a dependency expression to determine if a driver can be executed, the system attempts to fetch all requested parameters
defined in the function interface. If all are successfully fetched, then the component is executed. If not, it will not
be dispatched, and another attempt will be made in the next iteration.
---
config:
  layout: elk
  look: handDrawn
---
graph TD
    A[Component with Dependencies] --> B{All Dependencies Available?}
    B -->|Yes| C[Execute Component]
    B -->|No| D[Skip This Iteration]
    D --> E[Try Again Next Iteration]
    C --> F[Remove from Dispatch Queue]
Defining Components
Components are defined by applying the #[component] attribute to an impl block that contains an entry_point method.
The entry_point method name is mandatory - all components must use this exact name.
The #[component] attribute automatically:
- Validates that an
entry_pointmethod exists with the required signature - Validates parameters for conflicts at compile time
- Generates the necessary trait implementations to integrate with the dispatcher
The #[component] attribute validates that component parameters don't have conflicting combinations (like duplicate
ConfigMut<T> parameters or mixing Config<T> and ConfigMut<T> for the same type). The macro also automatically
generates the necessary trait implementations for component execution.
See Samples or Examples for examples of basic components.
Developing a component is as simple as writing an entry_point method whose parameters are part of the below list of
supported parameters (which is subject to change). Always reference the Type Implementations for a complete
list, however the below information should be up to date.
Component Execution
---
config:
  layout: elk
  look: handDrawn
---
graph TD
    A[Component in Queue] --> B[Validate Parameters]
    B --> C{All Parameters Available?}
    C -->|Yes| D[Execute Component]
    C -->|No| E[Mark Failed Parameter]
    D --> F[Remove from Queue]
    E --> G[Try Next Iteration]
    G --> H{Any Components Executed?}
    H -->|Yes| I[Continue Dispatching]
    H -->|No| J[Stop Dispatcher]
    I --> A
Components are executed by validating each individual parameter (See Params below) in the component. If all parameters are validated, then the component is executed and removed from the list of components to execute. If any parameter fails to validate, then that parameter is registered as the failed param and the dispatcher will attempt to validate and execute the component in the next iteration. The dispatcher stops executing when no components have been dispatched in a single iteration.
Component Params
Writing a component is as simple as writing a function whose parameters are a part of the below list of supported
types (which is subject to change). The Param trait is the interface that the dispatcher uses to (1) validate that a
parameter is available, (2) retrieve the datum from storage, and (3) pass it to the component when executing it. Always
reference the Param trait's Type Implementations for a complete list of parameters that can be used
in the function interface of a component.
| Param | Available When | Description |
|---|---|---|
| Config<T> | After config is locked | An immutable config value that will only be available once the underlying data has been locked. |
| ConfigMut<T> | While config is unlocked | A mutable config value that will only be available while the underlying data is unlocked. |
| Hob<T> | If GUID HOB exists in HOB list | A parsed, immutable, GUID HOB (Hand-Off Block) that is automatically parsed and registered. |
| Service<T> | After service is registered | A wrapper for producing and consuming services of a particular interface, T, that is agnostic to the underlying implementation. |
| Commands | Always | A deferred command queue for registering services and configs without conflicting with other params. See Commands section. |
| Handle | After image handle is set | The DXE Core's image handle. See Handle section. |
| StandardBootServices | After boot services init | UEFI Boot Services access. See StandardBootServices section. |
| StandardRuntimeServices | After runtime services init | UEFI Runtime Services access. See StandardRuntimeServices section. |
| &Storage / &mut Storage | Always | Direct storage access. Conflicts with Config/ConfigMut params. See Storage Access section. |
| (P1, P2, ...) | When all inner params available | A Tuple where each entry implements Param. Useful when you need more parameters than the current parameter limit. |
| Option<P> | Immediately | An Option, where P implements Param. Affects each param type differently. See Option section. |
Certain combinations of parameters are invalid and will cause compile-time errors. The #[component] attribute
enforces parameter validation for pre-defined parameter types, detecting conflicts such as:
- Duplicate
ConfigMut<T>parameters with the same type T - Both
Config<T>andConfigMut<T>for the same type T &mut Storagecombined withConfig<T>orConfigMut<T>&Storagecombined withConfigMut<T>- Multiple
Commands,StandardBootServices, orStandardRuntimeServicesparameters
Config<T> / ConfigMut<T>
Config<T> and ConfigMut<T> parameters are available for a platform or a component to produce a generic configuration
value that can be consumed by any other component. A platform can produce its own values by using the Core's
.with_config method.
As mentioned above, a component can also produce a configuration value, but the flow is slightly more complex. A
component is able to set or modify a configuration value using the ConfigMut<T> parameter. These components are able
to then lock the configuration value via the lock() method. As you would guess, locking a configuration value makes
the value immutable. What this means is that from the moment lock() is called, no other component with a ConfigMut<T>
parameter (of the same T) will be executed.
From this point on, it also allows for any component with a Config<T> to be executed. What this means is that no
component with Config<T> parameters will be executed until the configuration is locked.
Executing components currently happens in two phases. We execute all components until there are no components executed in that iteration. At that point, we lock all Configs and restart component execution.
By default, all Config<T> values are locked. However if a component is registered with the Core that requests
ConfigMut<T>, the value will be unlocked at that time. This is to allow components to execute immediately if it is
known that the configuration value will never be updated.
This type comes with a mock(...) method to make unit testing simple.
Hob<T>
The Hob<T> parameter type is used to access a GUID HOB value, which is automatically parsed from the HOB list
provided to the Core during initialization. Unlike Config<T> and ConfigMut<T>, these types are not always
available. This means a component that has this parameter implemented will only be executed if the guided HOB is
found in the HOB list. Due to how HOBs work, the same GUID HOB can be provided multiple times by the platform.
Due to this, Hob<T> implements both Deref to access the first found value, or IntoIterator to iterate through
all HOB values.
This type comes with a mock(...) method to make unit testing simple.
Service<T>
A Service exists as a way to share functionality across components. Some components may consume a service while
others may produce said service. This abstracts how consumers of said Service receive it. The platform can easily
swap implementation producers with no consumer being affected. A service can come in two flavors, a concrete struct
(Service<MyStruct>) or a zero-sized trait object (Service<dyn MyInterface>). The preferred implementation is the
latter as it simplifies mocking functionality for host-based unit tests, however it does come with some drawbacks. The
two main drawbacks are (1) functionality is accessed via a v-table, causing some performance degradation, and (2) dyn
trait objects do not support generics in their function interfaces.
Service implementations can be registered in two distinct ways. If the service implementation can be directly instantiated with no other dependencies, then it can be registered directly during core instantiation with Core::with_service, which makes the service immediately available. If the service implementation does have dependencies, then a component will be used to request those dependencies, instantiate the service, and pass it to the storage with Storage::add_service.
If function generics are needed / wanted, it is suggested that most functionality be provided via a typical, mockable trait object service, with a lightweight concrete struct Service Wrapper to support generics. This allows for easy mocking of the underlying functionality, but provides an easy to use interface as seen below:
#![allow(unused)]
fn main() {
extern crate patina;
use patina::{
    error::Result,
    component::service::Service,
};

trait TraitService {
    fn write_bytes(&self, bytes: Vec<u8>) -> Result<()>;
}

struct ConcreteService {
    inner: Service<dyn TraitService>
}

impl ConcreteService {
    fn write(&self, object: impl Into<Vec<u8>>) -> Result<()> {
        self.inner.write_bytes(object.into())
    }
}
}
Each service references the same underlying static and immutable type. This means that only the &self methods are available and forces the implementor to manage their own interior mutability via some sort of locking mechanism. Each component receives their own service instance (all of which point back to the same underlying implementation), which allows them stash it for their own needs post component execution.
This type comes with a mock(...) method to make unit testing simple.
Commands
Commands is a deferred command queue that allows a component to register services and configuration values without
conflicting with other parameters like Config<T> or ConfigMut<T>. Instead of modifying Storage directly during
component execution, the changes are queued and applied after the component finishes.
#![allow(unused)]
fn main() {
extern crate patina;
use patina::{
    component::{component, params::Commands},
    error::Result,
};

struct MyServiceImpl;
use patina::component::service::IntoService;
#[derive(Debug, IntoService)]
#[service(dyn core::fmt::Debug)]
struct DebugService;

pub struct MyComponent;

#[component]
impl MyComponent {
    fn entry_point(self, mut cmds: Commands) -> Result<()> {
        cmds.add_config(42i32);
        cmds.add_service(DebugService);
        Ok(())
    }
}
}
A mock() method is available to simplify writing unit tests.
Handle
Handle provides the DXE Core's image handle for use cases when it is needed.
This handle is the DXE Core's image handle, shared across all components. It should not be used as a
DriverBindingHandle in EFI_DRIVER_BINDING_PROTOCOL, as multiple components sharing the same agent handle will
conflict with protocol open/close tracking in the UEFI driver model.
Handle implements Deref to the underlying r_efi::efi::Handle, so it can be dereferenced directly.
This type comes with a mock(...) method to make unit testing simple.
StandardBootServices
StandardBootServices provides immutable access to UEFI Boot Services functions. It is available once boot services
have been initialized. Each component receives its own cloned instance.
#![allow(unused)]
fn main() {
extern crate patina;
use patina::{
    boot_services::StandardBootServices,
    component::component,
    error::Result,
};

pub struct MyComponent;

#[component]
impl MyComponent {
    fn entry_point(self, bs: StandardBootServices) -> Result<()> {
        // Use boot services functions...
        Ok(())
    }
}
}
StandardRuntimeServices
StandardRuntimeServices provides immutable access to UEFI Runtime Services functions. It is available once runtime
services have been initialized, which typically occurs later in the boot process than boot services.
Storage Access
&Storage and &mut Storage provide direct access to the component storage. They have some conflict rules:
&Storageconflicts withConfigMut<T>and&mut Storage.&mut Storageconflicts withConfig<T>,ConfigMut<T>,&Storage, and other&mut Storageparameters.
Because of these conflicts, prefer using Commands for registering services and configs, and use the typed Config<T>
/ ConfigMut<T> / Service<T> parameters for reading values. Direct storage access is only needed for advanced use
cases.
Option<P>
Some parameters are not always available. When a parameter is not available, the component will not be executed,
either in this iteration, or overall, if the parameter is never made available. There may be a situation where your
component may be able to execute even if a particular parameter is not available. This is where the Option<P>
parameter can be used. Instead of never executing because a parameter is missing, instead it will be executed
immediately, but the Option will be None. Here is how Option affects each particular parameter type.
In all scenarios, the parameter is marked as available immediately, which may result in a component executing before
the given parameter is actually available, even if it would have been made available later in component dispatching.
| Param | Description |
|---|---|
| Option<Config<T>> | The Option will return None if the Config value is currently unlocked. Use with caution. |
| Option<ConfigMut<T>> | The Option will return None if the Config value is currently locked. Use with caution. |
| Option<Hob<T>> | The Option will return None if no guided HOB was passed to the Core. This is a good use of Option. |
| Option<Service<T>> | The Option will return None if the service has not yet been produced. Use with caution. |
Examples
Compiled Examples
The patina crate has multiple example
binaries in it's example folder that can be compiled and executed. These show implementations of common use cases and
usage models for components and their parameters.
Component Examples
#![allow(unused)]
fn main() {
extern crate patina;
use patina::{
    boot_services::StandardBootServices,
    component::{
        component,
        params::{Config, ConfigMut},
    },
    error::{EfiError, Result},
};

// Basic component with configuration
pub struct MyComponent {
    private_config: u32,
}

#[component]
impl MyComponent {
    fn entry_point(self, public_config: Config<u32>) -> Result<()> {
        if *public_config != self.private_config {
            return Err(EfiError::Unsupported)
        }
        Ok(())
    }
}

// Component that modifies configuration
pub struct MyComponent2 {
    private_config: u32,
}

#[component]
impl MyComponent2 {
    fn entry_point(self, mut public_config: ConfigMut<u32>) -> Result<()> {
        *public_config += self.private_config;
        Ok(())
    }
}
}
Getting Started with Components
Components are the mechanism used to attach additional functionality to the Patina core while keeping each piece
decoupled from the others. In a systems programming context, components are akin to drivers. Patina uses dependency
injection through each component's entry point function. The component's entry point defines what it requires before it
can run. As an example, a component whose interface is fn entry_point() -> Result<()> has no dependencies where
as a component with the interface fn entry_point(service: Service<dyn Interface>) -> Result<()> has a dependency on
the dyn Interface service being registered. The latter component will not execute until this service has been
produced.
This architecture ensures:
- Loose coupling - Components do not depend directly on each other.
- Explicit dependencies - Components declare the services or configuration they need.
- Flexibility - It does not matter who provides a service or sets a configuration, only that it is available.
- Maintainability - Each component can be developed and maintained independently.
At runtime, the dependency injection model allows the patina core to track which component provides which service(s) and identify the missing dependency that is preventing any given component from running, making it easy to determine which components are not executing and why.
When it comes to understanding components and how they interact with each other, there are three main topics that you must understand - (1) Components, (2) Configuration, and (3) Services. Each will be discussed below in broad scopes, but more details can be found in this mdbook, and in the component documentation for patina.
Components
As mentioned above, Components are a way to attach additional functionality to the core that is executed in a controlled manner based off of the component function interface. Components can be used to set configuration, create services, communicate with physical devices, and many other things. The components section of the patina goes into much more detail regarding components.
Configuration
Configuration comes in two types of flavors - public configuration and private configuration. As the name suggests, public configuration can be accessed by any executing component, and is typically set by the platform to generically configure multiple components at once. Private configuration is configuration set when registering the component with the core.
Public configuration is consumed by components by using the Config<Type> in the function interface for the component
(See Interface).
Configuration is typically set by the platform using the Core::with_config,
however each configuration type must implement Default, so configuration will always be available to components.
Private configuration is the configuration set when instantiating a component that is registered with the core using Core::with_component. Not all components will have private configuration; it depends on the component implementor and the needs of the component.
Services
Services are the mechanism in which to share functionality between components via a well-defined interface (trait) while allowing the underlying implementation to have different implementations per platform. This enables platforms to switch implementations without directly breaking any other components that depend on that functionality. Services may be registered by the core itself, by components, or by the platform via the Core::with_service during Core setup. See the Patina Service or Patina Sdk crate documentation for more information.
The core may take an optional dependency on some services. These services will be directly communicated in the inline documentation from the core and must be directly registered using Core::with_service. If not, there is no guarantee that the service will be available before the core needs it. The core must be able to operate (albeit with potentially reduced capabilities) if no services are provided via Core::with_service.
If the core requires platform-specific functionality mandatory for core operation, it will be enforced via mechanisms other than the [Core::with_service] as missing services can only be determined at runtime. Typically this will involve using an API exposed from the core that will cause a build break if a platform fails to provide the required functionality.
Services can be registered and made available to components in a few different ways. The first way is that the core itself produces some services directly, such as the Memory Manager. This is a way to expose controlled access to internal functionality. The second is that a service can be registered directly with a core using Core::with_service. This is only available for services that have no external dependencies, and can be instantiated directly. Finally, a component can register a service by using Storage::add_service, which is used when a service has a dependency, be it another service, configuration, or something else.
Patina DXE Core Requirements Platform Checklist
| ✅ | Requirement | Summary | Details |
|---|---|---|---|
| [ ] | 1.1 Standalone MM is Used | Traditional SMM and combined SMM/DXE modules aren’t supported, use Standalone MM instead. SMM-specific file types/DEPEX aren’t dispatched/evaluated. | No Traditional SMM |
| [ ] | 1.2 A Priori Driver Dispatch Is Not Used | Remove A Priori sections. Patina dispatches in FFS listed order. Use DEPEX (optionally with empty/stub protocols) to control dependencies. | A Priori Driver Dispatch Is Not Allowed |
| [ ] | 1.3 All DXE Dispatchable Modules Have Page Aligned Sections | All DXE images (including C-based drivers) must have ≥ 4 KB section alignment. ARM64 DXE_RUNTIME_DRIVER images must use 64 KB. Set linker flags accordingly (e.g., /ALIGN:0x1000 or -z common-page-size=0x1000). | Driver Section Alignment |
| [ ] | 1.4 CpuDxe is Removed From the Flash File | CPU Arch & memory-attribute protocols are owned by Patina Core. Don’t include CpuDxe (and on ARM64, don’t include ArmGicDxe). Use a separate MP Services driver (e.g., MpDxe on x64). | CpuDxe Is No Longer Used |
| [ ] | 2.1 Resource Descriptor HOB v2 is Used | Use Resource Descriptor HOB v2 (with exactly one valid cacheability attribute). v1 is ignored. Allowed: UC, WC, WT, WB, WP. UCE is prohibited. | Resource Descriptor HOB v2 |
| [ ] | 2.2 All MMIO & Reserved Regions Are Described | Provide v2 Resource Descriptor HOBs for all memory resources, including MMIO and reserved regions. | MMIO & Reserved Regions |
| [ ] | 2.3 No Overlap in HOB Reported Resources | There must be no overlaps between Resource Descriptor HOB v2 entries. Split or remove duplicates so each address range is described by exactly one HOB. | Overlapping HOBs Prohibited |
| [ ] | 2.4 Page 0 is Not Allocated | Do not allocate page 0. Patina unmaps it to catch null dereferences. | No Memory Allocation HOB for Page 0 |
| [ ] | 3.1 No Memory Allocations/Deallocations After Exit Boot Servicesd | After ExitBootServices(), the memory map must not change. Ensure all alloc/free happens before EBS callbacks. | EBS Allocations Not Allowed |
| [ ] | 3.2 All DXE Code Used in the Platform Supports Native Address Width | Patina allocates top‑down, so addresses may be >4 GB. All code must store pointers in native-width types (not 32‑bit ints). | Native Address Width |
| [ ] | 3.3 ConnectController() Is Called Explicitly | Patina does not auto‑call ConnectController() during StartImage(). Drivers/platforms must call it for any handles they create/modify. | ConnectController() Must Be Called |
| [ ] | 3.4 Uncached Memory is Not Executable | Patina does not allow execution from uncached memory regions. Ensure all executable code resides in cached memory. | Uncached Memory Not Executable |
| [ ] | 3.5 Patina's Config.toml Used | Patina enforces toolchain configuration via copying its .cargo/config.toml to the platform | config.toml Must Be Copied |
Patina Requirements
The Patina DXE Core has several functional and implementation differences from the Platform Initialization (PI) Spec and EDK II DXE Core implementation.
- The Patina Readiness Tool validates many of these requirements.
- The Patina DXE Core Requirements Platform Checklist provides an easy way for platform integrators to track if they have met all requirements.
- The Patina DXE Core Integration Guide provides a detailed guide of how to integrate the DXE core into a platform.
Platform Requirements
Platforms should ensure the following specifications are met when transitioning over to the Patina DXE core:
1. Dispatcher Requirements
The following are the set of requirements the Patina DXE Core has in regard to driver dispatch.
1.1 No Traditional SMM
Traditional System Management Mode (SMM) is not supported in Patina. Standalone MM is supported.
Traditional SMM is not supported to prevent coupling between the DXE and MM environments. This is error prone, unnecessarily increases the scopes of DXE responsibilities, and can lead to security vulnerabilities.
Standalone MM should be used instead. The combined drivers have not gained traction in actual implementations due to their lack of compatibility for most practical purposes, increased likelihood of coupling between core environments, and user error when authoring those modules. The Patina DXE Core focuses on modern use cases and simplification of the overall DXE environment.
This specifically means that the following SMM module types that require cooperation between the SMM and DXE dispatchers are not supported:
EFI_FV_FILETYPE_SMM(0xA)EFI_FV_FILETYPE_SMM_CORE(0xD)
Further, combined DXE modules will not be dispatched. These include:
EFI_FV_FILETYPE_COMBINED_PEIM_DRIVER(0x8)EFI_FV_FILETYPE_COMBINED_SMM_DXE(0xC)
DXE drivers and Firmware volumes will be dispatched:
EFI_FV_FILETYPE_DRIVER(0x7)EFI_FV_FILETYPE_FIRMWARE_VOLUME_IMAGE(0xB)
Because Traditional SMM is not supported, events such as the gEfiEventDxeDispatchGuid defined in the PI spec and used
in the EDK II DXE Core to signal the end of a DXE dispatch round so SMM drivers with DXE dependency expressions could be
reevaluated will not be signaled.
Dependency expressions such as EFI_SECTION_SMM_DEPEX will not be evaluated on firmware volumes.
The use of Traditional SMM and combined drivers is detected by the Patina DXE Readiness Tool, which will report this as an issue requiring remediation before Patina can be used.
Additional resources:
Guidance: Platforms must transition to Standalone MM (or not use MM at all, as applicable) using the provided guidance. All combined modules must be dropped in favor of single phase modules.
1.2 A Priori Driver Dispatch Is Not Allowed
The Patina DXE Core does not support A Priori driver dispatch as described in the PI spec and supported in EDK II. See the Dispatcher Documentation for details and justification. Patina will dispatch drivers in FFS listed order.
Guidance: A Priori sections must be removed and proper driver dispatch must be ensured using depex statements. Drivers may produce empty protocols solely to ensure that other drivers can use that protocol as a depex statement, if required. Platforms may also list drivers in FFSes in the order they should be dispatched, though it is recommended to rely on depex statements.
1.3 Driver Section Alignment Must Be a Multiple of 4 KB
Patina relies on using a 4 KB page size and as a result requires that the C based drivers it dispatches have a multiple of 4KB as a page size in order to apply image memory protections. The EDK II DXE Core cannot apply image memory protections on images without this section alignment requirement, but it will dispatch them, depending on configuration.
AArch64 DXE_RUNTIME_DRIVERs must have a multiple of 64 KB image section alignment per UEFI spec requirements. This is required to boot operating systems with 16 KB or 64 KB page sizes.
Patina components will have 4 KB section alignment by nature of being compiled into Patina.
The DXE Readiness Tool validates all drivers have a multiple of 4 KB section alignment and reports an error if not. It will also validate that AArch64 DXE_RUNTIME_DRIVERs have a multiple of 64KB section alignment.
Guidance: All C based drivers must be compiled with a linker flag that enforces a multiple of 4 KB section alignment. For MSVC/CLANGPDB, this linker flag is
/ALIGN:0x1000for GCC/CLANGDWARF, the flag is-z common-page-size=0x1000. It is recommended to use 4 KB for everything except for AArch64 DXE_RUNTIME_DRIVERs which should use 64 KB i.e.,/ALIGN:0x10000for MSVC/CLANGPDB and-z common-page-size=0x10000for GCC/CLANGDWARF.
2. Hand Off Block (HOB) Requirements
The following are the Patina DXE Core HOB requirements.
2.1 Resource Descriptor HOB v2
Patina uses the Resource Descriptor HOB v2, which is in process of being added to the PI spec, instead of the EFI_HOB_RESOURCE_DESCRIPTOR.
Platforms need to exclusively use the Resource Descriptor HOB v2 and not EFI_HOB_RESOURCE_DESCRIPTOR. Functionally, this just requires adding an additional field to the v1 structure that describes the cacheability attributes to set on this region.
Patina requires cacheability attribute information for memory ranges because it implements full control of memory management and cache hierarchies in order to provide a cohesive and secure implementation of memory protection. This means that pre-DXE paging/caching setups will be superseded by Patina and Patina will rely on the Resource Descriptor HOB v2 structures as the canonical description of memory rather than attempting to infer it from page table/cache control state.
Patina will ignore any EFI_HOB_RESOURCE_DESCRIPTORs. The Patina DXE Readiness Tool verifies that all EFI_HOB_RESOURCE_DESCRIPTORs produced have a v2 HOB covering that region of memory and that all of the EFI_HOB_RESOURCE_DESCRIPTOR fields match the corresponding v2 HOB fields for that region.
The DXE Readiness Tool also verifies that a single valid cacheability attribute is set in every Resource Descriptor HOB v2. The accepted attributes are EFI_MEMORY_UC, EFI_MEMORY_WC, EFI_MEMORY_WT, EFI_MEMORY_WB, and EFI_MEMORY_WP. EFI_MEMORY_UCE, while defined as a cacheability attribute in the UEFI spec, is not implemented by modern architectures and so is prohibited. The DXE Readiness Tool will fail if EFI_MEMORY_UCE is present in a v2 HOB.
Guidance: Platforms must produce Resource Descriptor HOB v2s with a single valid cacheability attribute set. These can be the existing Resource Descriptor HOB fields with the cacheability attribute set as the only additional field in the v2 HOB.
2.2 MMIO and Reserved Regions Require Resource Descriptor HOB v2s
All memory resources used by the system require Resource Descriptor HOB v2s. Patina needs this information to map MMIO and reserved regions as existing EDK II based drivers expect to be able to touch these memory types without allocating it first; EDK II does not require Resource Descriptor HOBs for these regions.
This cannot be tested in the DXE Readiness Tool because the tool does not know what regions may be reserved or MMIO without the platform telling it and the only mechanism for a platform to do that is through a Resource Descriptor HOB v2. Platforms will see page faults if a driver attempts to access an MMIO or reserved region that does not have a Resource Descriptor HOB v2 describing it.
Guidance: Platforms must create Resource Descriptor HOB v2s for all memory resources including MMIO and reserved memory with a valid cacheability attribute set.
2.2.1 Resource Descriptor Hob v2 Guidance
Resource Descriptor HOBs are produced by a platform to describe ranges that compose the system's memory map. Historically, some platforms have only described memory that is in use, but the HOBs should describe the entire system memory map, as it stands, at the end of the HOB-producer phase. This includes caching attributes in V2 resource descriptor HOBs so that Patina is able to consume the data and provide enhanced memory protections from the start of DXE.
PEI Video Region Example
By the start of DXE, most system memory should be configured as Write Back (EFI_MEMORY_WB), and most Memory Mapped I/O should be configured as uncached (EFI_MEMORY_UC). There are exceptions to this, based upon platform level decisions.
One example is a PEI Video driver. If PEI configured a video device and displayed a logo on the screen, the memory region associated with the frame buffer would usually be configured as write combined (EFI_MEMORY_WC) for performance. If the video region was not configured as write combined, then attempting to display anything on the screen would be extremely slow. The caching attributes for this region would need to be reported through a non-overlapping resource descriptor HOB for that region.
The write combined cache setting would persist throughout the rest of the boot process, including after GOP drivers start managing the video device. The other transition point would be prior to handing off to the OS. At that point, the region would transition to uncached (EFI_MEMORY_UC). The OS would then be responsible to managing caching attributes.
Firmware Devices
SPI flash accessible through MMIO is another complex example.
Consider the following scenario:
- 64MB SPI part, mapped to 0xFC00_0000 - 0xFFFF_FFFF.
- FVs in the SPI part
- 0xFD00_0000 - 0xFD04_FFFF - Non Volatile Ram
- 0xFD05_0000 - 0xFE40_FFFF - DXE code
- 0xFF00_0000 - 0xFFFF_FFFF - PEI code
- HPET enabled, mapped to 0xFED0_0000 - 0xFED0_03FF.
Note: Both the HPET region and the FV hobs overlaps with the SPI region.
The HPET should have a MMIO resource descriptor HOB for its region, with cache type uncached (EFI_MEMORY_UC). The SPI flash can be reported around the HPET region as MMIO resources with the uncached attribute (EFI_MEMORY_UC) and with the memory type write protect (EFI_MEMORY_WP).
2.3 Overlapping HOBs Prohibited
Patina does not allow there to be overlapping Resource Descriptor HOB v2s in the system and the DXE Readiness Tool will fail if that is the case. Patina cannot choose which HOB should be valid for the overlapping region; the platform must decide this and correctly build its resource descriptor HOBs to describe system resources.
The EDK II DXE CORE silently ignores overlapping HOBs, which leads to unexpected behavior when a platform believes both HOBs or part of both HOBs, is being taken into account.
Guidance: Platforms must produce non-overlapping HOBs by splitting up overlapping HOBs into multiple HOBs and eliminating duplicates.
2.4 No Memory Allocation HOB for Page 0
Patina does not allow there to be a memory allocation HOB for page 0. The EDK II DXE Core allows allocations within page 0. Page 0 must be unmapped in the page table to catch null pointer dereferences and this cannot be safely done if a driver has allocated this page.
The DXE Readiness Tool will fail if a Memory Allocation HOB is discovered that covers page 0.
Guidance: Platforms must not allocate page 0.
3. Miscellaneous Requirements
This section details requirements that do not fit under another category.
3.1 Exit Boot Services Memory Allocations Are Not Allowed
When EXIT_BOOT_SERVICES is signaled, the memory map is not allowed to change. See
Exit Boot Services Handlers. The EDK II DXE Core does
not prevent memory allocations at this point, which causes hibernate resume failures, among other bugs.
The DXE Readiness Tool is not able to detect this anti-pattern because it requires driver dispatching and specific target configurations to trigger the memory allocation/free.
Guidance: Platforms must ensure all memory allocations/frees take place before exit boot services callbacks.
3.2 All Code Must Support Native Address Width
By default, the Patina DXE Core allocates memory top-down in the available memory space. Other DXE implementations such as EDK II allocate memory bottom-up. This means that all code storing memory addresses (including C and Rust code) must support storing that address in a variable as large as the native address width.
For example, in a platform with free system memory > 4GB, EDK II may have never returned a buffer address greater than
4GB so UINT32 variables were sufficient (though bad practice) for storing the address. Since Patina allocates memory
top-down, addresses greater than 4GB will be returned if suitable memory is available in that range and code must
be able to accommodate that.
Guidance: All DXE code (including all C modules) must support storing native address width memory addresses.
Note: The Patina DXE Readiness Tool does not perform this check.
3.3 ConnectController() Must Explicitly Be Called For Handles Created/Modified During Image Start
To maintain compatibility with UEFI drivers that are written to the EFI 1.02 Specification, the EDK II StartImage()
implementation is extended to monitor the handle database before and after each image is started. If any handles are
created or modified when an image is started, then EFI_BOOT_SERVICES.ConnectController() is called with the
Recursive parameter set to TRUE for each of the newly created or modified handles before StartImage() returns.
Patina does not implement this behavior. Images and platforms dependent on this behavior will need to be modified to
explicitly call ConnectController() on any handles that they create or modify.
3.4 EFI_MEMORY_UC Memory Must Be Non-Executable
Patina will automatically apply EFI_MEMORY_XP to all SetMemorySpaceAttributes(), CpuArchProtocol->SetMemoryAttributes(), and MemoryAttributesProtocol->SetMemoryAttributes() calls that pass in EFI_MEMORY_UC. In the DXE time frame, no uncached memory (typically representing device memory) should be marked as executable. For AArch64, the ARM ARM v8 B2.7.2 states that having executable device memory (what EFI_MEMORY_UC maps to) is a programming error and has been observed to cause crashes due to speculative execution trying instruction fetches from memory that is not ready to be touched or should never be touched. For x86 platforms, these regions are still protected to prevent devices having access to executable memory.
3.5 Config.toml Usage
Patina relies on its .cargo/config.toml being copied to the platform bin wrapper repo. A build.rs file is used
to enforce that the correct config is used. EDK II relies on a centralized tools_def.template being used by custom
build tools to create consistent toolchain configuration. In order to use standard Rust tools, Patina has opted for
this simpler approach. See the integration section for instructions on
setting up a platform.
4. Architectural Requirements
This section details Patina requirements that are specific to a particular CPU architectural requirements.
4.1 CpuDxe Is No Longer Used
EDK II supplies a driver named CpuDxe that provides CPU related functionality to a platform. In Patina DXE Core, this
is part of the core, not offloaded to a driver. As a result, the CPU Arch and memory attributes protocols are owned by
the Patina DXE Core. MultiProcessor (MP) Services are not part of the core (see following sections for specific
guidance on MP Service enabling for specific architectures).
Guidance: Platforms must not include
CpuDxein their platforms and instead use CPU services from Patina DXE Core and MP Services from a separate C based driver such asMpDxefor X64 systems orArmPsciMpServicesDxe.
4.2 AArch64-specific requirements
This section details Patina requirements specific to the AArch64 architecture.
4.2.1 AArch64 Generic Interrupt Controller (GIC)
On AArch64 systems, when Patina assumes ownership of CpuDxe it also encompasses the functionality provided by the
ArmGicDxe driver which configures the AArch64 GIC. This is because GIC support is a prerequisite for CpuDxe to
handle interrupts correctly. As such, AArch64 platforms also should not include the ArmGicDxe driver.
In addition, different AArch64 platforms can place the GIC register set at different locations in the system memory map.
Consequently, AArch64 platforms must supply the base addresses associated with the GIC as part of the CpuInfo struct
that is part of core configuration.
Guidance: AArch64 platforms should not use the
ArmGicDxedriver and must supply the base addresses of the GIC in theCpuInfostructure.
4.2.2 AArch64 Memory Caching Attribute Requirements for Device Memory
AArch64 brings with it specific architectural requirements around the caching attributes for MMIO peripheral memory. For example, marking a region as "Device" may activate alignment checks on memory access to that region, or not marking a peripheral MMIO region as Device may allow speculative execution to that region. Since Patina will configure the cache attributes of the memory map at startup (rather than, for example, relying on the paging structures that were set up prior to DXE start), special care must be taken to ensure that the caching attributes in the Resource HOB v2 that the platform produces are appropriate for the regions of memory that they describe.
Guidance: Ensure that the memory map as described via the Resource V2 HOBs is correct for the system, taking into account the special requirements for peripheral memory.
4.3 X64-specific requirements
As described in the general architectural requirements. X64 systems must exclude CpuDxe. In addition
MpDxe should be included in the
platform flash file as it is used to install the MP Services protocol.
Note: The
patina-mtrrrepo provides pure-Rust MTRR support for X64 platforms. This can be used indpendently of the Patina DXE Core. It is intended to provide generic MTRR support for Rust-based UEFI environments on X64 platforms.
4.3.1 X64 MM Core and MM Driver Requirements
Due to the No Traditional SMM requirement, X64 platforms must ensure that the MM core is of
module type MM_CORE_STANDALONE and all MM drivers are of module type MM_STANDALONE. X64 platforms can optionally
use the MM communication code in the patina_mm
crate to facilitate communication between DXE and MM during the DXE phase. However, this component does not provide
support during runtime. This is because Patina components are currently not supported during runtime. Because of this,
it is recommended to use the MM communication code produced by a DXE_RUNTIME_DRIVER such as
(StandaloneMmPkg/Drivers/MmCommunicationDxe/MmCommunicationDxe)
for C-driver communication support during boot and the MmCommunicator
component provided in patina_mm for MM communication in Patina components.
5. Known Limitations
This section details requirements Patina currently has due to limitations in implementation, but that support will be added for in the future.
5.1 Synchronous Exception Stack Size limitation on AArch64 Platforms
Presently a hard stack size limitation of 64KB applies to synchronous exceptions on AArch64 platforms. This means, for example, that platform panic handlers should not make large allocations on the stack. The following issue tracks this: 781
Patina DXE Core Integration Guide
This document describes how to produce a Patina-based DXE Core binary for a UEFI platform. It covers workspace setup, dependency selection, minimal entry scaffolding, core initialization, logging and debugging facilities, platform‑specific service/component integration, build and feature options, and integration of the Patina DXE Core into an existing firmware build process (typically EDK II).
It is important to understand that Patina delivers a collection of Rust crates (libraries) that are compiled into a
single monolithic DXE Core .efi image for a specific platform. Platform code is kept intentionally small and largely
declarative: you select implementations, supply configuration values, and register Patina components. The build to
produce the .efi binary uses the standard Rust toolchain (cargo) with UEFI targets like x86_64-unknown-uefi or
aarch64-unknown-uefi. The produced image is placed into the platform flash file (e.g. via an FDF in EDK II) replacing
the C DXE Core and select C drivers.
Patna DXE Core platform integrators do not need extensive Rust expertise to create a Patina DXE Core binary for a platform.
At a high-level, the integration process consists of:
- Selecting required Patina crates (core runtime plus optional capability modules)
- Providing platform-specific configuration (UART base addresses, MM communication ports, interrupt controller bases, etc.)
- Registering services and components to extend DXE Core functionality
- Enabling optional features (compatibility mode, performance tracing, memory allocation preferences) as required
Throughout this guide, terms like “Component”, “Service”, and configuration locking refer to those concepts in the Patina component model. These terms might be used differently than they have been in past firmware projects you've worked in. Always check the Patina definition if you are unsure of a term's definition. See the Component Interface for more details about Patina components.
General steps:
- Create Rust Binary Workspace
- Copy Reference Implementation
- Add patina_dxe_core Dependency
- Setup Rust Binary Scaffolding
- Add DXE Core Initialization
- Setup Logger and Debugger
- Customize Platform Services/Components
- Build Complete DXE Core
Guiding Principles
To better understand why the Patina DXE Core is integrated the way it is, it is helpful to understand some guiding principles that influence its design and configuration:
- Safety First: Patina prioritizes memory safety and security by leveraging Rust's ownership model and type system. This means configuring and customizing functionality in safe Rust code.
- Native First: Patina uses Rust's native features and ecosystem to avoid unnecessary abstractions and compatibility layers.
- Upstream Tool Second: If the native Rust ecosystem does not provide a solution, Patina uses established tools or libraries available in the broader Rust ecosystem. In nearly all cases, for a given problem, the preferred solution will be one that avoids Patina-specific or proprietary tooling.
- Rust Only: In the Patina repository, only Rust code is allowed outside of server CI support. All build processes,
tools, and other code must be written in Rust. All functions a Patina developer needs to perform should be
possible through a
cargo-maketask to simplify project maintenance and lower the barrier to entry for new developers. - Simple Configuration: The integration process is intended to be as straightforward as possible, minimizing boilerplate and configuration complexity. This includes all aspects of complexity including overhead for Patina project maintenance, tooling, Patina component writers, and platform integrators.
- Minimal Configuration: Patina values safety above flexibility. Unsafe configurations are avoided. In extremely rare cases where unsafe configurations are necessary, they are opt-in and require explicit justification. Unsafe scenarios are preferred to be unsupported rather than to provide a configuration option to allow unsafe functionality. This means Patina is not appropriate for platforms that require extensive unsafe and legacy functionality.
- Agility: In order to achieve Patina's primary goals of safety and simplicity, the Patina DXE Core must be able to evolve rapidly. This means Patina leverages its modified version of semantic versioning to remove technical debt and improve safety. This also means that Patina will not support legacy platforms or architectures. Patina's goal is to be the safest UEFI implementation available, not the most compatible.
All of this is to say that Patina is not a good fit for every platform. To use Patina, you will likely need to make an early and deliberate choice to prioritize safety and simplicity over legacy compatibility and extensive legacy compatibility.
1. Workspace Creation
Before starting, keep in mind that these examples might not be entirely up-to-date. They are provided to better explain the Patina DXE Core platform binary creation process in steps. Refer to the latest Patina repositories for the most current information. The repository that demonstrates Patina DXE Core platform integration is OpenDevicePartnership/patina-dxe-core-qemu.
First, create a new Rust binary workspace for your platform's DXE Core. Use a descriptive name appropriate for your
platform. In this example, we use platform_patina_dxe_core.
> cargo new --bin platform_patina_dxe_core
> cd platform_patina_dxe_core
You should see the following initial structure:
├── src
|    └── main.rs
├── .gitignore
└── Cargo.toml
2. Reference Implementation
Based on your target architecture, copy the appropriate reference implementation from the patina-dxe-core-qemu repository.
For x86_64 Platforms
Copy the Q35 reference implementation:
> mkdir -p bin
> cp <path-to-patina-dxe-core-qemu>/bin/q35_dxe_core.rs bin/platform_patina_dxe_core.rs
Reference: q35_dxe_core.rs
For AARCH64 Platforms
Copy the SBSA reference implementation:
> mkdir -p bin
> cp <path-to-patina-dxe-core-qemu>/bin/sbsa_dxe_core.rs bin/platform_patina_dxe_core.rs
Reference: sbsa_dxe_core.rs
While the QEMU Patina DXE Core implementations provide a good starting point, you need to modify the copied file to suit your platform's specific requirements.
Copy config.toml from Patina
Copy patina/.cargo/config.toml to bin/.cargo/config.toml. This ensures that the platform is using the same
toolchain configuration as Patina has been verified with and recommends. A platform may customize the copied
config.toml as it wishes, but for best performance and stability, use the recommended settings. See the
Patina DXE Core Requirements for more details.
The patina_dxe_core crate build will fail if the config version has changed. A platform should use this as an
indication when updating Patina to repeat this step to get the latest config.
Note: Patina will validate that the
PATINA_CONFIG_VERSIONenvironment variable is set to the same value as its.cargo/config.toml, so even if a platform updates toolchain configuration, it must keep the samePATINA_CONFIG_VERSION.
3. Dependencies
Inside your crate's Cargo.toml file, add the following, where $(VERSION) is replaced with the version of the
patina_dxe_core you wish to use.
3.1 Essential Dependency Set
Update your Cargo.toml to include necessary dependencies based on the reference implementation:
[dependencies]
patina_debugger = "$(VERSION)"
patina_dxe_core = "$(VERSION)"
patina_ffs_extractors = "$(VERSION)"
patina_stacktrace = "$(VERSION)"
# Add other platform-specific dependencies as needed
Review the Cargo.toml file in the patina-dxe-core-qemu repository for additional dependencies that may be required
for your platform.
4. Minimal Entry (efi_main) and no_std
Patina targets a firmware environment without the Rust standard library. The crate must declare #![no_std] and
provide a #[panic_handler]. The DXE Core entry function must be exported as efi_main with the efiapi calling
convention. This is an example of a minimal scaffold:
While Patina does not use the std library, it does use the Rust core library.
// #![no_std] // Commented out for mdbook compilation purposes
// #![no_main] // Commented out for mdbook compilation purposes
extern crate core;
use core::{ffi::c_void, panic::PanicInfo};

#[cfg_attr(target_os="uefi", panic_handler)]
fn panic(info: &PanicInfo) -> ! {
        // Consider integrating logging and debugging before final deployment.
        loop {}
}

#[cfg_attr(target_os = "uefi", export_name = "efi_main")]
pub extern "efiapi" fn _start(physical_hob_list: *const c_void) -> ! {
        // Core initialization inserted in later steps
        loop {}
}
fn main() {}
Key points:
#![no_std]removes the standard library; Patina crates provide required abstractions.- The panic handler should log and optionally emit a stack trace (see later sections).
- The entry parameter
physical_hob_listis a pointer to the firmware’s HOB list used for memory discovery and early initialization (see HOB Handling).
5. Core Initialization Abstractions
Patina exposes trait-based extension points enabling platforms to select or provide implementations. An example for
reference is the SectionExtractor trait used during firmware volume section decompression or integrity handling.
If your platform only requires (for example) Brotli decompression, you can supply just that implementation. Composite helpers are also available.
Add representative initialization (replace or augment extractors to match platform requirements):
#![allow(unused)]
fn main() {
extern crate patina;
extern crate patina_dxe_core;
extern crate patina_ffs_extractors;
extern crate core;
use core::ffi::c_void;
use patina_dxe_core::*;
use patina_ffs_extractors::BrotliSectionExtractor;

struct ExamplePlatform;

impl ComponentInfo for ExamplePlatform { }

impl MemoryInfo for ExamplePlatform { }

impl CpuInfo for ExamplePlatform { }

impl PlatformInfo for ExamplePlatform {
    type MemoryInfo = Self;
    type CpuInfo = Self;
    type ComponentInfo = Self;
    type Extractor = BrotliSectionExtractor;
}

static CORE: Core<ExamplePlatform> = Core::new(BrotliSectionExtractor::new());

#[cfg_attr(target_os = "uefi", export_name = "efi_main")]
pub extern "efiapi" fn _start(physical_hob_list: *const c_void) -> ! {
    CORE.entry_point(physical_hob_list)
}
}
If you copy + paste this directly, the compiler will not know what patina_ffs_extractors is. You will have to add
that crate to your platform's Cargo.toml file. Additionally, where the Default::default() option is, this is where
you would provide any configuration to the Patina DXE Core.
6. Logging and Debugging
The DXE Core logging model builds on the standard log crate. Patina currently
provides two logger implementations:
Select or implement a logger early to obtain diagnostic output during bring‑up. Configure UART parameters for your target (MMIO vs I/O space). Below are platform patterns.
6.1 Logger Configuration Examples
In this example, we will talk about how to configure the loggers provided by Patina. The SerialLogger and
AdvancedLogger both have the same new method interface, so we will pick one for this example:
#![allow(unused)]
fn main() {
extern crate patina;
extern crate log;
use patina::serial::uart::UartNull; // UartPl011 (AARCH64) and Uart16550 (X64) exist
use patina::log::{Format, SerialLogger};
use log::LevelFilter;

const LOGGER: SerialLogger<UartNull> = SerialLogger::new(
    Format::Standard, // The style to log in - standard, json, verbose json
    &[("goblin", LevelFilter::Off)], // (target, filter) tuple to filter certain log targets to certain levels
    LevelFilter::Warn, // Only log certain log levels and higher
    UartNull {}, // The SerialIO to write to. Could be a custom implementation
);
}
6.2 Debugger Configuration
Modify the DEBUGGER static to match your platform's debug serial infrastructure:
#![allow(unused)]
fn main() {
extern crate patina;
extern crate patina_debugger;
use patina::serial::uart::UartNull; // UartPl011 (AARCH64) and Uart16550 (X64) exist

#[cfg(feature = "enable_debugger")]
const _ENABLE_DEBUGGER: bool = true;
#[cfg(not(feature = "enable_debugger"))]
const _ENABLE_DEBUGGER: bool = false;

#[cfg(feature = "build_debugger")]
static DEBUGGER: patina_debugger::PatinaDebugger<UartNull> =
    patina_debugger::PatinaDebugger::new(UartNull {})  // <- Update for your platform
        .with_force_enable(_ENABLE_DEBUGGER)
        .with_log_policy(patina_debugger::DebuggerLoggingPolicy::FullLogging);
}
Adding a Logger Example
First, add the logger dependency to your Cargo.toml file in the crate:
patina = "$(VERSION)" # includes serial_logger
Next, update main.rs with the following, using Uart16550 or UartPl011 for X64 / AARCH64.
#![allow(unused)]
fn main() {
extern crate patina_dxe_core;
extern crate patina_ffs_extractors;
extern crate patina;
extern crate log;
extern crate core;
use core::ffi::c_void;

use patina_dxe_core::*;
use patina_ffs_extractors::BrotliSectionExtractor;
use patina::log::{Format, SerialLogger};
use patina::serial::uart::UartNull; // Uart16550 or UartPl011 available for X64 / AARCH64 platforms

static LOGGER: SerialLogger<UartNull> = SerialLogger::new(
    Format::Standard, // Format to write logs in
    &[], // filters [(target, log_level)]
    log::LevelFilter::Debug, // filter level
    UartNull {} // The SerialIO writer
);

struct ExamplePlatform;

impl ComponentInfo for ExamplePlatform { }

impl MemoryInfo for ExamplePlatform { }

impl CpuInfo for ExamplePlatform { }

impl PlatformInfo for ExamplePlatform {
    type MemoryInfo = Self;
    type ComponentInfo = Self;
    type CpuInfo = Self;
    type Extractor = BrotliSectionExtractor;
}

static CORE: Core<ExamplePlatform> = Core::new(BrotliSectionExtractor::new());

#[cfg_attr(target_os = "uefi", export_name = "efi_main")]
pub extern "efiapi" fn _start(physical_hob_list: *const c_void) -> ! {
    log::set_logger(&LOGGER).map(|()| log::set_max_level(log::LevelFilter::Info)).unwrap();

    CORE.entry_point(physical_hob_list)
}
}
Note:
- The logger is created as a static instance configured for your platform's UART.
- In this case we are writing to the Host-based STD Terminal. Your platform will require a different writer.
- Inside
efi_mainwe set the global logger to our static logger with thelogcrate and set the maximum log level. - The
serial_loggerprovides a simple, lightweight logging solution that writes directly to the serial port.
7. Platform Components and Services
Patina uses dependency injection in the dispatch process (see Component Interface) to execute components only when their declared parameters (services, configs, HOBs, etc.) are satisfiable.
This sections shows examples of how to add components and configure a platform. This is only for illustration; your platform may not require any of these components or configurations.
This is how you would add components and configuration to your platform. You can author platform components and services as needed and attach them here in addition to the Patina provided components and services.
Reference implementations: QEMU Patina DXE Core.
7.1 Management Mode (MM) (x86_64)
In this example, Patina MM configuration definitions come from the patina_mm crate while the QEMU Q35 platform
components come from the q35_services crate. The q35_services crate would reside in a QEMU Q35-specific platform
repository.
#![allow(unused)]
fn main() {
extern crate patina;
extern crate patina_dxe_core;
extern crate patina_mm;
use patina_dxe_core::*;

struct ExamplePlatform;

impl ComponentInfo for ExamplePlatform {
    fn configs(mut add: Add<Config>) {
        add.config(patina_mm::config::MmCommunicationConfiguration {
            acpi_base: patina_mm::config::AcpiBase::Mmio(0x0), // Set during boot
            cmd_port: patina_mm::config::MmiPort::Smi(0xB2),
            data_port: patina_mm::config::MmiPort::Smi(0xB3),
            enable_comm_buffer_updates: false,
            updatable_buffer_id: None,
            comm_buffers: vec![],
        });
    }

    fn components(mut add: Add<Component>) {
        add.component(patina_mm::component::sw_mmi_manager::SwMmiManager::new());
        // Platform Mm Init hook
        // add.component(q35_services::mm_control::QemuQ35PlatformMmControl::new())
    }
}
}
7.2 AArch64 Interrupt Controller (GIC)
For AArch64 platforms using GIC (Generic Interrupt Controller):
#![allow(unused)]
fn main() {
extern crate patina_dxe_core;
use patina_dxe_core::*;

struct ExamplePlatform;

impl CpuInfo for ExamplePlatform {
    #[cfg(target_arch = "aarch64")]
    fn gic_bases() -> GicBases {
        /// SAFETY: gicd and gicr bases correctly point to the register spaces.
        /// SAFETY: Access to these registers is exclusive to this struct instance.
        unsafe { GicBases::new(0x40060000, 0x40080000) } // Update for your platform
    }
}
}
7.3 Performance Monitoring (Optional)
The
patina_performance
component provides detailed UEFI performance measurement capabilities:
#![allow(unused)]
fn main() {
extern crate patina;
extern crate patina_dxe_core;
extern crate patina_performance;
use patina_dxe_core::*;

struct ExamplePlatform;

impl ComponentInfo for ExamplePlatform {
    fn components(mut add: Add<Component>) {
        add.component(patina_performance::component::Performance::new().with_measurements(
            patina_performance::component::Measurement::DriverBindingStart
                | patina_performance::component::Measurement::DriverBindingStop
                | patina_performance::component::Measurement::LoadImage
                | patina_performance::component::Measurement::StartImage
        ));
    }
}
}
8. Complete Implementation Example
Below is a comprehensive example demonstrating integration of logging, stack tracing, and component registration.
Stack traces are produced via the
patina_stacktrace
crate when supported by the target architecture.
// #![no_std] // Commented out for mdbook compilation purposes
// #![no_main] // Commented out for mdbook compilation purposes
extern crate core;
extern crate patina_dxe_core;
extern crate patina;
extern crate patina_stacktrace;
extern crate patina_debugger;
extern crate patina_ffs_extractors;
extern crate patina_performance;
extern crate patina_mm;
extern crate log;
fn main() {}

use core::{ffi::c_void, panic::PanicInfo};
use patina_dxe_core::*;
use patina_ffs_extractors::BrotliSectionExtractor;
use patina::log::{Format, SerialLogger};
use patina::serial::uart::UartNull; // Uart16550 or UartPl011 exist
use patina_stacktrace::StackTrace;
extern crate alloc;

#[cfg_attr(target_os = "uefi", panic_handler)]
fn panic(info: &PanicInfo) -> ! {
    log::error!("{}", info);

    if let Err(err) = unsafe { StackTrace::dump() } {
        log::error!("StackTrace: {}", err);
    }

    // The breakpoint() fn only issues a breakpoint instruction if
    // the debugger is enabled and initialized.
    patina_debugger::breakpoint();

    loop {}
}

static DEBUGGER: patina_debugger::PatinaDebugger<UartNull> =
    patina_debugger::PatinaDebugger::new(UartNull {})  // <- Update for your platform
        .with_force_enable(true)
        .with_log_policy(patina_debugger::DebuggerLoggingPolicy::FullLogging);

static LOGGER: SerialLogger<UartNull> = SerialLogger::new(
    Format::Standard, // Format to write logs in
    &[], // filters [(target, log_level)]
    log::LevelFilter::Debug, // filter level
    UartNull {} // The SerialIO writer
);

struct ExamplePlatform;

impl MemoryInfo for ExamplePlatform { }

impl CpuInfo for ExamplePlatform { }

impl ComponentInfo for ExamplePlatform {
    fn configs(mut add: Add<Config>) {
        add.config(patina_mm::config::MmCommunicationConfiguration {
            acpi_base: patina_mm::config::AcpiBase::Mmio(0x0), // Set during boot
            cmd_port: patina_mm::config::MmiPort::Smi(0xB2),
            data_port: patina_mm::config::MmiPort::Smi(0xB3),
            enable_comm_buffer_updates: false,
            updatable_buffer_id: None,
            comm_buffers: vec![],
        });
    }

    fn components(mut add: Add<Component>) {
        add.component(patina_mm::component::sw_mmi_manager::SwMmiManager::new());
        // Platform Mm Init hook
        // add.component(q35_services::mm_control::QemuQ35PlatformMmControl::new())
        add.component(patina_performance::component::Performance::new().with_measurements(
            patina_performance::component::Measurement::DriverBindingStart
                | patina_performance::component::Measurement::DriverBindingStop
                | patina_performance::component::Measurement::LoadImage
                | patina_performance::component::Measurement::StartImage
        ));
    }
}

impl PlatformInfo for ExamplePlatform {
    type MemoryInfo = Self;
    type CpuInfo = Self;
    type ComponentInfo = Self;
    type Extractor = BrotliSectionExtractor;
}

static CORE: Core<ExamplePlatform> = Core::new(BrotliSectionExtractor::new());

#[cfg_attr(target_os = "uefi", export_name = "efi_main")]
pub extern "efiapi" fn _start(physical_hob_list: *const c_void) -> ! {
    log::set_logger(&LOGGER).map(|()| log::set_max_level(log::LevelFilter::Info)).unwrap();
    patina_debugger::set_debugger(&DEBUGGER);

    CORE.entry_point(physical_hob_list)
}
9. Feature and Memory Configuration Options
9.1 Compatibility Mode
The Patina DXE Core supports a compatibility mode for launching bootloaders and applications that lack NX (No-Execute) protection support, including most shipping Linux distributions. This feature is disabled by default to enforce modern memory protection standards.
To enable compatibility mode, add the feature flag to your platform's Cargo.toml:
[dependencies]
patina_dxe_core = { features = ["compatibility_mode_allowed"] }
Behavior:
- Disabled (default): Only EFI applications with
NX_COMPATDLL characteristics will launch - Enabled: Applications without NX compatibility will be permitted to execute
See Memory Management for detailed information on memory protection policies.
9.2 32-bit Memory Allocation Preference
By default, Patina prioritizes high memory allocation (above 4GB), which helps identify 64-bit address handling bugs in platform components. This behavior is recommended for development and production platforms.
For platforms requiring compatibility with legacy software that improperly handles 64-bit addresses, enable 32-bit
memory preference using the prioritize_32_bit_memory() configuration:
#![allow(unused)]
fn main() {
extern crate patina_dxe_core;
extern crate patina_ffs_extractors;
use patina_ffs_extractors::BrotliSectionExtractor;
use patina_dxe_core::*;

struct ExamplePlatform;

impl MemoryInfo for ExamplePlatform {
    fn prioritize_32_bit_memory() -> bool { true }
}
impl ComponentInfo for ExamplePlatform { }
impl CpuInfo for ExamplePlatform { }
impl PlatformInfo for ExamplePlatform {
    type MemoryInfo = Self;
    type Extractor = BrotliSectionExtractor;
    type ComponentInfo = Self;
    type CpuInfo = Self;
}

static CORE: Core<ExamplePlatform> = Core::new(BrotliSectionExtractor::new());
}
Use default high-memory allocation for development builds to identify address width bugs during development. Only enable 32-bit preference for production builds requiring legacy software compatibility.
For detailed memory allocation behavior, see DXE Core Memory Management.
9.3 Resource Descriptor HOB Version Support
Patina DXE Core supports two mutually exclusive formats for Resource Descriptor HOBs: v1 (what EDK II uses) and v2 (v1 + cache attribute information). The version supported is selected at compile time using a Cargo feature flag:
- Default (v2): Only v2 Resource Descriptor HOBs are processed. This is the default in Patina and is required for ARM64 platforms.
- Compat (v1): If the
v1_resource_descriptor_supportfeature is enabled, only V1 Resource Descriptor HOBs are processed in order to support an easy transition from EDK II. v2 HOBs are ignored in this mode.
Platforms are required to move to Resource Descriptor HOB v2s to accurately describe their system memory with caching information.
In order to support easier adoption of Patina, a feature flag is provided to only process Resource Descriptor v1 HOBs.
This is simply added for bring up purposes and is not intended to be a production feature. Resource Descriptor HOB v1
support is enabled by setting the feature in the platform binary crate's Cargo.toml:
[dependencies]
patina = {version = "x", features = ["v1_resource_descriptor_support"]}
This will build and test the V1 code path by default, without needing to specify the feature flag on the command line. For production, remove it from the default list to restore V2 as the default.
10. Build Process and Validation
The Patina DXE Core build process uses standard Cargo tooling with UEFI-specific targets. Reference the patina-dxe-core-qemu repository for comprehensive build examples and configuration.
10.1 Required Build Configuration Files
Copy essential build infrastructure from the reference implementation:
Makefile.toml- cargo-make task automationrust-toolchain.toml- Ensures reproducible builds with a pinned Rust version- Workspace
Cargo.toml- Dependency resolution and feature configuration .cargo/config.toml- Custom target definitions and linker settings
10.2 Build Commands by Architecture
x86_64 Targets:
# Debug build
cargo make build

# Release build
cargo make build --release
AArch64 Targets:
# Debug build
cargo make build --target aarch64-unknown-uefi

# Release build
cargo make build --target aarch64-unknown-uefi --release
You can customize what cargo-make tasks are supported in your platform by
customizing the Makefile.toml file.
10.3 Build Output Validation
Successful builds produce:
.efibinary intarget/{arch}-unknown-uefi/{profile}/- Build timing report (when using
--timingsflag) - Dependency resolution logs for supply chain verification
Cargo.lockfile for reproducible builds
For detailed build optimization and binary size analysis, consult the Binary Size Optimization Guide.
11. Firmware (EDK II) Integration
Once you have your EFI binary, integrate it with your EDK II platform:
---
config:
  layout: elk
  look: handDrawn
displayMode: compact
---
graph TD
    A[EFI Binary] --> B[Copy to Platform Workspace]
    B --> C[Reference in Platform FDF]
    C --> D[Build Platform Firmware Image]
    D == Final Image ==> E[Platform Firmware]
11.1 Steps
- Copy the binary to your platform workspace
- Update your platform FDF file to include the binary in the firmware volume
- Build your platform using the EDK II build system
11.2 Example FDF Entry
Add the EFI binary to your platform FDF file:
[FV.DXEFV]
  # ... other files ...
  FILE DXE_CORE = 23C9322F-2AF2-476A-BC4C-26BC88266C71 {
    SECTION PE32 = your_platform_workspace_dir/Binaries/platform_patina_dxe_core.efi
    SECTION UI = "DxeCore"
  }
12. Troubleshooting and Optimization
12.1 Common Issues
- Build failures: Ensure all dependencies are properly specified and the rust toolchain version matches
- Runtime issues: Check logger configuration and UART base address for your platform. For detailed debugging
techniques, see the
patina_debuggingREADME - Memory issues: Use 32-bit memory compatibility settings if DXE code usd on the platform does not properly handle addresses >4GB. Review DXE Core Memory Management
12.2 Performance / Size Considerations
For binary size optimization and performance analysis, refer to the Patina DXE Core Release Binary Composition and Size Optimization documentation.
13. Further Reading
After successfully integrating your Patina DXE Core binary:
- Component Development: Learn about creating custom Patina components in Component Interface and review sample implementations
- Debugging Techniques: Set up debugging workflows using tools and methods in DXE Core Debugging
14. Next Steps
With your Patina DXE Core integrated:
- Add platform-specific components using the Patina component system as needed
- Configure additional services as needed for your platform
- Test thoroughly across different boot scenarios and configurations
Your platform now has a Rust-based DXE Core foundation. Continue iterating by refining service boundaries, expanding component coverage, and tightening security controls.
How Does This All Work with EDK II?
Since a lot of developers will be visiting Patina that are familiar with EDK II, this section is intended to help those developers understand how the Patina DXE Core is configured and integrated with common EDK II configuration points.
The Patina DXE Core build is intentionally separated from the EDK II build process. The Patina DXE Core build is
meant to be performed in a standalone pure-Rust workspace. The output of that build is a single .efi binary that is
then integrated into the EDK II build process as a binary file.
The Patina DXE Core replaces the C DXE Core binary. At a minimum, this results in the C DXE Core being removed from the
platform build process and flash file. At this time CpuDxe is also brought into the Patina DXE Core too, for example,
and can be removed from the platform. However, because the Patina DXE Core is a monolithic binary, it also means
that as it increases the number of components and services it provides, the need for additional C components and
services decreases. Over time, fewer C modules will be required by the platform as their functionality is replaced by
equivalent code in the Patina DXE Core.
Library classes and PCDs are project-specific configuration points in EDK II. These are not supported in Patina. They continue to work as-is for C code and the many C-based modules built in the platform, but they do not influence the Patina DXE Core. Therefore, a platform does not need to change how configuration is done for their C code, but it must be understood how configuration is performed for the Patina DXE Core.
Patina components take configuration input in two primary ways - through Patina configuration structures and through HOBs. Platforms can populate these data structures from any source, including EDK II PCDs, platform configuration files, or hardcoded values.
In Patina, we use Traits for abstractions and Crates for code reuse. To learn how to use these, review the Abstractions and Code reuse sections.
Why Isn't Patina Built as Part of the EDK II Build?
First and foremost, Patina is a Rust project. It is a pivot to not only Rust but modern software engineering practices that are common to a much broader set of developers than EDK II-specific processes and conventions and may not be acceptable within the EDK II community. Patina seeks to engage closely with the broader Rust ecosystem and reduce barriers to Rust developers getting involved in the project that have no need to understand EDK II.
Initially, the Patina DXE was actually built in the EDK II build process. In the end, this negatively impacted both the EDK II and Patina/Rust experience.
The Patina DXE Core is built outside of the EDK II build process for several reasons:
- Simplicity: The Rust build system (
cargo) is significantly simpler than the EDK II build system. It is standardized, well documented, and well understood by the broader Rust community. - Competing Build Systems: The EDK II build system is not designed to handle Rust code. While it is possible to
integrate Rust into the EDK II build system (and that has been done), it is not a first-class citizen and requires
significant custom configuration. This adds complexity and maintenance overhead to the overall EDK II project and
Rust developers that have no need for EDK II. For example, EDK II uses INF files to describe dependencies and
resources used in the module that are resolved through a custom autogen system. Rust uses
Cargo.tomlfiles to describe dependencies and resources that are resolved through thecargotool. These two systems are fundamentally different and work most effectively for their individual use cases. - Competing Ways of Sharing Code: We have found using crates on a registry is essential for efficient code sharing
in Rust. EDK II does not have a similar concept. Tangling C and Rust code in repos introduces the potential for
referencing Rust code in a C repo through a
cargogit dependency or a path dependency. This prevents semantic versioning from being used as is available with crate dependencies. Semantic versioning is crucial for effectively havingcargoresolve dependencies in a way that is sustainable. Placing Rust code in C repos has also resulted in dependencies being established like a path dependency to code in a submodule. This adds significant complexity to the overall and is unnecessary when working in Rust. - Workspace Layout: EDK II lays out workspaces a in specific way and Rust lays out workspaces a different way. While it is possible to make them work together (and we have), neither follows their natural conventions and adds a a lot of unnecessary bloat to the project. It is important for both that the workspace layout is organized a certain way as the layout has consequences on how the build systems work and code is written.
- Toolchain Overload: It is frustrating for Rust developers to maintain and use C toolchains and build systems when they have no need for them. It is also frustrating for C developers to maintain and use Rust toolchains and build systems when they have no need for them. By separating the build systems, we can allow each group to focus on their own tools and processes without needing to understand the other.
In addition, cargo also simply builds Rust code fast and directly targets different scenarios like only build unit
tests, documentation, examples, benchmarks, etc. Developers can get results for these within seconds. The EDK II
build system simply serves an entirely different purpose than cargo and the Rust development model.
How Do I Integrate the Patina DXE Core into My EDK II Platform?
The platform owner sets up a Rust workspace for their platform's Patina DXE Core. This workspace is separate from the
EDK II workspace. The platform owner then configures the Patina DXE Core for their platform as described in this guide.
Once the Patina DXE Core is built, the resulting .efi binary is referenced in the platform FDF file as a binary file
to be included in the firmware volume.
Aren't two builds more inefficient than one? No. It is much faster to iterate and build the Rust code with Rust tools. Building a flash image requires a full EDK II build anyway so the fact that the Patina DXE Core binary is built separately does not add any additional overhead.
Patina also has a patching tool that can patch and run Patina changes in seconds on QEMU. Separating the builds allows flows like this to be used that significantly speed up development and testing.
Theory and Operation
The documentation in the following sections document the high-level architectural design, code flow, and theory of operation for the different critical components that make up the DXE Core.
Advanced Logger
Patina uses the Log crate to facilitate logging
and the platform code is responsible for configuring its desired log implementation
prior to executing the Patina core using the standard log::set_logger routine.
The platform may choose any implementation of the Log trait it wishes; however,
Patina provides a robust serial and memory logging solution called Advanced Logger, which
is designed to be compatible with the Project Mu Advanced Logger.
This compatibility means that Patina Advanced Logger can be used in combination
with Project Mu Advanced Logger to provide a memory log that spans multiple phases
(e.g. PEI and DXE) and can be parsed with existing tools.
Patina Advanced Logger is implemented in two parts: the log::Log implementation called
AdvancedLogger,
and the component called AdvancedLoggerComponent.
The former is responsible for handling log messages and forwarding them to both the serial
transport and the memory log as appropriate. The latter is responsible for
implementing the Advanced Logger Protocol and configuring
the logger based on HOB input to Patina.
Logger
The logger is designed to be statically instantiated as required by the log crate
and is responsible for handling the log messages forwarded through the logging interfaces
such as log::info!(). Logger initialization acts as the primary interface for platform
configurations such as serial interfaces, log level limits, message filtering,
etc.
The Log implementation will send all messages to both the configured serial port
and its memory log to be picked up later by components in DXE or at runtime.
This splits all messages to be both output to the serial console and stored in
the memory log, depending on configuration. More messages that be sent to the memory
log then the serial port depending on the message filtering used.
---
config:
  layout: elk
  look: handDrawn
displayMode: compact
---
flowchart LR
    patina["Patina"]
    log["Log Crate"]
    logger["Advanced Logger"]
    serial["Serial IO"]
    memory_log["Memory Log"]
    patina -- log::info!('foo') --> log
    log --> logger
    logger -- 'foo' --> serial
    logger -- entry{'foo'} --> memory_log
In order to maintain compatibility with a wide range of terminal emulators and log viewers, it is
recommended to use patina::writelncrlf instead of writeln when formatting messages that will
be printed via the log crate. This will ensure that the log line ending is CRLF.
Memory Log
Advanced Logger generates a binary format memory log which includes a header, followed by entries containing the entry metadata and the log string. Entry metadata includes: timestamp, log level, and the boot phase (e.g., DXE). For the exact format, see the memory log implementation. The format is subject to change, and the memory log is intended to be accessed and parsed by tools within Project Mu and this crate. For details on accessing and parsing the logs, see the tools section.
Memory Log Initialization
The memory log is currently expected to be allocated and initialized by an earlier phase of boot such as SEC, PEI, or ARM64 Standalone MM. Patina will inherit the memory log from this earlier phase to provide a continuous log of the entire boot sequence. The location of the memory log provided by a previous phase will be provided through the Advanced Logger HOB, which simply consists of the physical address of the log. From there, the header, which is validated by signature, will describe the size and other state of the memory log. All configuration will be used from the inherited log; Advanced Logger expects that the creator of the log defines the state for the entire system, such as what the hardware port logging level is.
Support will be added to initialize the log in Patina. This has some limitations, as logging is normally initialized prior to memory allocations being available, and relying on such allocations would mean losing early log events from the memory log.
Memory Log Concurrency
After initialization, the memory log is designed to be altered by multiple environments at once. To achieve this, all alterations to global metadata used to allocate blocks in the log and update statistics are done through atomic compare exchange operations. This allows for multiple components to asynchronously allocate and fill entries without locking. This also allows for creating entries in the memory log from interrupts and callbacks without causing torn state, even if the interrupted code was in the middle of creating a log entry. These compare exchange operations should be done to reserve the space before any alteration to the log occurs.
Message Filtering
Log messages going through the advanced logger pipeline have multiple forms of filtering applied at different levels that may not all have the desired effect.
-
Log::set_max_level: This mechanism filters the level of messages that the Log crate will forward to the Advanced Logger. This will affect all traffic coming from the Patina core and components, but will have no effect on logging through the Protocol. -
Target Filters: The logger can be instantiated with context-specific level filters that can be used to control logging from noisy components. This is provided as a tuple of target string and a level; if the target string matches the log metadata, the level will be further restricted. This will affect only messages coming from the core and components and will not affect protocol messages.
-
Advanced Logger HW Port Level: The advanced logger will track logging levels that will be sent to the serial port in its memory log header. This can be used to filter serial usage while still capturing messages in the memory log. This will affect all log messages, both from the Log crate and the protocol. This will often be used to prevent serial logging on systems in production while still allowing for memory logs.
This is always set by the creator of the memory log to maintain consistency between concurrent boot phases.
Component
The component serves as the integration point for the Advanced Logger to interact with the platform. It is special in that it is intended to be initialized by the platform code. This is to allow the HOBs and the memory log to be initialized as early as possible. After this initialization, the component will use its normal execution path to create the Advanced Logger Protocol.
Advanced Logger Protocol
The Advanced Logger Protocol provides UEFI drivers access to the advanced logger, allowing their logs to be centrally controlled and routed to the serial and memory log as appropriate. EDK II-based drivers may use the Project Mu Advanced Logger DebugLib to forward debug messages to the Advanced Logger.
---
config:
  layout: elk
  look: handDrawn
displayMode: compact
---
flowchart LR
    driver["DXE Driver"]
    component["AdvLogger Component"]
    logger["Advanced Logger"]
    serial[["SerialIO"]]
    memory_log[["Memory Log"]]
    driver -- protocol('bar') --> component
    component --> logger
    logger -- 'bar' --> serial
    logger -- entry{'bar'} --> memory_log
Tools
Tools for accessing and parsing the Advanced Logger memory buffer exist both in
the patina_adv_logger crate and in Project Mu.
Access
The memory log, being in memory, is not directly accessible from a user or developer. There are a few different mechanisms for accessing the log, detailed below. The most common access mechanism is the Advanced File Logger. The file logger is a DXE driver that will periodically read, parse, and write the memory log to a file on the EFI System Partition. For more details, read the link above.
Other access mechanisms can be found in the Project Mu Advanced Logger readme.
Parsing
In some access methods, parsing of the buffer may be needed on the raw binary format log. For this parsing, users may use the Project Mu script, but there is also a binary parser built from the patina_adv_logger crate. The crate provided binary is preferable as it is guaranteed to stay in-sync with the implementation of the memory log. The rust parser wraps generic parsing logic in the library code.
Monolithically Compiled Component Model
This section covers the design and operations flow of how a monolithically compiled component is dispatched by the pure Patina DXE Core. That is to say how the component is registered, initialized, validated, and eventually dispatched. This does not expand any further on Driver Dispatch and is distinctly different then the UEFI Driver Model.
See Quick Reference at the bottom of this documentation.
General Design
There are four main parts to this model: (1) Filling Storage (2) Registering Configuration, (3) Registering Components, and (4) Executing Components.
Filling Storage
Storage is the single struct that contains all data (or a reference to data) that can be consumed by a
driver. The design point of having a centralized location for all data was chosen because it ensures that adding new
Param types does not become a breaking change. This is because the Component trait interface consumes
the Storage object instead each piece of data individually. When adding a new Param type, instead of updating the
Component trait interface with this new data, we instead update the Storage object, adding the new data to that
instead. This causes the "breaking change" to be internal to the DXE Core, instead of to every driver written.
Due to this, however, Storage is the bridge between Components and the rest of the DXE Core. During DXE Core
initialization, Storage must also be updated to hold certain important pieces of data. As an example, once the boot
services table has been fully initialized, it must also be registered with Storage, otherwise no component that
wishes to use the boot services table will ever be executed. Another example is that Storage directly contains the
HobList object, and allows for components to have am immutable reference to this. This particular part of the model
is not complex, but it is important because when adding new Param types, Storage must be provided accesses to
the underlying data, provided by the DXE Core.
Registering Configuration
Configuration is managed by the Config<T> and ConfigMut<T> Param implementations. The inner value, T must
implement Default, allowing all configuration to always be available. This is important because it allows default
implementation of configuration that platforms can then override with their platform. A platform can easily register
custom configuration, which is cascaded to all components that have Config<T> or ConfigMut<T> in their function
interface.
#![allow(unused)]
fn main() {
extern crate patina_dxe_core;
use patina_dxe_core::*;

struct Platform;

impl ComponentInfo for Platform {
  fn configs(mut add: Add<Config>) {
    add.config(52_u32);
    add.config(62_usize);
  }
}
}
Config<T> and ConfigMut<T> are special, as they both reference the same underlying data. As you might expect
ConfigMut<T> allows you to mutate configuration. To prevent drivers that rely on Config<T> from running with T
that has not been finalized, The below rules have been implemented for the interaction between the two.
- The underlying value
Thas the concept of being "locked" or "unlocked" Config<T>is only "retrievable" when the underlying valueTis "locked"ConfigMut<T>is only "retrievable" when the underlying valueTis "unlocked"- All configuration values are "locked" by default.
- Only the dispatcher is able to "unlock" a component, which occurs prior to any component execution, if a registered
component is detected to use
ConfigMut<T>. - Configuration can be locked two separate ways: via
ConfigMut<T>::lock()and automatically by the dispatcher.
In layman's terms, what this means is that all drivers with ConfigMut<T> will run first, allowing configuration to be
mutated as needed. Only once the underlying value has been locked, will drivers that require Config<T> run. Once a
configuration value has been locked, it cannot be unlocked. The actual flow diagram will be provided in the
Executing Components section.
Registering Components
Registering a component is a fairly simple process. The component is turned into a Box<dyn Component>
(using into_component()) so that multiple implementations of Component can be supported. The cost of this
abstraction and v-table lookup is fairly minimal due to the low number of components as compared to other parts of the
DXE Core. From there, the Component::initialize method is called. This is different for each component
implementation, however generically, this method is used to initialize, register, and validate all Param usage that
the specific component uses.
In terms of initialization, Component::initialize is used to initialize the param and store any immutable state. As an
example, the Config<T> and ConfigMut<T> params use this to request and store the global registration id of the
underlying T value so that when attempting to fetch the value, it does not have to first query the global id before
requesting the type using the id.
In terms of registration, Component::initialize is used to register any data accesses the parameter has with the
component's metadata. The scheduler can use the access set of each component for scheduling parallel execution of
components, though this is not yet implemented.
In terms of validation, Patina-defined parameter types are validated at compile time. Custom parameter types are
validated in Component::initialize. This is done via the access set mentioned above. As an example, a component that
uses ConfigMut<T> and Config<T> is invalid. You cannot have mutable and immutable access to the same data.
Once the component and its params are fully registered, the component is stored for dispatch.
#![allow(unused)]
fn main() {
extern crate patina_dxe_core;
extern crate patina;
use patina::component::component;
#[derive(Default)]
pub struct ExampleComponent;
#[component]
impl ExampleComponent {
  fn entry_point(self) -> patina::error::Result<()> { Ok(()) }
}
use patina_dxe_core::*;

struct Platform;

impl ComponentInfo for Platform {
  fn components(mut add: Add<Component>) {
    add.component(ExampleComponent::default())
  }
}
}
Executing Components
Executing a component is also a fairly simple process. There is an outer process handled by the DXE Core (controlling
when to execute a component), and an inner process handled by the Component trait implementation on how to
execute a component.
We will first talk about the logic behind when to execute a component. This processes is straight forward. The
dispatcher attempts to run all components as-is. It does this in a similar fashion as the EDK II dispatcher. That is
to say it will loop through all components, attempting to execute them until either no components are left, or no
change has happened since the previous loop. Whereas EDK II would normally exit dispatch, the component dispatcher
instead will lock all configuration values and restart the process. This is important because it allows any component
that relies on Config<T> to execute, even if a driver that needed ConfigMut<T> never locked the underlying value.
Below is the flow chart for attempting to dispatch all components:
---
config:
  layout: elk
  look: handDrawn
---
graph LR
    A[Core::core_dispatcher] --> B[Storage::lock_configs]
    B --> C[Core::core_dispatcher]
    C --> D[Core::display_components_not_dispatched]
Below is the flow chart for Core::core_dispatcher.
---
config:
  layout: elk
  look: handDrawn
displayMode: compact
---
graph LR
    A[Component::run] --> B{Success?}
    B -- Yes --> C[Remove Component]
    B -- No --> D
    C --> D{More Components?}
    D -- Yes --> A
    D -- No --> E{Env Changed?}
    E -- Yes --> A
    E -- No --> Exit
Next, we will talk about the logic behind how to execute a component. The process for executing a component will vary
between component implementations, however generically the process is to validate that each component's params are
available. If all are available, we then execute the component. If all params are not available, we exit with a return
value indicating as such. it must be noted that params self-validate, so it is important that each implementation of
Param is correct.
Below is the flow chart for Component::run
---
config:
  layout: elk
  look: handDrawn
displayMode: compact
---
graph LR
    B[Param::validate] --> C{Valid?};
    C -- Yes --> D[Param::retrieve];
    D --> E{More Params?};
    E -- Yes --> B;
    E -- No --> Y[Run Component];
    C -- No --> Z[Exit];
Quick Reference
Traits
Component: The trait every component must implement.IntoComponent: A trait for converting non-components into aBox<dyn Component>for dynamic dispatchParam: A trait implemented on various types that allow them to be used as a function parameter for dependency injection
Default Param implementations
See Component Interface for the list of default Param implementations.
Naming Conventions
It is recommended to avoid including "Config", "Component", or "Service" directly in the names of your types unless it adds value for clarity (such as some of the example names in this document). Otherwise, the fully qualified name and other code context has been observed to be sufficient for understanding what the type represents while reducing the amount of repetitive naming across the codebase. This is not a rule, but a recommendation.
Advantages
-
Non-breaking interface:
Paramimplementations can be added at any time without directly breaking existing interfaces. This means extending functionality and adding additional abstractions and functionality can be done at any time without breaking existing drivers. Additionally, new implementations ofComponentcan be added that could be completely different that existing implementations such asStructComponent. They may not even use dependency injection! -
Configuration: A single location exists for all configuration for the platform. This prevents configuration from being duplicated across multiple drivers as with Static PCDs. This also allows for configuration to be of any rust supported type, unlike the limited configuration of EDK II. Finally, any component is able to hook any configuration value it wants, so long as it is public configuration.
-
Testing: Testing is made easy. Simply create an instance / mock for each
paramyour component expects, and test it! No complex levels of indirection and setup necessary to test the function. -
Dependency Expression: No need to define a dependency expression, the interface is the dependency expression!
CPU
Paging Implementation
See the paging documentation for paging internals and memory protection documentation for memory protections.
Debugging
Source debugging in Patina is implemented as a self-hosted or "kernel" debugger
that executes within the exception handlers in the system. These exception handlers
will inspect the state of the system through memory, registers, and exception frames to present
the debugger application with a snapshot of the system at the moment it took the exception.
The communication between the exception handlers and the software debugger is implemented
using the GDB Remote Protocol
which is supported by a number of debugger applications. For instructions on configuring
and using the debugger, see the patina_debugging README.
The Patina debugger is a software debugger which, in contrast to a hardware or JTAG debugger, is implemented entirely within the patina software stack. This has many advantages such as being more flexible, accessible, and available but also means that it will have inherent limitations on its ability to debug all scenarios. Like with all debugging tools, it is a powerful tool but may not be the correct choice for all scenarios.
Below is a simplified diagram of the sequence of a debugger interaction, starting with the exception, continuing with the debugger operations, and ending with resuming from the exception.
---
config:
  layout: elk
  look: handDrawn
displayMode: compact
---
sequenceDiagram
  Box blue Patina Platform
  participant Patina
  participant ExceptionHandler as Patina Exception Handler
  participant Debugger
  participant GdbStub as Gdb Stub
  end
  participant DebuggerApp as Debugger Application

  Patina->>ExceptionHandler: Exception occurs (e.g. breakpoint)
  ExceptionHandler->>Debugger: Invoke debugger callback
  Debugger->>GdbStub: Notify break
  GdbStub->>DebuggerApp: Notify break
  DebuggerApp->>GdbStub: Read state (e.g. memory/registers)
  GdbStub->>Debugger: Read state
  Debugger->>GdbStub: Send result
  GdbStub->>DebuggerApp: Return result
  DebuggerApp->>GdbStub: Continue command
  GdbStub->>Debugger: Continue command
  Debugger->>ExceptionHandler: Return
  ExceptionHandler->>Patina: Return from exception
Prerequisites
The debugger relies on exception table information being preserved in order to get an accurate stack trace. Two flags are needed to tell the toolchain to preserve this information, one for Rust, one for C code.
Rust:
This needs to be set in the environment variables for the build.
RUSTFLAGS=-Cforce-unwind-tables
C:
This needs to be set in the platform DSC's build options section:
*_*_*_GENFW_FLAGS = --keepexceptiontable
Structures
The debugger consists of two high-level structures: the debugger struct itself and the transport. The debugger implements the debugging logic and exception handling while the transport handles the physical communication to the debugger application.
Debugger Struct
The debugger is primary implemented through a 'static struct, PatinaDebugger,
which is instantiated and configured by the platform code, but will be initialized by the core.
This allows the platform to setup the appropriate transport and configurations prior
to Patina. However, as Patina will control the exception handlers framework, the debugger
cannot be initialized until that is available during early initialization. This struct must
be 'static as it will be registered as an exception handler which cannot assume any
ownership or lifetimes as they will occur independent of the previous executing thread.
Because of the need for a 'static lifetime, global access, and generic implementation
based on the transport, the debugger will be set to a static variable. Access to debugger
functions is done through static routines that will internally access the globally
installed debugger, if it exists. This is a contrasting design to other Patina
services because of the unique integration of the debugger in core initialization.
Debug Transport
For the self-hosted debugger to communicate with the debugging software, such as Windbg, there needs to be a physical line of communication between the system under debug and the host machine. This transport should implement the SerialIO trait to provide a simple mechanism to read or write to the bus. This transport may be the same transport used by the logging console or it may be a dedicated UART or other serial connection. Most devices should be able to use a standard UART implementation from the SDK as the transport, providing the correct interface configurations.
Phases of the Debugger
The debugger has two primary phases of operation: initialization where it prepares the debugging infrastructure, and exception handling where it will inspect system state and communicate with the debugger application.
Initialization
Initialization of the debugger consists of two major operations: allocating resources and configuration exception handlers.
A number of buffers are required for the debugger to function such as the GDB and monitor buffers used for parsing input and preparing responses. These buffers are pre-allocated because memory should not be allocated while actively broken into the debugger as the state of the system is unknown should be minimally altered by the presence of the debugger. This ensures a consistent view of the system under debug as well as prevent debugger instability with reliance on systems in an unknown state.
The exception handlers are where the debugger is "broken-in" and is actively inspecting system state and communicating with the debugger application. These are configured during initialization so whenever an exception is taken, such as a breakpoint or an access violation, it will cause the debugger to be invoked.
Initial Breakpoint
If enabled, at the end of initialization the debugger will invoke a hard-coded breakpoint instruction, causing the CPU to take an exception invoking the debugger exception handlers. This is referred to as the Initial Breakpoint. The initial breakpoint is intended to give the developer time to connect to the system as early as possible in order to setup breakpoints or otherwise interact with the debugger before any further execution takes place.
Support is planned to allow the initial breakpoint to have a timeout such that if a connection is not established within a configured time, the system will continue execution. This will allow scenarios where the debugger is enabled but only used occasionally.
Exception Handling
All actual debugging occurs within the exception handlers installed during initialization.
This will rely on the Patina InterruptManager to capture the executing context
during the initial exception, storing register state in a struct, before calling
out to the registered debugger exception handler. At this point, the debugger will
send a message over the transport to notify the debugger application that a break
has occurred. From this point forward, the application will dictate all operations that occur.
The following are the primary operations requested by the application.
- Querying system/architecture information
- Reading/writing registers
- Reading/writing memory
- Executing monitor commands
- Setting/clearing breakpoints
- Continuing or stepping
The self-hosted debugger will perform these operations but does not have the greater context that the application does. e.g. the self-hosted debugger may be asked to set memory address to a certain value, but only the application knows the significance of the memory address - be it a variable, stack, or other structure. The self-hosted debugger just performs rudimentary inspected/alteration of system state and is not responsible for understanding why these things are done.
Operations
While broken-in the Patina debugger is responsible for communicating with the application and performing various operations to support debugging scenarios. This communication and the resulting operations are detailed in this section.
GDB Stub
The GDB Remote Protocol implementation for a debugger is often referred to as the GDB Stub. For the Patina debugger, the gdbstub crate is used. This crate handles all of the protocol packet interpretation and creation and calls out to a target structure provided by the Patina debugger to handle the debugging operations such as reading/writing registers. Additionally a custom gdbstub_arch is used to align to the UEFI interrupt context structures.
The GDB protocol was selected because it is a robust communication standard that is open and supported by many debug applications, including Windbg, GDB, LLDB, etc. The GDB protocol is ascii based and so is not as performant as binary protocols such as those used by Windbg natively. Other protocols may be supported in the future to accommodate this and other shortcomings.
Register Access
During the exception, the Patina exception handler will capture the register state into a stack variable and provide this to the Patina debugger exception handler routines. This captured state is what will be presented to the application as the current state of the system, providing a snapshot of the registers at the point of the exception. Any change to this structure will be restored faithfully by the Patina exception handler code when the exception stack unwinds so that any change to these registers while in the debugger will take affect when returning from the exception.
Notably, this does not include most system registers or MSRs. Any alteration to these registers will take immediate effect (and may impact the debugger operation).
Memory Access
Unlike register state, memory inspected by the debugger is the actual memory. For this reason, the debugger should attempt to be minimally invasive or reliant on other stateful services in the core as it could cause torn state or inconsistent debugging results. The debugger currently requires that all memory access be mapped, but it will temporarily fix-up write access to memory as needed.
Alteration to memory used by the debugger while the debugger is broken-in may cause unexpected behavior.
Breakpoints
There are several types of breakpoints that are configurable on the system.
Software Breakpoints - These are the most common type of dynamic breakpoints
configured by the debugger and are the default for generic breakpoint instructions
sent from the application. Software breakpoints are breakpoint instructions that
the debugger will inject into the instruction stream, directly replacing the original
instruction. For example, on x64 the debugger will replace the instruction with an
int 3 instruction for the address of the breakpoint. When broken in, the application
will typically temporarily remove the breakpoint so that this behavior is transparent
to the user. Resuming from a software breakpoint must be done with care as a simple
continue would either take the exception again or leave the instruction stream
unaltered preventing the breakpoint from functioning in the future. So the the application
will typically step beyond the broken instruction before setting the breakpoint again.
Break Instructions - These are permanent and compile time breakpoint instructions
in the underlying code. In Patina this will typically be achieved by calling patina_debugger::breakpoint().
When resuming from a breakpoint, the debugger will inspect the exception address to
see if it contains a hardcoded breakpoint, and if so it will increment the program
counter to skip the instruction. Otherwise the system would never be able to make
progress from a breakpoint instruction.
Data Breakpoints - Also known as watchpoints, these are the only supported form of hardware breakpoint, where debug registers are configured to cause an exception on access to a specific address. The hardware is responsible for creating the exception in these cases. These are used to capture reads or write to specific memory.
Module Breakpoints - These are simply break instruction, but can be conceptually considered their own entity. Module breaks are configured to cause the debugger to break in when a specific module is loaded. This is achieved through a callout from the core each time a new module is loaded. This is useful for developers who want to debug a specific module as it gives them a chance to set breakpoints prior to the module being executed.
Monitor Commands
Monitor commands are implementation interpreted commands in the GDB remote protocol
through the qRcmd packet.
These locally interpreted commands are useful for operations that do not have standard
or well-supported remote protocol functions but require local code execution on the
system. Some examples for this could be:
- Altering debugger behavior such as mapping checks.
- Querying the state of the debugger.
- Querying arbitrary system registers.
- Configuring module breakpoints.
- Environment specific extensions.
The debugger allows for external code to register for monitor callbacks to allows
for Patina or components to add their own monitor commands through the add_monitor_command
routine. As these commands are executed from the exception handler, special care
should be taken to avoid memory allocations or other global state alterations.
It is possible to have commands that alter global state or allocate memory, but
your mileage may vary depending on system state, e.g. the system may hang.
Continuing execution
When a step or continue instruction is received, the debugger will resume from the exception. This is done by returning from the exception callback where the generic Patina exception handling code will then restore register state and return from the exception.
If the continuing command is a step instruction, the debugger will set debug registers to indicate to the processor that after a single instruction has been executed, an exception should be taken. On X64 this is the Trap Flag in the RFlags, and on AArch64 this a combination of the SS bit in the MDSCR and the SS bit in the SPSR. These bits will always be cleared on break to ensure the system doesn't get stuck stepping.
Configuring the Debugger
Configuring the debugger is left to the platform as the decision on when and how
to enable the debugger has environment, security, and other considerations that
are specific to a platform and its use case. There are two supported methods for
enabling the debugger: hard-coded enablement through use of the enablement routines
in the PatinaDebugger struct.
Direct configuration through the PatinaDebugger initialization can be useful for
quick configuration during development or controlled configuration through a platform
designed mechanism. Thie configuration is done through the with_default_config
routine allowing the caller to set enablement, initial breakpoint, and the initial
breakpoint timeout.
Debugger enablement on release platforms can be dangerous. It is critical that platforms that use the debugger ensure that enablement cannot be done without proper configuration or authorization.
Debugger Applications
While the GDB remote protocol is supported by other debugger applications, the Patina development has been primarily focused on Windbg support. This is because Windbg provides strong support for systems programming concepts as well as strong PDB support, which patina relies on.
Windbg Integrations
Windbg supports the GDB interface through an EXDI extension. This implementation uses a small subset of the full GDB protocol, but is sufficient for most operations. To supplement this support, the UefiExt extension has been modified to support the Patina debugger. The extension is critical for the developer experience while using Windbg.
Other Debugger Applications
While the debugger is designed to be compatible with GDB and other debugger applications that support the GDB protocol, no investment has currently been made into testing and tooling. Future support here would be welcomed as the need arises.
Dispatcher
This portion of the core deals with discovering and executing drivers found in firmware volumes as ordered by their dependencies. The Patina DXE Core dispatcher generally aligns with the requirements laid out in the UEFI Platform Initialization Spec for the DXE Dispatcher, with the exception of a priori file support.
Dispatcher Initialization
The dispatcher relies on the Patina DXE Core Event and Protocol services in order to
locate and execute drivers. On initialization, the dispatcher registers an event notify callback on the
EFI_FIRMWARE_VOLUME_BLOCK2_PROTOCOL,
which is produced for each firmware volume. This allows the dispatcher to interrogate the firmware volume and add any
new drivers within the volume to the dispatcher queue.
The core also provides an instance of the section extractor
interface, which is used by the dispatcher to process compressed and
guided
sections. The reference section extractor provided with the Patina DXE Core can
extract sections compressed with the UEFI
Compress
algorithm, as well as sections compressed with the
Brotli compression algorithm.
As part of core initialization, any firmware volumes produced by the HOB producer phase (to include at least the firmware volume containing the Patina DXE Core itself) are added to the dispatcher prior to initial invocation (otherwise, there would be nothing to dispatch). See Firmware Volume Processing below for details.
Dispatcher Invocation
After initialization, the dispatcher is invoked by the core_dispatch function, which has the same semantics as the
DXE Services Dispatch() function. This
executes the core dispatcher loop, which is described below.
Once the first execution of core_dispatch loop processes and executes all available drivers, it returns control to the
Patina DXE Core, which then transfers control to the "BDS" driver by invoking the
BDS Architectural Protocol.
The dispatcher may be invoked again (for example, if the BDS phase produces additional firmware volumes) by invoking the
core_dispatch function again. This may also be done by applications or drivers outside the core by invoking the
DXE Services Dispatch() function.
Dispatcher state is preserved between invocations. This means that any pending drivers or firmware volumes which were not dispatched on prior invocations remain in the dispatcher queues and may be dispatched if their DEPEX expressions become satisfied on a subsequent invocation of the dispatch loop. This could happen if new firmware volumes are added to the system between invocations of the dispatcher.
Core Dispatch Loop
Each time the dispatcher is invoked, it performs the following in a loop until no new drivers are dispatched:
- Evaluates the DEPEX expressions for all "pending" drivers. If the DEPEX expression associated with a driver evaluates
to
TRUE, that driver is added to the "scheduled" queue. See the Depex Processing section below for details on DEPEX processing. This is the green box in the diagram below. - Each driver in the "scheduled" queue from the prior step is loaded via
core_load_image. core_load_imagereturns a security status for the image in addition to loading it. If the security status isefi::status::SUCCESS, then the image will be started. If it isefi::status::SECURITY_VIOLATION, that indicates that the image does not pass authentication at the present time, but may be authorized by theTrust()API of DXE Services. if the security status is some other error status, then the dispatcher will drop that driver from the queue and it will not be processed further.- If the driver passes the security checks, then its entry point is invoked via
core_start_image. This is the purple box in the diagram below. - If any of the drivers produced new Firmware Volume instances then the DEPEX expressions associated with Firmware Volume instances (if any) are evaluated. If the DEPEX expression associated with the firmware volume evaluates to true (or if the Firmware Volume had no associated DEPEX expression), then all the drivers in the firmware volume are added to the "pending" driver queue to be evaluated in the next pass through the loop. See the Firmware Volume Processing section below for details on Firmware Volume processing. This is the red box in the diagram below.
On the first pass through the core dispatcher loop, the "Pending" and "Scheduled" driver queues are empty until the set of Firmware Volumes can be processed to add new drivers to the "Pending" queue.
---
title: Dispatcher Flow
config:
  layout: elk
displayMode: compact
---
flowchart TB

start([core_dispatch])
pending_drivers{{Foreach Driver in *Pending* Queue}}
depex_eval(Depex Satisfied?)
schedule_driver(Add Driver to *Scheduled* Queue)
more_pending_drivers(More Pending Drivers?)
pending_drivers_complete{{All Pending Drivers Processed}}

scheduled_drivers{{Foreach Driver in *Scheduled* Queue}}
load_driver("core_load_image(*driver*)")
start_driver("core_start_image(*driver*)")
produces_firmware_volume(Produces Firmware Volume?)
add_firmware_volume(Add Firmware Volume to *Firmware Volume* Queue)
more_scheduled_drivers(More Scheduled Drivers?)
scheduled_drivers_complete{{All Scheduled Drivers Processed}}

firmware_volumes{{Foreach FV in *Firmware Volume* Queue}}
fv_depex_eval(Firmare Volume Depex Satisfied?)
add_drivers(Add all FV drivers to *Pending* Queue)
more_pending_fvs(More Firmware Volumes?)
firmware_volumes_complete{{All Firmware Volumes Processed}}

any_dispatched(Any Drivers added to *Pending* or *Scheduled* Queues?)

dispatch_complete([core_dispatch_complete])

start-->pending_drivers

subgraph pending_drivers_block[" "]
pending_drivers-->depex_eval
depex_eval-- YES -->schedule_driver
depex_eval-- NO -->more_pending_drivers
schedule_driver-->more_pending_drivers
more_pending_drivers-- YES -->pending_drivers
more_pending_drivers-- NO -->pending_drivers_complete
end

pending_drivers_complete-->scheduled_drivers

subgraph scheduled_drivers_block[" "]
scheduled_drivers-->load_driver
load_driver-->start_driver
start_driver-->produces_firmware_volume
produces_firmware_volume -- YES -->add_firmware_volume
produces_firmware_volume -- NO -->more_scheduled_drivers
add_firmware_volume-->more_scheduled_drivers
more_scheduled_drivers -- YES -->scheduled_drivers
more_scheduled_drivers -- NO -->scheduled_drivers_complete
end

scheduled_drivers_complete-->firmware_volumes

subgraph firmware_volumes_block[" "]
firmware_volumes-->fv_depex_eval
fv_depex_eval-- No DEPEX Present -->add_drivers
fv_depex_eval-- YES -->add_drivers
fv_depex_eval-- NO -->more_pending_fvs
add_drivers-->more_pending_fvs
more_pending_fvs-- YES -->firmware_volumes
more_pending_fvs-- NO -->firmware_volumes_complete
end

firmware_volumes_complete-->any_dispatched
any_dispatched-- YES -->start
any_dispatched-- NO -->dispatch_complete

style pending_drivers_block fill:#5a5
style scheduled_drivers_block fill:#aac
style firmware_volumes_block fill:#caa
DEPEX Processing
Dependency Expressions ("DEPEX") are a method to describe the dependencies of a UEFI module so that the dispatcher can order module execution. In order for the dispatcher to execute a module, the associated DEPEX must evaluate to TRUE. The DEPEX architecture and details of the various dependency operations are specified in the UEFI Platform Initialization Spec section on Dependency Expressions.
Modules that do not have a DEPEX associated with them will get an implicit DEPEX for "All Architectural Protocols" installed per the guidance in the UEFI Platform Initialization Spec.
DEPEX are also used to determine whether a newly-discovered encapsulated firmware volume is processed. If a nested firmware volume file is discovered while processing the files in a firmware volume, and if the nested firmware volume file also has a DEPEX section, then then associated DEPEX must evaluate to TRUE before the modules within the nested firmware volume will be processed.
The core dispatcher uses the patina_internal_core::depex module to support DEPEX parsing and
evaluation, which implements all of the DEPEX operators and capabilities specified in the UEFI
Platform Initialization Spec.
A Priori File
The Patina DXE Core does not presently provide support for a priori file control of dispatch order for drivers.
The a priori file was introduced in the Platform Initialization (PI) Specification to provide additional flexibility when designing platform firmware. A single a priori file was optionally allowed per firmware volume. The a priori file allowed a list of DXE drivers to be specified by their module GUID that received special treatment from the DXE dispatcher:
- Drivers listed in the a priori file were always dispatched first, regardless of their dependency expressions (DEPEX are ignored).
- Drivers listed in the a priori file were always dispatched in the order they were listed in the file.
The a priori mechanism was envisioned to support two primary use cases:
- Allow a small set of early drivers to be grouped for early dispatch before the remainder of drivers are evaluated via their dependency expressions.
- Allow a platform to bypass the DEPEX evaluation mechanism entirely in a given platform. This was targeted at smaller, embedded projects that wanted to maintain a fixed and predictable dispatch order.
In practice, we have found that an a priori file serves neither of these purposes well and makes DXE driver dispatch error prone and brittle. (1) has largely evolved into a code smell that indicates the drivers have not defined their dependencies correctly and (2) has shown to be impractical. Truly embedded projects have opted for boot loader designs outside of the PI Specification while projects adhering to the PI Specification remain large and complex, consisting of hundreds of DXE drivers.
Brittleness of a priori
First, an a priori file is not reusable. It must be constructed correctly per platform. This alone makes the exercise of maintaining an a priori file error prone. Second, a modern platform constructed with industry standard DXE drivers and common layers of abstraction will have in excess of 100 DXE drivers which exacerbates the complexity of crafting the a priori file correctly and the maintainability of the file over time.
Of the hundreds of DXE drivers in modern platform firmware, only a very small number are authored by the platform engineer that will be responsible for constructing an a priori file for a given platform.
- It is not practical to expect a platform engineer(s) to understand the dependencies of all the drivers in the system.
- The dependencies are not fixed per driver but an aggregation of all the dependencies that are in code linked into the driver. This means the platform engineer must now account for the dependencies of code within each driver and how those dependencies interact with the dependencies of other drivers.
- Even if dependency expressions are ignored entirely, in order for code written by other authors to be portable, dependencies must be declared and accounted for correctly. There has been no tangible value in bypassing or duplicating alternate dependency systems.
- While both a pure a priori and a dependency-based dispatch can "appear to work" with room for error in dependencies, the a priori file is much more brittle. The human responsible for constructing the a priori file must get the dependencies correct that would already be correct with dependency-based dispatch in addition to those that are not.
Alternatives
To foster a more maintainable, robust, and correct DXE environment, the Patina DXE Core does not support a priori files and requires that code being dispatched declare its dependencies properly. These are alternatives to maintain some of the properties in a priori without using an a priori file:
- Driver Order: Files will be dispatched in order of their placement within a firmware volume. If two drivers are both eligible for dispatch, the one that appears first in the firmware volume will be dispatched first.
- Driver vs Code Dependency: Driver and code dispatch are separate. A driver must establish what dependencies are necessary for its entry point. The entry point may install additional notifications and events that will trigger specific code on other external events.
Summary
The Patina DXE Core opts to require a programatically accurate evaluation of author-declared dependencies rather than a "predictable" order that is more susceptible to error and assumptions built around that order that result in rigid code. Libraries and drivers should declare their dependencies correctly so that platforms can quickly and easily integrate their code into larger systems.
Firmware Volume Processing
The dispatcher is responsible for processing firmware volumes installed in the core and discovering and dispatching
modules within those firmware volumes. The initial set of firmware volumes available to the dispatcher is supplied from
the HOB list and on initialization, the dispatcher will install a notification callback to fire whenever a new instance
of EFI_FIRMWARE_VOLUME_BLOCK2_PROTOCOL
is produced.
New firmware volume instances are made available to the core either via installing an instance of
EFI_FIRMWARE_VOLUME_BLOCK2_PROTOCOL directly into the protocol database, or calling the process_firmware_volume()
routine that is part of the DXE Services interface.
When a new firmware volume is installed in the core, the dispatcher notification will fire to process the contents of the new firmware volume. Each new firmware volume is processed as follows:
- The physical base address of the firmware volume in memory is retrieved from the
EFI_FIRMWARE_VOLUME_BLOCK2_PROTOCOLinstance and used to instantiate aFirmwareVolumewhich allows traversal of the files within the firmware volume. - The new firmware volume is authenticated using the Security Architectural Protocol. If the authentication fails, the the firmware volume is ignored and not processed by the dispatcher.
- Using the
FirmwareVolumeinstance, each file in the firmware volume is inspected.- If it has an FFS filetype of "DRIVER", then its sections are inspected to see if there is a PE32 section. If the file contains a PE32 section, then it is added to the pending driver queue in the dispatcher, along with a DEPEX section if present.
- If it has an FFS filetype of "FIRMWARE_VOLUME_IMAGE", then its sections are inspected to see if there is a firmware volume section. If the file contains a firmware volume section, then it is added to the pending firmware volume queue in the dispatcher, along with a DEPEX section if present.
Event, Timer and Task Priority Services
This portion of the core is concerned with producing the capabilities described in Section 7.1 of the UEFI specification to support synchronous and asynchronous eventing within the UEFI context. This section assumes basic familiarity with UEFI event, timer and task priority services and focuses on how they are implemented in the Rust DXE Core.
The main implementation for Event, Timer and Task Priority features resides in the Event Database object implemented by
the patina_dxe_core crate. The event database is then used to implement the UEFI spec boot services for event, timer and
task priority by the main Patina DXE Core event.rs module.
Event Database
There are two main data structures tracked within the event database: events themselves, and pending event notifies.
Event Objects
An "event" is used to track events of interest to the firmware. See: Section 7.1.1 of the UEFI spec for a discussion of what an event is and how it is used in the firmware. In the Patina DXE Core event database, an event object contains the following data:
| Data | Purpose | Applies to |
|---|---|---|
| id | Uniquely identify an event | All Event Types |
| type | Type of event | All Event Types |
| group | Group to which this event belongs | All Event Types (Optional) |
| signaled | Whether the event is currently in the 'signaled' state | All Event Types |
| notify data | TPL, notify function, and context for event notifications | Notify Events |
| timer data | period/relative offset for timer events | Timer Events |
An event may be of more than one type, (for example, a Timer/Notify event will use both Notify Event and Timer Event fields).
Pending Event Notify Objects
A pending notification is used to track an outstanding notification for an event that has been placed in the 'signaled' state but which has not yet been "delivered" by the core (typically because the firmware is running at a TPL equal to or higher to the notification TPL of the event). In the Patina DXE Core event database, a pending notify object contains the following data:
| Field | Purpose |
|---|---|
| event | The id of the event for which this notify is pending |
| notify tpl | TPL at which the event notification should be delivered |
| notify function | Function to invoke to deliver the notification |
| notify context | Context data passed to to the notification function |
Database Structure
The event database has two main tracking structures:
- A map of
eventobjects indexed byidfor fast lookup, and - An ordered set of unique
pending event notifyobjects ordered by TPL and then by creation time (oldest notifies first)
In addition, the event database also tracks the next available id for assignment to new events, as well as tracking
internal state associated with the proper ordering of pending event notify objects.
Operations
The event database supports a number of operations to support event, timer, and task priority services. These include event creation and deletion, event signaling, timer creation, timer tick, and notification queue management.
Event Lifecycle
The lifecycle of an event is as follows:
---
Event Lifecycle
---
stateDiagram-v2
state "Event" as event {
  state "signaled" as signaled
  state "Not signaled" as not_signaled
}

[*] --> event:Create
not_signaled --> signaled: Signal
signaled --> not_signaled: Handle (notify/wait)
event --> [*]:Close
Creating an Event
An event is created by calling the create_event function on the event database, and specifying the event_type,
notify_tpl (can be zero for non-notify events), and optional notify_function, notify_context and event_group
parameters. This will create the event object, assign it an id, and insert it into the event database. The id value
of the created event (of type efi::Event) is returned on success.
The type of an event can be queried by calling the get_event_type function on the event database and specifying the
id of the event. The notification data associated with a given event can be queried by calling the
get_notification_data function on the event database and specifying the id of the event.
Closing an Event
An event can be removed from the database by calling the close_event function on the event database, and specifying
the id of the event to be removed. Closing an event will prevent it from being signaled, and any pending notifies for
that event are
effectively cancelled and will not be delivered once the event is closed.
Signaling an Event
An event can be explicitly placed in the 'signaled' state by calling the signal_event function on the event database
and specifying the id of the event to be placed in the 'signaled' state, or by calling the signal_event_group and
specifying the event group that an event is a member of (specified on event creation). A timer event may also be
automatically signaled on timer expiration (see Timers).
Signaling an event does the following:
- puts the event in the 'signaled' state.
- signals events with the same
groupas the current event. - for
notifyevents, creates and inserts apending event notifyobject in the ordered set that tracks pending events.
Whether an event is in the 'signaled' state can be queried by calling the is_signaled function on the event database
and specifying the id of the event to query. The 'signaled' state can be cleared by calling the clear_signal
function on the event database and specifying the id of the event. Note that clearing the 'signaled' state does not
cancel pending notifications of the event - these will still be processed even if the 'signaled' state has ben
independently cleared. The event database also provides a read_and_clear_signaled function to allow the signal state
to be read and cleared as a single operation.
Pending Event Notification Queue
The event database maintains an ordered set of pending event notify objects representing queued for notifications for
events.
When an event with a notify event type is signaled or explicitly queued for notify (see:
Queuing an Event without a Signal), a new pending event notify object
is added to the ordered set of pending event notify objects.
Note: this is technically an ordered set (not strictly a queue) because only one pending event notify may exist in
the set for a given event id - no duplicates are permitted. If a pending event notify already exists for a given
event and an attempt is made to queue it again, nothing happens.
The pending event notify queue is ordered first by the notify tpl level of the event, and then by 'arrival time' of
the event notification - earlier pending event notify objects will be ordered ahead of later pending event notify
objects at the same notify tpl.
---
title: Initial Queue
config:
  layout: elk
---
flowchart LR
  event1["`event id: 1,
  notify tpl: TPL_NOTIFY`"]
  event2["`event id: 2,
  notify tpl: TPL_NOTIFY`"]
  event3["`event id: 3,
  notify tpl: TPL_CALLBACK`"]
  event4["`event id: 4,
  notify tpl: TPL_CALLBACK`"]

event1-->event2-->event3-->event4
---
title: New Pending Event Notify Added at TPL_NOTIFY
config:
  layout: elk
---
flowchart LR
  event1["`event id: 1,
  notify tpl: TPL_NOTIFY`"]
  event2["`event id: 2,
  notify tpl: TPL_NOTIFY`"]
  event3["`event id: 3,
  notify tpl: TPL_CALLBACK`"]
  event4["`event id: 4,
  notify tpl: TPL_CALLBACK`"]
  event5["`event id: 5,
  notify tpl: TPL_NOTIFY`"]
  style event5 fill:#11aa11

  event1-->event2-->event5-->event3-->event4
---
title: New Pending Event Notify Added at TPL_CALLBACK
config:
  layout: elk
---
flowchart LR
  event1["`event id: 1,
  notify tpl: TPL_NOTIFY`"]
  event2["`event id: 2,
  notify tpl: TPL_NOTIFY`"]
  event3["`event id: 3,
  notify tpl: TPL_CALLBACK`"]
  event4["`event id: 4,
  notify tpl: TPL_CALLBACK`"]
  event5["`event id: 5,
  notify tpl: TPL_NOTIFY`"]
  event6["`event id: 6,
  notify tpl: TPL_CALLBACK`"]
  style event6 fill:#11aa11

  event1-->event2-->event5-->event3-->event4-->event6
Queuing an Event without a Signal
In some scenarios it may be desirable to invoke the notification callback of the event when it is in the 'Not signaled'
state. This can be done by invoking the queue_event_notify function on the event database and specifying the id of
the event to queue for notification. This will add a pending event notify object to the pending notification queue.
This is useful when the event is a 'Notify Wait' type and is intended to be used by UEFI BOOT_SERVICES.WaitForEvent() or UEFI BOOT_SERVICES.CheckEvent(), where invocation of the notification function is used to check and potentially transition the event to a 'signaled' state.
Accessing the Pending Event Queue
The pending event queue can be accessed by calling the event_notification_iter function on the event database and
specifying the minimum TPL level for which events should be returned. This function returns an iterator that will return
pending event notify objects in order until no objects remain in the ordered set of pending notifications at that TPL
or higher.
Since events may be signaled asynchronously to pending event iteration , events may be added to the ordered sets of
pending event notify objects while the iterator is in use; the iterator will continue to return pending event notify
objects at the specified TPL even if they were added after the creation of the iterator object.
---
title: Consuming an Pending Event Notify From The `event_notification_iter`
config:
  layout: elk
---
flowchart LR
  event1["`event id: 1,
  notify tpl: TPL_NOTIFY
  (consumed)`"]
  event2["`event id: 2,
  notify tpl: TPL_NOTIFY`"]
  event3["`event id: 3,
  notify tpl: TPL_CALLBACK`"]
  event4["`event id: 4,
  notify tpl: TPL_CALLBACK`"]
  event5["`event id: 5,
  notify tpl: TPL_NOTIFY`"]
  event6["`event id: 6,
  notify tpl: TPL_CALLBACK`"]
  style event1 fill:#cc3333

  event2-->event5-->event3-->event4-->event6
---
title: New Pending Event Notify During Iteration
config:
  layout: elk
---
flowchart LR
  event1["`event id: 1,
  notify tpl: TPL_NOTIFY
  (being processed)`"]
  event2["`event id: 2,
  notify tpl: TPL_NOTIFY`"]
  event3["`event id: 3,
  notify tpl: TPL_CALLBACK`"]
  event4["`event id: 4,
  notify tpl: TPL_CALLBACK`"]
  event5["`event id: 5,
  notify tpl: TPL_NOTIFY`"]
  event6["`event id: 6,
  notify tpl: TPL_CALLBACK`"]
  event7["`event id: 7,
  notify tpl: TPL_HIGH_LEVEL
  (will be the next returned)`"]
  style event1 fill:#cc3333
  style event7 fill:#11aa11

  event7-->event2-->event5-->event3-->event4-->event6
When an event is consumed through the iterator, it is removed from the pending event notify queue, and the
corresponding event in the database will be marked 'not-signaled'.
Timers
Event Database Time
The event database implementation is agnostic to the units for time; as long as the units used in set_timer and
timer_tick (see following sections) are consistent, the event database will handle timer events as expected. The
standard unit of time used by the Patina DXE Core Event Module is 100ns, but
nothing in the event database implementation assumes a particular unit of time.
Timer Event Configuration
Timer events are a subset of events that can be associated with a timer. These events have the EVT_TIMER flag set as
part of the event type. The set_timer function of the event database can be used to configure the timer
characteristics associated with these events.
There are three types of timer operations that can be configured with set_timer:
TimerCancel- cancels a currently activated timer. Note that closing an event effectively cancels any running timers for that event as well.TimerPeriodic- Configures a periodic timer for an event. The event will be signaled every time the system time advances by the specified period.TimerRelative- Configures a one-shot timer for an event. The event will be signaled after the system time advances by the specified amount of time.
Interaction with the System Timer
The event database itself does not directly interact with the system timer hardware. Instead, the Patina DXE Core will
invoke the timer_tick function on the event database to communicate passage of time. The Patina DXE Core will pass the
current system time in ticks (see Event Database Time) to the call to indicate how
much time has passed.
When timer_tick is called, the event database implementation will inspect each event in the database to see if it is
configured as a timer event. For events configured with an active periodic or one-shot timer, the event database will
calculate whether the timer has expired, and if so, will signal the event.
Patina DXE Core Event Module
The event database described above is consumed by the event module of the Patina DXE Core to provide the actual UEFI Spec compliant event, timer and task priority services.
In the events.rs module, the naming convention for pub functions intended for use by the core is to prefix them with core_. Many of the functions described below are for implementing FFI APIs for UEFI spec compliance. These are not usually designed for calling within the core. If calling from elsewhere in the core is required, it is often best to create a Rust-friendly version of the API and prefix the name with core_ to signify that it is for core usage.
Event Creation and Closure
The two event creation APIs defined in the UEFI spec are:
These are both implemented as simple calls to the event database create_event function (see:
Creating an Event).
The UEFI spec API for removing an event is
EFI_BOOT_SERVICES.CloseEvent()
and is also implemented as a simple call to the close_event function in the event database (see:
Closing an Event).
Event Signaling
The UEFI spec API for signaling an event is
EFI_BOOT_SERVICES.SignalEvent().
This is implemented as a call to the signal_event function in the event database (see:
signaling an Event).
When an event is signaled, an immediate dispatch of the pending event notify queue is initiated by raising and restoring the TPL (see: Raising and Restoring the Task Priority Level (TPL)). This ensures that any event notifications higher than the current TPL are immediately executed before proceeding (but see Processing Pending Events).
Waiting for an Event List
The UEFI spec API for waiting on an event list is
EFI_BOOT_SERVICES.WaitForEvent().
This function allows code at TPL_APPLICATION to wait on a set of events, proceeding whenever any of the events in the
set entered the 'signaled' state. The events are polled in a repeated loop. For each event in the list,
check_event is invoked. If check_event returns EFI_SUCCESS, then the loop is
exited, and the function returns the index of that event.
Checking an Event
The UEFI spec API for checking an event is EFI_BOOT_SERVICES.CheckEvent(). This API checks to see whether the specified event is in the 'signaled' state.
- If Event is in the 'signaled' state, it is cleared and
EFI_SUCCESSis returned. - If Event is not in the 'signaled' state and has no notification function,
EFI_NOT_READYis returned. - If Event is not in the 'signaled' state but does have a notification function, the notification function is queued
at the event’s notification task priority level. If the execution of the notification function causes Event to be
signaled, then the 'signaled' state is cleared and
EFI_SUCCESSis returned; if the Event is not signaled, thenEFI_NOT_READYis returned.
This is implemented via means of the event database API:
- First
read_and_clear_signaledis used to check and clear the event state. If the event state was 'signaled' thenEFI_SUCCESSis returned. - Otherwise,
queue_event_notifyis used to schedule the event notification at the event TPL. Note that this is a no-op for events that do not have notification functions. - Then
read_and_clear_signaledis used to check and clear the event state again. If the event state was 'signaled' thenEFI_SUCCESSis returned. - If the event state was still not 'signaled' after execution of the notification function (if any), then
EFI_NOT_READYis returned.
System Time
The events module of the Patina DXE Core maintains a global SYSTEM_TIME variable as an AtomicU64. This maintains the
current system time tick count. When the Timer Architectural Protocol is made available part way through boot, the event
module registers a timer handler with the architectural protocol to receive timer ticks callbacks (a tick is 100ns).
When a timer tick occurs, the following actions are taken:
- Raise the system TPL level to TPL_HIGH_LEVEL (see: TPL).
- Atomic increment
SYSTEM_TIMEby the number of ticks that have passed since the last time the handler was invoked. - Call the event database
timer_tickroutine to inform the event database of the updated time and signal any expired timer events. - Restore the system TPL level to the original TPL level (which will dispatch any pending notifications at higher TPL levels)
Timer Event configuration
The UEFI spec API for configuring event timers is
EFI_BOOT_SERVICES.SetTimer().
This is implemented as a simple call to the set_timer function in the event database (see:
Timer Event Configuration).
Task Priority Level (TPL)
The event module of the Patina DXE Core maintains a global CURRENT_TPL as an AtomicUsize. This maintains the current
system Task Priority Level.
Per the UEFI spec, Section 7.1.8:
Only three task priority levels are exposed outside of the firmware during boot services execution. The first is TPL_APPLICATION where all normal execution occurs. That level may be interrupted to perform various asynchronous interrupt style notifications, which occur at the TPL_CALLBACK or TPL_NOTIFY level. By raising the task priority level to TPL_NOTIFY such notifications are masked until the task priority level is restored, thereby synchronizing execution with such notifications. Synchronous blocking I/O functions execute at TPL_NOTIFY . TPL_CALLBACK is the typically used for application level notification functions. Device drivers will typically use TPL_CALLBACK or TPL_NOTIFY for their notification functions. Applications and drivers may also use TPL_NOTIFY to protect data structures in critical sections of code.
Raising the TPL
The UEFI spec API for raising the Task Priority Level is EFI_BOOT_SERVICES.RaiseTPL().
When invoked, the global CURRENT_TPL is set to the specified TPL, which must follow the rules given in the
specification (the implementation enforces that the new TPL must be greater than or equal to CURRENT_TPL). In
addition, if the current TPL is set to TPL_HIGH_LEVEL, then the CPU Architectural Protocol is invoked to disable
hardware interrupts.
Restoring the TPL
The UEFI spec API for raising the Task Priority Level is EFI_BOOT_SERVICES.RestoreTPL().
When invoked, the following sequence of actions are taken:
- The
CURRENT_TPLis checked to make sure that it is equal or higher than the TPL being restored. - If the TPL being restored is lower than the current TPL, then the pending event queue for TPL greater than the TPL being restored is processed (see following section)
- Once all pending events are processed, if the current TPL is
TPL_HIGH_LEVELand the TPL being restored is lower thanTPL_HIGH_LEVEL, then the CPU Architectural Protocol is invoked to enable hardware interrupts.
Processing Pending Events
If RestoreTPL is called to change to a lower TPL, then the events module will process and dispatch any notify
functions for any events that are a) in the 'signaled' state, b) have a notification function, and c) have a
notification TPL level above the TPL being restored.
This is done by instantiating an event notification iterator (see: Accessing the Pending Event Queue) for the TPL being restored that will return all pending event notifications above the TPL being restored. For each event returned by the iterator:
- The
CURRENT_TPLwill be set to thenotify tplfor the given pending event. If this isTPL_HIGH_LEVEL, the CPU Architectural Protocol is invoked to disable hardware interrupts. Otherwise, the CPU Architectural Protocol is invoked to enable hardware interrupts. - The
notify functionfor the given pending event is executed.
Note that a notify function may itself execute RaiseTPL/RestoreTPL, which means RestoreTPL must handle
re-entrant calls. This is done by using an AtomicBool EVENTS_IN_PROGRESS static flag to skip processing of pending
events if there is already an event notification iterator active.
This approach to handling re-entrant RestoreTPL calls may introduce a subtle ordering difference with respect to event
notify function execution relative to the standard EDK2 reference implementation in C.
This is because EFI_BOOT_SERVICES.SignalEvent() invoked within a notify function at a given TPL will not invoke an
event notify function for a signaled event at a higher TPL before SignalEvent() returns; instead the event notify will
be inserted in the event notify queue and invoked after the return of the notify function that called SignalEvent().
The EDK2 reference implementation in C would dispatch the notify function immediately on the SignalEvent() call,
effectively interrupting the notify function running at the lower TPL.
The UEFI spec does not explicitly prescribe the ordering behavior in this scenario; but it is possible that some code may make assumptions about this ordering, resulting in unexpected behavior.
Image Loading and Execution
This portion of the core deals with loading images from media (such firmware volumes or the EFI System Partiion) into RAM as well as setting up image execution context and executing images.
Loading an Image
Images are loaded by the core through the core_load_image function, which has the same semantics as the EFI_BOOT_SERVICES.LoadImage()
in the UEFI spec. This routine takes as input the image source, in the form of either a device_path that describes
where to load the image from, or a image source buffer. This routine also takes as input the parent_image_handle
(which is typically the well-known Patina DXE Core handle), but can be used in some scenarios where another agent is
loading the image (for example, UEFI Shell), as well as a 'boot_policy' flag that has meaning when device_path is used
to source the image (see Loading an Image from a Device Path, below).
Image Security
As part of the loading process, the security of the image is checked using the Security Architectural Protocols.
The security status of the image is returned from core_load_image. Platforms use the Security Architectural Protocol
hooks to allow different security elements to be added per platform-specific requirements. Examples of such elements
implemented through the Security Architectural Protocols include measurement into the TPM per
TCG EFI Protocol Specification and
UEFI Secure Boot.
Sourcing an Image from a Device Path
If the image parameter is provided to this function, then it contains a byte buffer containing the image data.
Otherwise, this function will attempt to load the image based on the provided device_path parameter.
The device_path parameter should still be provided even if the image buffer is used since the device_path will
still be used when creating the image handle, and other portions of the firmware may use it.
If the image parameter is not provided, then this function will attempt to read the image based on the device_path
parameter:
- If there is an instance of the
EFI_SIMPLE_FILE_SYSTEM_PROTOCOLthat corresponds to the givendevice_path, then the file is read from the SFS instance. - If there is no instance of
EFI_SIMPLE_FILE_SYSTEM_PROTOCOLthat matchesdevice_path, then this function will attempt to read the image from based on theboot_policyflag:- if
boot_policyis true, thenEFI_LOAD_FILE_PROTOCOLis used to read the file. - if
boot_policyis false, thenEFI_LOAD_FILE2_PROTOCOLis used to read the file, and if that fails, then the function will attempt to useEFI_LOAD_FILE_PROTOCOLas a fallback.
- if
Processing an Image into RAM
Once the source image buffer is available (either having been directly passed in the image parameter or read from
somewhere identified by the device_path parameter), it must be loaded into memory and processed so that it can be
executed.
The Patina DXE Core supports images in the PE32+
format as required by the UEFI spec. In addition, the Patina DXE Core also supports the Terse Executable (TE)
format as specified in the UEFI Platform Initialization Spec.
To parse these image formats, the Patina DXE Core uses the goblin crate which
supports parsing both formats. Interactions with Goblin to support image parsing are implemented in the patina_dxe_core
crate.
To load an image, the Patina DXE Core does the following:
- Parse the PE32+ or TE header to extract information about the image.
- Allocate a destination buffer of the appropriate type to hold the loaded image.
- Load the image from the source image buffer into the destination buffer section by section.
- Apply relocation fixups to the image (see PE Format
documentation for details on the
.relocSection) to match the destination buffer where it is loaded. - Calculates the new entry point for the image in the destination buffer.
- If the image contains a custom PE/COFF resource with type
HIIa buffer is allocated to contain that resource data. - Memory protections are applied to the image so that code sections are marked
efi::MEMORY_ROand other sections of the image are markedefi::MEMORY_XP.
Information Associated with the Image
Once the image has been loaded, an efi::Handle is created and instances of EFI_LOADED_IMAGE_PROTOCOL
and EFI_LOADED_IMAGE_DEVICE_PATH_PROTOCOL
are installed on this handle to expose information about the image to the rest of the system. This becomes the "image
handle" of the newly loaded image.
In addition, if the image contained an HII resource section, an instance of EFI_HII_PACKAGE_LIST_PROTOCOL
(which is an alias of EFI_HII_PACKAGE_LIST_HEADER)
is also installed on the image handle.
Executing an Image
Once an image is loaded, it may be executed with a call to core_start_image. To manage the execution context of the
new image, the Patina DXE Core uses a modified version of the corosensei crate to
run the entry point as a "coroutine". The main extension to corosensei is the definition of a "UEFI" target to match UEFI
stack conventions - which is basically a "windows" target without TEB.
The primary rationale for using a coroutine-based approach to image execution is to simplify and generalize the ability
to "exit" an image, which would otherwise require architecture-specific processor context save/and restore operations
(i.e. "SetJump" and "LongJump"). In addition, the coroutine approach allows for better isolation of the image stack from
the Patina DXE Core stack.
When core_start_image is called, it first allocates a stack for the new image context, and then constructs a
corosensei Coroutine structure. The coroutine is
initialized with a closure that is used to invoke the image entry point.
Once the Coroutine has been constructed, core_start_image passes control to it via the resume()
method. Control then passes to the coroutine closure, which stores the coroutine Yielder
that serves as the context for the coroutine and then calls the entry_point of the image. Once the image entry point
completes and returns, the coroutine calls the exit() method, which uses the coroutine yielder to pass control back to
the point in core_start_image immediately following the point where resume() was invoked to start the co-routine.
Note that this process can be recursive - for example, core_start_image can be invoked to start execution of UEFI
Shell, which may in turn call core_start_image to invoke an application. Storing the Yielder context for each image
start allows calls to exit() to properly resume into the previous context.
---
title: Image Coroutine Flow
config:
  layout: elk
---
flowchart TD

  dispatcher-- "core_start_image()" -->image1_entrypoint
  image1_entrypoint-- "core_start_image()" -->image2_entrypoint
  image2_entrypoint-->image2_exit
  image2_exit-- "exit()" -->image1_exit
  image1_exit-- "exit()" -->dispatcher

  subgraph core_dispatcher["Patina DXE Core Stack"]
    dispatcher
  end

  subgraph image1["Coroutine A - Stack A"]
    image1_entrypoint
    image1_exit
  end

  subgraph image2["Coroutine B - Stack B"]
    image2_entrypoint
    image2_exit
  end

  style image1 fill:#aca
  style image2 fill:#caa
See the following compatibility note - ConnectController() Must Explicitly Be Called For Handles Created/Modified During Image Start.
Exiting an Image
The exit() routine is used to transfer control from the image execution context back to the core_start_image context
that started the image in question. exit() may be invoked at any point in the callstack below the entry point of the
image, and will return control to the context from which the image was started.
exit() functions by reclaiming hte Yielder context that was saved prior to the entry point of the image and invoking
the suspend function on it. This
will switch control back to the original point at which Coroutine::resume()
was called to start the image.
Unloading an Image
If the entry point for an image returns an error status, or if an other agent wishes to unload an image (e.g. to remove
a driver so that it can be replaced with a different driver for testing), the core_unload_image function can be
invoked to unload the image. It takes the image handle of the image to unload, along with a force_unload flag that
controls whether the image should be forcibly unloaded. This routine has the same semantics as EFI_BOOT_SERVICES.UnloadImage().
If the image has been started with core_start_image, and an unload function has been installed into the
EFI_LOADED_IMAGE_PROTOCOL instance for this image in question by the entry point, then the unload() function is
invoked to allow the image to execute any logic necessary to prepare for being unloaded (such as uninstalling global
state it may have produced). If an unload function was not installed by the entry point then core_unload_image will
return "unsupported" unless the force_unload flag is set to true.
Any protocols that were opened with EFI_BOOT_SERVICES.OpenProtocol()
with the current image as the agent opening the protocol are automatically closed as if EFI_BOOT_SERVICES.CloseProtocol()
had been invoked to do so. Next, the EFI_LOADED_IMAGE_PROTOCOL and EFI_LOADED_IMAGE_DEVICE_PATH instances on the
image handle are uninstalled.
Finally, the memory protections applied to the image are reset, and the global private data corresponding to the image is dropped and any resources associated with it (including the buffer containing the loaded image) are released.
Executing a Component
The Patina DXE Core also supports dispatching Rust Components. A
component can be started by invoking core_start_local_image. The usage model is much simpler since exit() is not
supported and neither are nested calls to core_start_local_image. A Coroutine is still instantiated with a separate
stack for each component invocation, but the coroutine simply runs until the Component entry point returns at which
point it resumes back to the the core_start_local_image context.
Image Module Global Private Data
The Patina DXE Core image module maintains a global database of private data associated with each image that has been
loaded, indexed by the image handle. This data contains some data that is published on the handle (e.g., data in the
EFI_LOADED_IMAGE_PROTOCOL), as well as private data required to maintain the image and support public operations on it
(such as relocation of runtime images, whether the image has been "started", a copy of the PE/COFF header information
etc). The particular contents of the private image data are implementation details beyond the scope of this document. In
addition to the private image database, the core also maintains global state tracking which image is currently executing
as well as a list of "start contexts" to handle scenarios where the core starts an image that then starts another nested
image (such as can occur with the UEFI shell).
Memory Management
This portion of the core is responsible for producing the capabilities described in Section 7.2 of the UEFI specification to support memory allocation and tracking within the UEFI environment and to track and report the system memory map. In addition to UEFI spec APIs, the memory management module also implements the "Global Coherency Domain(GCD)" APIs from the Platform Initialization (PI) spec. The memory management subsystem also produces a Global System Allocator implementation for Rust Heap allocations that is used throughout the rest of the core.
General Architecture
The memory management architecture of the Patina DXE Core is split into two main layers - an upper UefiAllocator
layer consisting of discrete allocators for each EFI memory type that are designed to service general heap allocations
in a performant manner, and a lower layer consisting of a single large (and relatively slower) allocator that tracks the
global system memory map at page-level granularity and enforces memory attributes (such as Execute Protect) on memory
ranges. This lower layer is called the GCD since it deals with
memory at the level of the overall global system memory map.
---
Allocator Architecture
---
block-beta
  columns 1
  block
    columns 3
    top(["Top Level 'UefiAllocators':"])
    EfiBootServicesData
    EfiBootServicesCode
    EfiRuntimeServicesData
    EfiRuntimeServicesCode
    EfiAcpiReclaimMemory
    EfiLoaderData
    EfiLoaderCode
    Etc...
  end
  GCD("Global Coherency Domain (GCD)")
UEFI Spec APIs that track specific memory types such as AllocatePool
and AllocatePages
are typically implemented by the UefiAllocator layer (sometimes as just a passthru for tracking the memory type). APIs
that are more general such as GetMemoryMap
as well as the GCD APIs
from the PI spec interact directly with the lower-layer GCD allocator.
UefiAllocator
UefiAllocator - General Architecture and Performance
The UefiAllocator implements a general purpose slab allocator based
on the Fixed-Size Block Allocator that is
presented as part of the Writing an OS in Rust blog series.
Each allocator tracks "free" blocks of fixed sizes that are used to satisfy allocation requests. These lists are backed up by a linked list allocator to satisfy allocations in the event that a fixed-sized block list doesn't exist (in the case of very large allocations) or does not have a free block.
This allows for a very efficient allocation procedure:
- Round up requested allocation size to next block size.
- Remove the first block from the corresponding "free-list" and return it.
If there are free blocks of the required size available this operation is constant-time. This should be the expected normal case after the allocators have run for a while and have built up a set of free blocks.
Freeing a block (except for very large blocks) is also constant-time, since the procedure is the reverse of the above:
- Round up the freed allocation size to the next block size.
- Push the block on the front of the corresponding "free-list."
If the fixed-block size list corresponding to the requested block size is empty or if the requested size is larger than any fixed-block size, then the allocation falls back to a linked-list based allocator. This is also typically constant- time, since the first block in the linked-list backing allocator is larger than all the free-list block sizes (because blocks are only freed back to the fallback allocator if they are larger than the all free-list block sizes). This means that allocation typically consists of simply splitting the required block off the front of the first free block in the list.
If the fallback linked-list allocator is also not able to satisfy the request, then a new large block is fetched from the GCD and inserted into the fallback linked-list allocator. This is a slower operation and its performance is a function of how fragmented the GCD has become - on a typical boot this can extend to a search through hundreds of nodes. This is a relatively rare event and the impact on overall allocator performance is negligible.
Allocation "Buckets"
In order to ensure that the OS sees a generally stable memory map boot-to-boot, the UefiAllocator implementation can be
seeded with an initial "bucket" of memory that is statically assigned to the allocator at startup in a deterministic
fashion. This allows a platform integrator to specify (via means of a "Memory Type Info" HOB) a set of pre-determined
minimum sizes for each allocator. All memory associated with an UefiAllocator instance is reported to the OS as that
memory type (for example, all memory associated with the EfiRuntimeServicesData allocator in the GCD will be reported
to the OS as EfiRuntimeServicesData, even if it is not actually allocated). If the platform seeds the bucket with a
large enough initial allocation such that all memory requests of that type can be satisfied during boot without a
further call to the GCD for more memory, then all the memory of that type will be reported in a single contiguous block
to the OS that is stable from boot-to-boot. This facility is important for enabling certain use cases (such as
hibernate) where the OS assumes a stable boot-to-boot memory map.
UefiAllocator Operations
The UefiAllocator supports the following operations:
- Creating a new allocator for arbitrary memory types. A subset of well-known allocators are provided by the core to support UEFI spec standard memory types, but the spec also allows for arbitrary OEM-defined memory types. If a caller makes an allocation request to a previously unused OEM-defined memory type, a new allocator instance is dynamically instantiated to track memory for the new memory type.
- Retrieving the
EfiMemoryTypeassociated with the allocator. All allocations done with this allocator instance will be of this type. - Reserving pages for the allocator. This is used to seed the allocator with an initial bucket of memory.
- APIs for allocate and free operations of arbitrary sizes, including
implforAllocatorandGloballAlloctraits. See RustAllocatorandGlobalAllocImplementations below. - APIs for allocating and freeing pages (as distinct from arbitrary sizes). These are pass-throughs to the underlying GCD operations with some logic to handle preserving ownership for allocation buckets.
- Expanding the allocator by making a call to the GCD to acquire more memory if the allocator does not have enough memory to satisfy a request.
- Locking the allocator to support exclusive access for allocation (see Concurrency).
Global Coherency Domain (GCD)
GCD - General Architecture and Performance
The GCD tracks memory allocations at the system level to provide a global view of the memory map. In addition, this is
level at which memory attributes (such as Execute Protect or Read Protect) are tracked.
The Patina DXE Core implements the GCD using a Red-Black Tree to track the memory regions within the
GCD. This gives the best expected performance when the number of elements in the GCD is expected to
be large. There are alternative storage implementations in the patina_internal_core::collections module
within the core that implement the same interface that provide different performance characteristics
(which may be desirable if different assumptions are used - for example if the number of map entries
is expected to be small), but the RBT-based implementation is expected to give the best performance
in the general case.
GCD Data Model
The GCD tracks both memory address space and I/O address space. Each node in the data structure tracks a region of the address space and includes characteristics such as the memory or I/O type of the region, capabilities and attributes of the region, as well as ownership information. Regions of the space can be split or merged as appropriate to maintain a consistent view of the address space.
A sample memory GCD might look like the following:
GCDMemType Range                             Capabilities     Attributes       ImageHandle      DeviceHandle
========== ================================= ================ ================ ================ ================
NonExist   0000000000000000-00000000000fffff 0000000000000000 0000000000000000 0x00000000000000 0x00000000000000
MMIO       0000000000100000-000000004fffffff c700000000027001 0000000000000001 0x00000000000000 0x00000000000000
NonExist   0000000050000000-0000000053ffffff 0000000000000000 0000000000000000 0x00000000000000 0x00000000000000
MMIO       0000000054000000-000000007fffffff c700000000027001 0000000000000001 0x00000000000000 0x00000000000000
SystemMem  0000000080000000-0000000080000fff 800000000002700f 0000000000002008 0x00000000000000 0x00000000000000
SystemMem  0000000080001000-0000000080002fff 800000000002700f 0000000000004008 0x00000000000002 0x00000000000000
SystemMem  0000000080003000-0000000081805fff 800000000002700f 0000000000002008 0x00000000000000 0x00000000000000
GCD Operations
The GCD supports the following operations:
- Adding, Removing, and Allocating and Freeing regions within the address space. The semantics for these operations largely follow the Platform Initialization spec APIs for manipulating address spaces.
- Configuring the capabilities and attributes of the memory space. The GCD uses CPU memory management hardware to enforce these attributes where supported. See Paging for details on how this hardware is configured.
- Retrieving the current address space map as a list of descriptors containing details about each memory region.
- Locking the memory space to disallow modifications to the GCD. This allows the GCD to be protected in certain sensitive scenarios (such as during Exit Boot Services) where modifications to the GCD are not permitted.
- Obtaining a locked instance of the GCD instance to allow for concurrency-safe modification of the memory map. (see Concurrency).
The internal GCD implementation will ensure that a consistent map is maintained as various operations are performed to transform the memory space. In general, all modifications of the GCD can result in adding, removing, splitting, or merging GCD data nodes within the GCD data structure. For example, if some characteristic (such as attributes, capabilities, memory type, etc.) is modified on a region of memory that is within a larger block of memory, that will result in a split of the larger block into smaller blocks so that the region with new characteristic is carved out of the larger block:
---
Splitting Blocks
---
block-beta
  columns 3
  single_large_block["Single Large Block (Characteristics = A)"]:3
  space
  blockArrowId4[\"Set Characteristics = B"/]
  space
  new_block_a["Block (Characteristics = A)"]
  new_block_b["Block (Characteristics = B)"]
  new_block_c["Block (Characteristics = A)"]
Similarly, if characteristics are modified on adjacent regions of memory such that the blocks are identical except for the start and end of the address range, they will be merged into a single larger block:
---
Splitting Blocks
---
block-beta
  columns 3
  old_block_a["Block (Characteristics = A)"]
  old_block_b["Block (Characteristics = B)"]
  old_block_c["Block (Characteristics = A)"]
  space
  blockArrowId4[\"Set Characteristics = A"/]
  space
  single_large_block["Single Large Block (Characteristics = A)"]:3
Concurrency
UefiAllocator and GCD operations require taking a lock on the associated data structure to prevent concurrent
modifications to internal allocation tracking structures by operations taking place at different TPL levels (for
example, allocating memory in an event callback that interrupts a lower TPL). This is accomplished by using a
TplMutex that switches to the highest TPL level (uninterruptible) before executing the
requested operation. One consequence of this is that care must be taken in the memory subsystem implementation that
no explicit allocations or implicit Rust heap allocations
occur in the course of servicing an allocation.
In general, the entire memory management subsystem is designed to avoid implicit allocations while servicing allocation calls to avoid reentrancy. If an attempt is made to re-acquire the lock (indicating an unexpected reentrancy bug has occurred) then a panic will be generated.
Rust Allocator and GlobalAlloc Implementations
In addition to producing the memory allocation APIs required by the UEFI spec, the memory allocation subsystem also
produces implementations of the Allocator and
GloballAlloc traits.
These implementations are used within the core for two purposes:
- The
GlobalAllocimplementation allows one of theUefiAllocatorinstances to be designated as the Rust Global Allocator. This permits use of the standard Rustallocsmart pointers (e.g. Box) and collections (e.g. Vec, BTreeMap). TheEfiBootServicesDataUefiAllocator instance is designated as the default global allocator for the Patina DXE Core. - UEFI requires being able to manage many different memory regions with different characteristics. As such, it may
require heap allocations that are not in the default
EfiBootServicesDataallocator. For example, the EFI System Tables need to be allocated inEfiRuntimeServicesData. To facilitate this in a natural way, theAllocatoris implemented on all theUefiAllocators. This is a nightly-only experimental API, but aligning on this implementation and tracking it as it stabilizes provides a natural way to handle multiple allocators in a manner consistent with the design point that the broader Rust community is working towards.
An example of how the Allocator trait can be used in the core to allocate memory in a different region:
#![allow(unused)]
#![feature(allocator_api)]
fn main() {
extern crate patina;
extern crate r_efi;
use patina::{
    efi_types::EfiMemoryType,
    component::service::{
      Service,
      memory::{
        MemoryManager,
        MemoryError,
      },
    },
};

fn example_function(mm: Service<dyn MemoryManager>) -> Result<(), MemoryError> {
  let _boxed = Box::new_in(50usize, mm.get_allocator(EfiMemoryType::RuntimeServicesData)?);

  Ok(())
}
}
Exit Boot Services Handlers
Platforms should ensure that when handling an EXIT_BOOT_SERVICES signal (and PRE_EXIT_BOOT_SERVICES_SIGNAL),
they do not change the memory map. This means allocating and freeing are disallowed once
EFI_BOOT_SERVICES.ExitBootServices() (exit_boot_services()) is invoked.
In the Patina DXE Core in release mode, allocating and freeing within the GCD (which changes the memory map and its key)
will return an error that can be handled by the corresponding driver.
In debug builds, any changes to the memory map following exit_boot_services will panic due to an assertion.
Memory Map Reporting
The Patina DXE Core implements the UEFI specification API for report the memory map. A note about the Patina DXE Core
implementation of GetMemoryMap() is that it will return a memory map size that reflects an unmerged descriptor count
while the EDK II implementation returns a merged descriptor count. This simplifies the implementation and provides a
some headroom for additional descriptors that may be added between calls to GetMemoryMap(). This means that the
merged descriptors ultimately written into the caller's buffer may be fewer than the number of descriptors reported by
GetMemoryMap().
Memory Protections
Patina (here called Patina or the core interchangeably) applies strict memory protections while still allowing for PI and UEFI spec APIs to adjust them. Protections are applied categorically with the only customization currently supported being Compatibility Mode.
All memory protection policy decisions in Patina are driven through the MemoryProtectionPolicy struct for simple
auditability and ensuring consistency.
Note: This section primarily deals with access attributes. Caching attributes are platform and driver driven and outside the scope of this document. The core gets the initial platform specified caching attributes via the Resource Descriptor HOB v2 and persists whatever the GCD entry has on every other call. After this point, drivers (such as the PCI Host Bridge driver) may update memory regions with different caching attributes.
General Flow
Page Table Initialization
When Patina is given control at its entry point, typically all memory is mapped as Read/Write/Execute (RWX). This is up to the entity that launches Patina and Patina takes no dependencies on the initial memory state (other than the fundamentals of its code regions being executable, etc.).
As soon as the GCD is initialized and memory allocations are possible, the core sets up a new page table using the patina_paging crate. Memory allocations are required to back the page tables themselves. In this initial Patina owned page table, which is not installed yet, all currently allocated memory is set to be non-executable, as the majority of memory is expected not to be executable code.
Next, the Patina image location is discovered via the MemoryAllocationModule associated with it. The core needs
to ensure its own image code sections are read only (RO) and executable or else we will immediately fault after
installing this page table. See Image Memory Protections for the rationale behind RO + X
for image code sections. All of the core's data sections are left as non-executable, as is done for other images.
Note: All Rust components are monolithically compiled into the Patina image, so all of their image protections are applied at this point, as well.
Finally, all MMIO and reserved regions (as reported by resource descriptor HOBs) are mapped as non-executable. Patina must map all of these regions because existing C drivers expect to be able to directly access this memory without going through an API to allocate it.
After this, the page table is installed; all other pages are unmapped and access to them will generate a page fault. Early platform integration will involve describing all MMIO and reserved regions in resource descriptor HOBs so they will be mapped for use.
Allocations
All page allocations, regardless of source, will cause Patina to map the page as non-executable. If the allocating entity requires different attributes, they will need to use PI spec, UEFI spec, or Patina APIs to update them. Most allocations do not need different attributes.
Pool allocations, as described in the UefiAllocator section, are simply managed memory on top of pages, so all pool memory allocated will be non-executable. No entity should attempt to set attributes on pool owned memory, as many other entities may own memory from the same underlying page and attributes must be set at page granularity per HW requirements. If an entity requires different attributes, they must instead allocate pages and update the attributes.
When pages are freed, Patina will unmap the pages in the page table so that any further accesses to them cause page faults. This helps to catch use-after-free bugs as well as meeting the cleanliness requirements of Patina.
Image Memory Protections
Patina follows industry standards for image protection: making code sections RO + X and data sections non-executable. It also ensures the stack for each image is non-executable.
Rust Component Memory Protection
As noted in the page table initialization flow, Rust components get their image memory protections applied when Patina protects its own image, as they are monolithically compiled into it.
PI Dispatched Driver Memory Protection
When PI compliant drivers are dispatched by Patina, it will read through the PE/COFF headers and apply the appropriate memory attributes depending on the section type.
Compatibility Mode
Compatibility Mode is the state used to describe a deprecated set of memory protections required to boot current versions of Linux. The most common Linux bootloaders, shim and grub, currently crash with memory protections enabled. Booting Linux is a critical scenario for platforms, so compatibility mode is implemented to support that case. Old versions of Windows bootmgr are also susceptible to some of the issues listed below.
The integration steps for Patina describe the single platform configurable knob for compatibility mode, which is simply the ability for a platform to allow compatibility mode to be entered. By default, this is false and compatibility will not be entered and any EFI_APPLICATION that is not marked as NX_COMPAT will not be loaded.
The only way Patina will enter Compatibility Mode is by attempting to load an EFI_APPLICATION (chosen because this is what bootloaders are) that does not have the NX_COMPAT DLL Characteristic set in its PE/COFF header.
Entering Compatibility Mode causes the following to occur:
- Map all memory in the legacy BIOS write back range (0x0 - 0xA000) as RWX if it is part of system memory. This is done as Linux both can have null pointer dereferences and attempts to access structures in that range.
- Map all newly allocated pages as RWX. This is done as non-NX_COMPAT bootloaders will attempt to allocate pages and execute from them without updating attributes.
- Map the current image that triggered Compatibility Mode as RWX. This is done as Linux will try to execute out of data regions.
- Map all memory owned by the
EFI_LOADER_CODEandEFI_LOADER_DATAUefiAllocatorsas RWX. This supports Linux allocating pool memory and attempting to execute from it. - The
EFI_MEMORY_ATTRIBUTE_PROTOCOLis uninstalled. This is done because versions of Linux bootloaders in the wild will use the protocol to map their entire image as non-executable, then attempt to map each section as executable, but the subsequent calls aren't page aligned, causing the protocol to return an error, which is unchecked. The bootloader then attempts to execute out of non-executable memory and crashes.
Patina implements Compatibility Mode as a one time event that causes actions; it is not a global state that is
checked on each invocation of memory allocation or image loading. This design pattern was deliberately chosen. It
simplifies hot code paths and reduces the complexity of the feature. The only state that is tracked related to
Compatibility Mode is what default attributes are applied to new memory allocations. As stated above, this is
efi::MEMORY_XP when Compatibility Mode is not active and 0 (i.e. memory is mapped RWX) when Compatibility Mode is
active. This state is tracked in the GCD itself and does not exist as conditionals in the code.
Future Work
Patina does not currently support the complete set of protections it will.
Heap Guard
C based FW implementations rely on guard pages around pages and pools to ensure buffer overflow is not occurring, typically only in debug scenarios, at least for pool guard, due to the memory requirements it has. Rust has more built in buffer safety guarantees than C does, but buffer overflows are still possible when interacting with raw pointers. C drivers are also still executed by Patina, so there does remain value for them to have Heap Guard enabled.
Validation
The C based UEFI shell apps that are used to validate memory protections on a C codebase are not all valid to use in Patina; they rely on internal C DXE Core state. These need to be ported to Rust or new tests designed. The other test apps also need to be run and confirmed that the final memory state is as expected.
Memory Bins
Memory bins are pre-allocated regions of memory for specific EFI memory types that stabilize the UEFI runtime memory footprint across boots. This stability is required for S4 (hibernate) resume, where the OS must restore system memory to the same layout as the previous boot. Without bins, small variations in runtime memory allocation patterns between boots can shift memory map entries and break S4 resume.
For background on the S4 problem and the overall bin design, refer to the edk2 Memory Bin Feature document. This page focuses on the Patina implementation of the DXE side of that design.
How Bins Work
A platform declares the desired bin sizes by producing a Memory Type Information GUID HOB
(MEMORY_TYPE_INFO_HOB_GUID). Each entry in this HOB specifies a memory type and a page count representing
the bin size for that type. The memory map must not change during S4 resume because the OS will restore system memory
from disk. The memory bins keep memory ranges consistent for ranges of memory types that need to be consistent across
hibernation.
EfiReservedMemoryType- Memory that is reserved for firmware use and may not be used by the OS.
EfiRuntimeServicesCode- Used for UEFI runtime services code sections.
EfiRuntimeServicesData- Used for UEFI runtime services data buffers.
EfiACPIMemoryNVS- Memory used or reserved by the system (e.g. ACPI FACS) and must not be used by the operating system. This memory is required to be saved and restored across across an NVS sleep and saved in S4.
EfiACPIReclaimMemory- Used for most ACPI tables. Memory that is preserved by the loader and OS until ACPI is enabled and the ACPI tables are read. This memory is required to be saved and restored across an NVS sleep cycle and saved in S4.
When the Patina DXE Core initializes memory services, it:
- Finds the Memory Type Information HOB and extracts the bin configuration.
- Establishes a contiguous address range for the bins.
- Steers page allocations for bin types into their designated range.
- Tracks allocation statistics so BDS can recommend next-boot bin sizes.
- Adjusts
GetMemoryMap()output so each bin appears as a single descriptor of its type, absorbing any free space within the bin range. - Publishes the memory type information config table so BDS can recommend next-boot bin sizes.
The bin size is an intentional over-allocation. Runtime allocations that fluctuate between boots are absorbed by the bin, so the overall memory map reported to the OS remains stable.
Patina Implementation
The implementation primarily resides in two files:
allocator.rs- Integration points in the DXE Core memory allocator.memory_bin.rs- The standaloneMemoryBinManagermodule.
Input HOBs
The bin feature consumes up to three types of HOBs from the PEI phase. The first HOB enables basic memory bin support while the additional HOBs provide extra control over bin placement from the HOB producer phase.
1. Memory Type Information GUID HOB (required)
A GUID Extension HOB (EFI_HOB_TYPE_GUID_EXTENSION) whose Name matches MEMORY_TYPE_INFO_HOB_GUID
(4C19049F-4137-4DD3-9C10-8B97A83FFDFA). The HOB data is an array of EFI_MEMORY_TYPE_INFORMATION
entries terminated by a sentinel entry with Type = EfiMaxMemoryType:
+--------+--------+--------+--------+--------+--------+---
| Type₀  | Pages₀ | Type₁  | Pages₁ | ...    | 0x10   | 0
+--------+--------+--------+--------+--------+--------+---
  u32      u32      u32      u32               sentinel
Each entry specifies a memory type and the number of 4 KB pages to reserve for that type's bin.
Fields used:
| Field | Size | Description |
|---|---|---|
Type | u32 | efi::MemoryType value (e.g. EfiRuntimeServicesData = 6). |
NumberOfPages | u32 | Bin size in 4 KB pages. The actual GCD allocation is aligned up to the type's granularity (64 KB for runtime types on AArch64, 4 KB otherwise). |
If this HOB is absent, no bins are initialized and the feature is disabled.
2. Resource Descriptor HOB with Owner GUID (optional, recommended)
A Resource Descriptor HOB (EFI_HOB_TYPE_RESOURCE_DESCRIPTOR) whose Owner field matches
MEMORY_TYPE_INFO_HOB_GUID. This HOB describes a pre-allocated contiguous memory region that
PEI set aside for the bins.
+----------+--------------------------+------+------+-----------+-----------+
| Header   | Owner                    | Type | Attr | PhysStart | Length    |
| (Hob)    | 4C19049F-...-A83FFDFA    | 0x00 | 0x07 |           |           |
+----------+--------------------------+------+------+-----------+-----------+
                                        ^      ^
                                        |      PRESENT | INITIALIZED | TESTED
                                        EFI_RESOURCE_SYSTEM_MEMORY
Fields used:
| Field | Value/Constraint | Description |
|---|---|---|
Owner | MEMORY_TYPE_INFO_HOB_GUID | Identifies this as the bin region HOB. |
ResourceType | EFI_RESOURCE_SYSTEM_MEMORY (0) | Must be system memory. |
ResourceAttribute | PRESENT | INITIALIZED | TESTED (0x07) | Must have all three tested-memory flags. |
PhysicalStart | Address | Base address of the bin region. |
ResourceLength | Size in bytes | Must be ≥ total bin size (sum of aligned page counts). |
Validation rules:
- Exactly one Resource Descriptor HOB with this owner GUID must exist. Multiple are rejected.
ResourceLengthmust be large enough to hold all bins (checked viacalculate_total_bin_size()).- If this HOB is present and valid, bins use the provided range (Path A). If absent, DXE allocates its own range (Path B).
3. Memory Allocation HOBs with Name GUID (optional)
Memory Allocation HOBs (EFI_HOB_TYPE_MEMORY_ALLOCATION) whose Name field in the allocation
descriptor matches MEMORY_TYPE_INFO_HOB_GUID. These are produced by PEI's bin-aware allocator
to mark runtime allocations that PEI made within the bin region.
+----------+------------------------------+-----------+-----------+------+---+
| Header   | Name                         | MemBase   | MemLen    | Type |...|
| (Hob)    | 4C19049F-...-A83FFDFA        |           |           |      |   |
+----------+------------------------------+-----------+-----------+------+---+
Fields used:
| Field | Description |
|---|---|
Name | MEMORY_TYPE_INFO_HOB_GUID - marks this as a PEI bin-aware allocation. |
MemoryBaseAddress | Physical address of the allocation. |
MemoryLength | Size in bytes (converted to pages). |
MemoryType | efi::MemoryType of the allocation. |
Patina iterates these HOBs after bin initialization and calls seed_statistics_from_hob() for each. If the allocation
falls within the type's bin range, current_number_of_pages() is incremented to account for PEI-phase bin usage.
Allocations that fall outside all bin ranges are not counted.
Memory Allocation HOBs without the MEMORY_TYPE_INFO_HOB_GUID name are processed normally by
process_hob_allocations() but are not included in bin statistics.
Initialization
Bin initialization runs once during init_memory_support(), after the GCD and pre-DXE HOB allocations have been fully
processed.
The initialization flow resolves a contiguous bin range and then subdivides it into per-type bins. The range is resolved in priority order:
- PEI bins (Path A): Use a pre-allocated range from an incoming Resource Descriptor HOB.
- DXE bins (Path B): Designate a single contiguous block from the GCD.
Path A: PEI provided bin range
If PEI allocated memory bins (indicated by a Resource Descriptor HOB with an owner GUID ofMEMORY_TYPE_INFO_HOB_GUID),
Patina uses that pre-allocated range directly:
- The Resource Descriptor HOB must describe
EFI_RESOURCE_SYSTEM_MEMORYwithPRESENT | INITIALIZED | TESTEDattributes. - Exactly one such HOB must exist. If multiple are found, all are rejected since this request would be ambiguous.
- The range must be large enough to fit all bins (including alignment padding).
- Bins are divided within the range from the top address downward, with each bin aligned to its type's allocation granularity (64 KB for runtime types on AArch64, 4 KB otherwise).
This path provides the most resilience for hibernate stability because the bin region lives at the same physical address every boot (the platform controls where it is placed in PEI).
After bin ranges are established, Patina scans Memory Allocation HOBs whose Name field matches
MEMORY_TYPE_INFO_HOB_GUID. These are allocations PEI's bin-aware allocator made. For each one that falls within
a bin range, the bin's current_number_of_pages is incremented to seed the statistics with pre-DXE usage.
Path B: DXE-allocated bins
If no Resource Descriptor HOB is found, Patina allocates a single contiguous block from the GCD that is large enough to hold all bins plus worst-case alignment padding:
- A conservative total size is calculated which is the sum of all entry sizes plus one unit of
max_granularityper entry for alignment padding, rounded up tomax_granularity. - The block is allocated with
GCD.allocate_memory_space()with alignment matching the maximum granularity across all bin types (MemoryBinManager::max_granularity()). - The block is immediately freed back to the GCD so it can be re-claimed.
- The block is then subdivided into per-type bins using the same logic as Path A.
This path provides less stability than Path A because the bin addresses depend on the GCD allocator's state at the time of initialization, which has a relatively greater chance to vary between boots.
Integration with Per-Type Allocators
Patina uses a per-type allocator model where each EFI memory type has its own FixedSizeBlockAllocator that manages
a pool of pages obtained from the GCD. Two allocation paths must respect bin boundaries:
- UEFI API path:
EFI_BOOT_SERVICES.AllocatePages()callscore_allocate_pages(), which delegates to the per-type allocator'sallocate_pages(). - Internal expansion path: Pool allocations (
AllocatePool), Rust heap allocations (Vec,Box), and allocator expansion callGCD.allocate_memory_space()directly from within theSpinLockedFixedSizeBlockAllocator, bypassingcore_allocate_pages().
Two mechanisms ensure allocations land in bins and bins are protected:
GCD Ownership Protection
During bin initialization, bin pages are allocated then freed with free_memory_space_preserving_ownership(). The
pages become free but retain the per-type allocator's handle as the GCD owner. Other allocators using
AllocateRespectingOwnership (the default strategy) skip blocks owned by a different handle, preventing
cross-type intrusion at the GCD level.
Bin-Preference Allocation
The reserved_range set on each per-type SpinLockedFixedSizeBlockAllocator enables two behaviors:
- Allocation preference:
allocate_from_gcd()first attemptsTopDown(bin_end)to allocate within the bin range. If the result lands within the bin, it is used immediately. If the bin is full (the result lands below the bin base), the allocation is freed and retried with the original strategy. This preference applies to unconstrained strategies (TopDown(None),BottomUp(None)) and constrained strategies (TopDown(Some(max)),BottomUp(Some(max))) when the max address is at or above the bin range.Addressstrategies are never redirected. This ensures thatAllocateMaxAddresscalls from DXE drivers also land in their designated bins when possible, preventing fragmented special-type allocations outside bin ranges. - Ownership-preserving free:
free_pages()checksin_reserved_range(). Pages within the bin are freed withfree_memory_space_preserving_ownership(), retaining the GCD ownership handle so the bin pages remain protected after free.
Statistics Tracking
core_allocate_pages() and core_free_pages() record each operation in the bin manager for special memory types only
(runtime, reserved, ACPI, and PAL types that persist into the OS). Non-special types like BootServicesCode and
BootServicesData are skipped. Their allocations do not affect bin descriptors or BDS recommendations, so tracking them
would be pure overhead.
For tracked types:
- Every allocation and free for the type increments/decrements the "number of pages".
- If
current_number_of_pagesexceeds the previous peak, the memory type information entry is updated. BDS can use this value to recommend a larger bin size for the next boot.
Internal allocator expansion (pool growth, Rust heap allocations) is not individually tracked in the bin statistics. This is consistent with edk2, where pool allocations are only visible through the page-level expansion events they trigger.
GetMemoryMap() Bin Descriptors
When GetMemoryMap() is called, the GCD populates the memory map as usual, then the bin manager post-processes the
buffer. For each "special" memory type with an active bin:
- Find
EfiConventionalMemoryentries that overlap the bin range. - Convert entries fully within the bin to the bin's memory type.
- Split entries that partially overlap at the bin boundaries.
- Set
EFI_MEMORY_RUNTIMEon entries for runtime types.
This ensures the OS sees a single large descriptor for each bin type, regardless of how much of the bin is actually allocated. Free space within the bin is reported as the bin type rather than as conventional memory.
The buffer size calculation in get_memory_map() accounts for the worst-case number of additional entries from bin
splitting (2 extra entries per active bin).
Config Table
The bin manager's memory type information is published as the gMemoryTypeInformationGuid config table via
install_memory_type_info_table(). BDS consumes this table to decide whether bin sizes need adjustment.
The config table data comes from a fixed-size [EFiMemoryTypeInformation] array inside the MemoryBinManager
static. It is populated from the HOB during initialization with the original HOB values. record_allocation()
updates entries when in-bin usage exceeds the original value, creating a monotonically increasing high-water mark.
If bins are not initialized (no Memory Type Information HOB was present), the config table is not installed.
Comparison with edk2
Since both the edk2 DXE Core and Patina DXE Core implement PEI memory bin support, this section makes comparison of the two implementations easier by summarizing the key design and implementation differences in one place.
PEI bin support is provided by the PEI Core (C code in edk2), the Patina DXE Core consumes the HOBs that PEI produces.
| Aspect | edk2 | Patina |
|---|---|---|
| Primary Implementation | Shared implementation in MemoryBin.c (C, used by both PEI and DXE cores) | Not applicable. Patina is DXE-only. PEI bin logic lives in edk2's PEI Core. |
| Bin state storage | Global arrays mMemoryTypeStatistics[] and gMemoryTypeInformation[] | MemoryBinManager struct behind a TplMutex static. Statistics and memory type info are fixed-size arrays inside the struct. |
| Allocation steering | FindFreePages() checks mMemoryTypeStatistics[Type].MaximumAddress / BaseAddress first, falls back to mDefaultMaximumAddress, then full range. | allocate_from_gcd() tries TopDown(bin_end) first for unconstrained and reachable constrained strategies, falls back to the original strategy. |
| GetMemoryMap() bin descriptors | Inline loop in CoreGetMemoryMap() splits and converts EfiConventionalMemory entries overlapping bins. | apply_bin_descriptors() post-processes the buffer after populate_efi_memory_map(). Same splitting logic. |
| Statistics update | UpdateMemoryStatistics() counts allocations in the bin range or in the "default range". | record_allocation() / record_free() count all special-type allocations in and outside the bin range. |
| PEI HOB seeding | InitializeBinStatisticsFromRange() processes Memory Allocation HOBs with the MEMORY_TYPE_INFO_HOB_GUID name. | seed_bin_statistics_from_hobs() performs the same scan and calls seed_statistics_from_hob() for each matching HOB. |
| Memory type info storage | gMemoryTypeInformation[] is a global C array. | Fixed-size [EFiMemoryTypeInformation] array inside the MemoryBinManager static, to allow pointers to a stable memory location. |
What Patina Does Not Implement
- PEI bin allocation. PEI bin setup, PCD-based opt-in, PHIT updates, and Memory Allocation HOB marking are all handled by the pre-DXE environment.
- BDS heuristics. The bin size recommendation logic and
PcdResetOnMemoryTypeInformationChangereboot are in BDS code outside of the DXE Core.
Logging
All memory bin log messages use the memory_bin log target. These are some key messages and their log levels:
| Level | Message | When |
|---|---|---|
info | Memory Type Information HOB found | HOB extraction during init |
info | Bin layout per type (base, max, pages) | Bin initialization |
info | Bins allocated/initialized from range | Initialization complete |
debug | PEI seed per allocation HOBs | Statistics seeding |
debug | GetMemoryMap() bin processing | Each bin processed in GetMemoryMap() |
trace | Individual alloc/free recording | Every page allocation/free |
trace | Bin stats old -> new transitions | Every record_allocation/record_free |
trace | Bin table peak updates | When peak exceeds previous value |
Filter with the memory_bin log target to isolate bin-related output.
Protocol Database
This portion of the core is concerned with producing UEFI protocol handler services as described in Section 7.3 of the UEFI specification. This section assumes basic familiarity with the protocol services as described in the UEFI Spec, and focuses on how they are implemented in the Patina DXE Core.
The main implementation for protocol services in the Patina DXE Core resides in the protocol database object implemented
by the patina_dxe_core crate. The protocol database implemented by that crate is used to implement the UEFI protocol
handler services by the main Patina DXE Core protocol.rs module.
High-level Architectural Elements in the Protocol Database
Protocols
The fundamental data unit for the protocol database is the Protocol:
In the abstract, a protocol consists of a 128-bit globally unique identifier (GUID) and a Protocol Interface structure. The structure contains the functions and instance data that are used to access a device.1
Handles
Protocol instances are attached to a handle. A given handle may have many protocol instances installed on it,
but each protocol instance must be unique - a handle may not have two instances of a protocol that have the same
GUID. A handle can be conceptually thought of as representing a "device" - such as a PCIe endpoint. It can also
represent a software abstraction. For example, the UEFI ConSplitter is an abstraction that supports multiplexing to
multiple consoles - its handle can be thought of as a "device" handle, even though it isn't an actual hardware device.
Another example of an abstract handle is the image_handle that represents a loaded image (such as a driver or
application).
Agents
The protocol database also tracks the usage of protocol instances by agents. An agent consists of an
image_handle that identifies a driver, and a controller_handle that represents a device that the driver is managing.
A driver may manage more than one controller, and will have an agent (i.e. a image_handle/controller_handle pair)
for each controller it manages. For each agent that is using a protocol, the database tracks how the agent is using the
protocol. This allows the enforcement of certain constraints on protocol usage which are used to implement features such
as drivers being able to guarantee exclusive usage of a given protocol.
Protocol Installation Notifications
In addition to tracking protocol instances, the database also allows for drivers to register for a notification
callback on installation of particular protocol GUID and return the handles associated with freshly installed protocol
instances. The database implements logic to track these registrations and the corresponding list of newly installed
handles.
Protocol Database Organization
This section describes the underlying data objects and data structure of the protocol database.
Handle Objects
The protocol database generates opaque handle values for any new protocols installed in the protocol database. For
compatibility with UEFI EFI_HANDLE type, these handles are usize. Handles have two interesting properties:
-
They are opaque and arbitrary values of
usize- with the exception of some "well-known" handles (see next section). While it is possible to guess the value of a newly-created handle beforehand, handles are deliberately scrambled with a hash function. -
They are guaranteed to be unique. The protocol database implementation will ensure that two identical handle values will not simultaneously exist in the database. It is possible, (though very unlikely), that a handle value could be "re-used" after being deleted.
Why Hashed?
Why Hashed?
This is primarily done as a debug aid to ensure that no users of the Patina DXE Core are relying on invalid assumptions
that EFI_HANDLE is a pointer. The UEFI specification forbids this, but in the C EDK2 reference implementation,
EFI_HANDLE is internally implemented as a pointer type, so external modules could (in theory) attempt to obtain access
to the private EFI_HANDLE structure. Treating EFI_HANDLE from the Patina DXE Core as a pointer and de-referencing
it would result in a bad memory access, and ensuring that handles are at a wide range of values makes it more likely
that such behavior would be caught by memory protections and fault. It also makes it more obvious on inspection that
they are not pointers.
Well-Known Handles
The protocol database supports a number of "well-known" handles that permit commonly-used handles to be used without needing to execute a lookup in the protocol database to determine their value. The well defined handles are as follows:
| Handle | Purpose |
|---|---|
| 0 | Invalid Handle |
| 1 | DXE Core Handle |
| 2 | Reserved Memory Allocator |
| 3 | Loader Code Allocator |
| 4 | Loader Data Allocator |
| 5 | Boot Services Code Allocator |
| 6 | Boot Services Data Allocator |
| 7 | Runtime Services Code Allocator |
| 8 | Runtime Services Data Allocator |
| 9 | ACPI Reclaim Allocator |
| 10 | ACPI NVS Allocator |
Each well-know handle has a marker protocol instance installed on it to ensure it stays resident in the protocol database (this is because a handle with no protocols on it will be deleted).
Protocol Instances
A protocol instance consists of a raw interface pointer that points to the protocol interface structure. This
pointer may be null in situations where the protocol is used as a marker rather than providing an interface. The
protocol instance also has a usage list which contains open protocol information objects describing the current
tracked usages of the protocol by various drivers and the attributes associated with each usage. Usages are
described in greater detail in the next section.
Usages (Open Protocol Information)
A usage or open protocol information structure is used to track what agents are presently using a given protocol
instance and how they are using it. A usage has the following information:
| Data | Purpose |
|---|---|
| agent | tracks the image_handle of the driver that is using the protocol |
| controller | tracks the controller_handle of the controller associated with this usage of the protocol |
| attributes | tracks the attributes of the usage (exclusive, by_driver, etc.) |
| open_count | how many times this usage has been opened (if the attribute permits multiple openings) |
Only certain types of usages are permitted by the UEFI spec2, and the protocol database will
enforce proper attribute usage; attempts to create usages that are not permitted when opening an event will result in an
error.
Protocol Data Relationships
At the top level, the protocol database is organized as set of handles elements indexed by the handle value, each of
which contain a set of protocol elements, indexed by the protocol GUID, each of which in turn contains a vector of
active usages of the protocol:
---
title: Protocol Database
config:
  layout: elk
---
flowchart TD
  subgraph usage1[" "]
    direction LR
    usage_1(["usage(agent=1,controller=1,*attributes*)"])
    usage_2(["usage(agent=2,controller=2,*attributes*)"])
  end

  subgraph usage2[" "]
    direction LR
    usage_3(["usage(agent=3,controller=1,*attributes*)"])
    usage_4(["usage(agent=4,controller=2,*attributes*)"])
    usage_5(["usage(agent=4,controller=3,*attributes*)"])
  end

  subgraph usage3[" "]
    direction LR
    usage_6(["usage(agent=3,controller=1,*attributes*)"])
    usage_7(["usage(agent=4,controller=2,*attributes*)"])
  end

  subgraph usage4[" "]
    direction LR
    usage_8(["usage(agent=5,controller=1,*attributes*)"])
  end

  subgraph bucket1[" "]
    direction TB
    protocol1{{"Protocol
    GUID: 2acb50bf-9f78-4bc5-9a0d-e702fe8f821a
    interface: *interface1"}}
    protocol2{{"Protocol
    GUID: 4427b52e-1fb8-49e5-b68e-00f760736593
    interface: *interface2"}}
    protocol1-->usage1
    protocol2-->usage2
  end

  subgraph bucket2[" "]
    direction TB
    protocol3{{"Protocol
    GUID: 4427b52e-1fb8-49e5-b68e-00f760736593
    interface: *interface2"}}
    protocol3-->usage3
  end

  subgraph bucket3[" "]
    direction TB
    protocol5{{"Protocol
    GUID: 4427b52e-1fb8-49e5-b68e-00f760736593
    interface: *interface2"}}
    protocol6{{"Protocol
    GUID: 27e8a1a2-d776-43fa-8f3b-2b4786741a05
    interface: *interface3"}}
    protocol7{{"Protocol
    GUID: 54ceb550-ee1f-4052-bb0d-de525e2767c2
    interface: *interface4"}}
    protocol7-->usage4
  end

  subgraph database[" "]
    direction LR
    handle1-->bucket1
    handle2-->bucket2
    handle3-->bucket3
  end

  style database fill:#aca
  style bucket1 fill:#caa
  style bucket2 fill:#caa
  style bucket3 fill:#caa
Protocol Database Operations
This section describes the operations supported by the protocol database.
Initialization
The database must be initialized with well-known handles after creation. This is done by invoking the init_protocol_db
function on the event database. Once the well-known handles are installed, hashing is enabled for subsequent handle
creation (see Handle Objects).
Protocol Installation
Call the install_protocol_interface function to install protocol instances into the protocol database on an existing
handle or on a freshly created handle. This function takes an optional handle argument as well as required guid and
interface arguments. If a handle is provided, the new protocol is installed on that handle, otherwise a new handle is
created and the protocol is installed on the new handle. The behavior of this function closely matches the semantics of
EFI_BOOT_SERVICES.InstallProtocolInterface().
If the installation succeeds, a vector of ProtocolNotify objects is returned, and these objects contain the events
that should be signalled to notify registered listeners that a new protocol has arrived (see:
Signaling an Event). The protocol database manages the set of registered listeners and
constructs the vector so that only those events that match a registered notification listener matching the installed
guid are returned.
Protocol Removal
Remove protocol instances from the protocol database by invoking the uninstall_protocol_interface function. This takes
handle, guid, and interface arguments. The database checks for the existence of the protocol on the given
handle identified by the given (guid,interface) pair, and if found, attempt to remove it. If the usages
associated with a discovered protocol instance indicate that it is in use, then ACCESS_DENIED status is returned.
If the last protocol interface on a handle is removed, then the handle is removed from the protocol database and is no longer valid.
The behavior of this function closely matches the semantics of EFI_BOOT_SERVICES.UninstallProtocolInterface().
The EFI 1.10 behavior extension of calling
EFI_BOOT_SERVICES.DisconnectController()
to attempt to remove usages that prevent the protocol from being closed is implemented outside the protocol database
in the Patina DXE Core protocol module (see:
Patina DXE Core Protocol Module::Uninstall Protocol Interface).
Retrieving and Validating Handles
Retrieve a list of all handles that have a specified protocol instance from the database by invoking the
locate_handles function. This takes an optional guid parameter. If not specified, then all handles in the database
are returned. If specified, then only handles containing a protocol instance with the matching GUID are returned.
Check whether a handle is valid by invoking the validate_handle function. This function will return Ok if the
handle is a valid handle in the database, and Err otherwise.
Retrieving Protocol Instances
In many cases, there is only a single instance of a protocol in a system, or the calling code does not care which
instance is returned. In this case, use the locate_protocol function to retrieve a protocol instance. This takes a
protocol GUID parameter, and returns an interface pointer associated with the the specified protocol from the
database. If more than one handle has a matching protocol instance, then no guarantees are made about which handle
the protocol interface pointer comes from, nor are any guarantees that the same interface pointer would be returned
from different calls to locate_protocol for the same protocol.
In other cases, it is desirable to locate an instance of a protocol associated with a particular handle. Call the
get_interface_for_handle function to retrive the desired instance. This function takes as input a handle parameter
as well as a protocol parameter that specifies the GUID for the desired protocol. If the specified handle exists in
the database and has an instance of protocol associated with it, the interface pointer for that instance is returned.
3
To retrieve all protocol instances associated with a particular handle, call get_protocols_on_handle and specify the
handle in question. This function will return a list of all the protocol guid values for protocol instances
currently installed on the specified handle.4
Managing Protocol Usages
To add a protocol usage, call the add_protocol_usage function and supply the handle, protocol, agent_handle
(optional), controller_handle (optional) and attrbiutes arguments. This will apply the corresponding usage to the
protocol instance on the given handle if it exists. See
EFI_BOOT_SERVICE.OpenProtocol()
for a description of the usage attributes and the constraints on their usage. The protocol database will enforce these
constraints.
To remove a protocol usage, call the remove_protocol_usage function and supply the handle, protocol,
agent_handle (optional), and controller_handle (optional) arguments. This will remove the corresponding usage from
the protocol instance on the given handle if it exists5.
Some of the behavior specified by the UEFI spec for OpenProtocol and CloseProtocol require access to driver model APIs that are not available to the protocol database crate. These behaviors are implemented outside the protocol database in the Patina DXE Core protocol module (see: Patina DXE Core Protocol Module::Open Protocol Interface).
To query what usages are active on a protocol for a given handle, call the get_open_protocol_information and specify
the handle for which to retrieve the usages. The function will return a list of OpenProtocolInformation structures
corresponding to the active usages indexed by the protocol each ie associated with. To query the usages for a
particular protocol, call get_open_protocol_information_by_protocol instead. This function takes an additional
protocol parameter and returns the list of OpenProtocolInformation structures corresponding to only that protocol
6.
One special use case for usages is retriveing the set of "child handles" for a given "parent handle". A full discussion
of where this is useful is deferred to documentation on the UEFI Driver Model7. In terms of the protocol
database mechanics, what is required is the ability to return the list of controller_handles that are part of a
usage on the parent handle where the usage has an attribute of BY_CHILD_HANDLE. To retrieve such a list, call
get_child_handles on the protocol database and specify the desired parent handle; the function will return all the
"child" controller_handles.
Registering for Protocol Notifications
To register for notification on protocol installation, call the register_protocol_notify function and pass the
protocol GUID and an event to be signaled. The protocol database will track registered listeners, and when a new
protocol is installed that matches the protocol GUID that was registered is installed via
install_protocol, install_protocol will return the corresponding
event that can be signalled to indicate that the protocol has been installed. Any number of separate registrations may
be added to the protocol database, and all events matching a given installation event will be returned whenever an
installation occurs. register_protocol_notify will return a registration key which can be used to identify the
registration. 8
The protocol database implementation does not actually signal the event when a protocol installation occurs when a
registration is matched. Instead, the event is returned to the caller. This allows the protocol database to avoid
taking a direct dependency on the event subsystem. The event will be signaled by the Patina DXE Core
protocol module as needed.
To unregister a protocol notification, call the unregister_protocol_notify_events function and pass a list of events
that correspond to the registered notifies to remove. The protocol database will remove any registrations that match the
corresponding
event id.
If a registration has been created for a protocol instance, the protocol database will track all new instances of that
protocol as they are installed. To retrieve new protocols (in the order they are added), call
next_handle_for_registration and pass the registration key that was returned from register_protocol_notify. The
call will return the next newly installed protocol instance, or None if there are no fresh protocol installations.
This can be used to iterate through any newly created handles and is particularly intended for use in registration event
notification functions.9
Patina DXE Core Protocol Module
The protocol database described above is consumed by the protocol module of the Patina DXE Core to provide the actual UEFI Spec compliant protocol services. The Patina DXE Core protocol module translates the UEFI Boot Services Protocol API10 calls into interactions with the protocol database, and handles elements of the implementation that require interaction with other Patina DXE Core subsystems such as eventing or driver model.
In the protocol.rs module, the naming convention for pub functions intended for use by the core is to prefix them with
core_. Many of the functions described below are for implementing FFI APIs for UEFI spec compliance. These are not
usually designed for calling within the core. If calling from elsewhere in the core is required, it is often best to
create a Rust-friendly version of the API and prefix the name with core_ to signify that it is for core usage.
Install Protocol Interface
There are three functions that provide protocol installation services:
core_install_protocol_interface- main business logic, intended to be used as the main interface for any calls within the Patina DXE Core.install_protocol_interface- implements the UEFI Spec EFI_BOOT_SERVICES.InstallProtocolInterface() API. A simple wrapper aroundcore_install_protocol_interface. Not intended for direct usage in the core, callcore_install_protocol_interfaceinstead.install_multiple_protocol_interfaces- implements the UEFI Spec EFI_BOOT_SERVICES.InstallMultipleProtocolInterfaces() API. A wrapper aroundinstall_protocol_interfacewhich also callsuninstall_protocol_interfaceas needed in error scenarios.
The core_install_protocol_interface function will do the following:
- Install the protocol interface into the protocol database (see Protocol Installation). The protocol database will return the list of events for notification registration (if any).
- Signal Event for each of the events returned.
- If signaling any of the events returns an
INVALID_PARAMETERerror, it means that the event has been closed. If any such events exist, then the corresponding registration is removed from the protocol database (see Registering for Protocol Notifications).
The install_protocol_interface function is a simple wrapper around core_install_protocol_interface that handles the
raw pointers required the UEFI SPEC API.
The install_multiple_protocol_interfaces function installs a NULL-terminated list of protocols into the database. The
main difference between this routine and simply calling install_protocol_interface in a loop is that this function
handles uninstalling any previously installed protocols (from the same call) if one of the protocol installation
operations fails. This attempts to ensure that either all the given protocols are installed, or none of them are.
Uninstall Protocol Interface
There are two functions that provide protocol removal from the protocol database:
uninstall_protocol_interface- implements the UEFI Spec EFI_BOOT_SERVICES.UninstallProtocolInterface() API.uninstall_multiple_protocol_interfaces- implements the UEFI Spec EFI_BOOT_SERVICES.UninstallMultipleProtocolInterfaces() API.
The uninstall_protocol_interface function will do the following:
- Retrieve a list of all
usageson thehandlespecified in the call. - If any
usagesindicate that the protocol is in useBY_DRIVER, thencore_disconnect_controlleris called to attempt to release the protocol usage. - If any
usagesindicate that the protocol is openedBY_HANDLE_PROTOCOL,GET_PROTOCOL, orTEST_PROTOCOL, those usages are removed. - If any
usagesremain for the specifiedprotocolafter the above steps, then the protocol interface is not removed from the protocol database andACCESS_DENIEDstatus is returned. In addition, in this case any drivers that were disconnected in step 2 above are re-connected by callingcore_connect_controller. - Otherwise, if no
usagesremain on the handle for the specifiedprotocolafter the above steps, then the handle is removed from the protocol database (see: Protocol Removal).
The uninstall_multiple_protocol_interfaces function removes a NULL-terminated list of protocols from the database. The
main difference between this routine and simply calling uninstall_protocol_interface in a loop is that this function
handles re-installing any previously removed protocols (from the same call) if one of the protocol removal operations
fail. This attempts to ensure that either all the given protocols are removed, or none of them are.
There is presently no core_uninstall_protocol_interface because no elements of the core require it outside of the the
protocol module. Should a general requirement for this API materialize in the core, a core_uninstall_protocol function
should be added with Rust-style semantics instead of calling uninstall_protocol_interface which is primarily intended
for FFI usage.
Reinstall Protocol Interface
The reinstall_protocol_interface function replaces an old protocol interface on a handle with a new one. It may
also be called with the same interface for old and new which will\ trigger notifications for a registration on a
protocol interface without actually modifying the interface. This implements the UEFI Spec
EFI_BOOT_SERVICES.ReinstallProtocolInterface().
The there are two main difference between calling this function and simply calling back-to-back
uninstall_protocol_interface/install_protocol_interface:
- If the given interface is the only protocol interface on the
handle, then callinguninstall_protocol_interfaceon it would result in thehandlebeing removed from the database, and the subsequentinstall_protocol_interfacewould fail because the handle would no longer exist. This function avoids that issue. uninstall_protocol_interfacewill disconnect any drivers that have the protocol openBY_DRIVER(see Uninstall Protocol Interface). This function will callcore_connect_controlleron thehandleso that any disconnected drivers are re-connected to the controller.
Protocol Notification
The register_protocol_notify function registers an event to be signalled on installation of a new protocol. This
function implements the
EFI_BOOT_SERVICES.RegisterProtocolNotify()
API. It is a simple wrapper around the protocol database
register_protocol_notify
function. The function returns a registration key that is used as an input to
locate_handle or
locate_protocol.
Locating a Handle
The locate_handle function returns a list of handles that support a specified protocol. This function implements the
EFI_BOOT_SERVICES.LocateHandle()
API.
There are several different search_type options that can be specified which control the behavior of the function:
AllHandles- returns all the handles in the database. For this search type, theprotocolandsearch_keyarguments are ignored.ByRegisterNotify- returns the nexthandlethat has a fresh instance of a protocol installed on it for the givensearch_key. See (Registering for Protocol Notifications and Protocol Notification). Note that only one protocol instance at a time is returned for this search type.ByProtocol- Returns allhandlesin the database that have a protocol instance of the type specified in theprotocolargument.
The related locate_handle_buffer function implements the same logic as locate_handle, except that the memory to
contain the resulting handle list is pool-allocated by locate_handle_buffer (to be freed by caller), rather than
taking a caller-allocated buffer like locate_handle does. locate_handle_buffer implements the
EFI_BOOT_SERVICES.LocateHandleBuffer()
function.
A specialized form of handle location is provided by the locate_device_path function, which implements the
EFI_BOOT_SERVICES.LocateDevicePath().
Call this function to locate the handle to a decvice on the specified device_path that supports the specified
protocol. This is useful in scenarios where a logical child driver needs to invoke services on a logical parent
driver.
Locating a Protocol
The handle_protocol retrieves a particular protocol interface from a particular handle. This function implements
the EFI_BOOT_SERVICES.HandleProtocol()
API. Note that while this function is available for historical purposes, new applications and drivers should prefer the
Open Protocol Interface instead.
The protocols_per_handle function queries the list of protocols that are supported on the specified handle. This
function implements the
EFI_BOOT_SERVICES.ProtocolsPerHandle()
API. Note that this function a) returns a list of GUIDs, but not the associated interface pointers, and b) creates a
pool-allocated buffer to hold the result that the caller must free.
The locate_protocol function is used in simple scenarios where only a single instance of a protocol is expected to
exist. If multiple protocol instances exist, it does not matter which of multiple instances of a protocol is returned.
It can be used with register_protocol_notify in conjunction with a search_key to return protocols associated with a
notification. This function implements the EFI_BOOT_SERVICES.LocateProtocol()
API.
Open Protocol Interface
The open_protocol function queries the protocol database for a given protocol on a given handle, and if present,
adds a usage (see: Managing Protocol Usages) for the protocol
instance according to the attributes specified to the call. This function implements the
EFI_BOOT_SERVICE.OpenProtocol()
API.
There are a number of spec-defined interactions between different agents opening the protocol - for example, an agent
may request exclusive access to a protocol instance on a given handle. These rules are largely enforced by the protocol
database implementation, the add_protocol_usage will return an appropriate error if an attempt is made to add a usage
that would cause a conflict. Interactions with the driver model are implemented in the protocol module since the
database does not have access to these APIs.
The open_protocol function executes the following logic:
- Validate inputs:
protocolandinterfacepointers must not be null (nullinterfaceis permitted forTEST_PROTOCOLattribute),agentandcontrollerhandles must be valid. - If the
EXCLUSIVEflag is set in the attributes, retrive all current usages for thehandleand if any of those usages indicate that theprotocolis openBY_DRIVER, then executecore_disconnect_controllerto close the protocol usage. - Call
add_protocol_usageto insert a new usage representing this open operation into the protocol database. Note: in most cases where there is an error returned fromadd_protocol_usage, the error is simply returned. but in the special case ofALREADY_STARTEDwith a requested attribute containingBY_DRIVER, the interface pointer is also returned. Also, if the requested attribute containedTEST_PROTOCOL, then the interface is not returned on success.
Close Protocol Interface
The close_protocol function removes a usage from a protocol on a handle. This function implements the
EFI_BOOT_SERVICE.CloseProtocol()
API.
The close_protocol function is a simple passthrough to remove_protocol_usage (see:
Managing Protocol Usages).
Querying Protocol Usages Information
The open_protocol_information function queries the protocol database for the usage information on the given handle
for the given protocol. This function implements the
EFI_BOOT_SERVICE.OpenProtocolInformation()
API. This is a simple wrapper around the underlying protocol database get_open_protocol_information_by_protocol
function (see: Managing Protocol Usages).
Driver Model Services
In the UEFI spec, EFI_BOOT_SERVICES.ConnectController() and EFI_BOOT_SERVICES.DisconnectController() are part of the Protocol Handler Services section of the specification, however, in the Patina DXE Core, these services are implemented in the driver_services.rs module, and have their own section in this book on their theory of operation - see UEFI Driver Model.
-
UEFI Driver Model - and in particular Bus Drivers ↩
-
EFI_BOOT_SERVICE.LocateProtocol(), in particular, see the description of the
Registrationparameter. ↩ -
UEFI Spec Protocol Handler Services ↩
Synchronization
UEFI does not support true multi-threaded operation; in general, all interaction with the Patina DXE Core is expected to take place on a single processor thread. UEFI does permit that single thread to have multiple "tasks" executing simultaneously at different "Task Priority Levels1."
Routines executing at a higher TPL may interrupt routines executing at a lower TPL. Both routines may access Patina DXE Core Services, so global state in the Patina DXE Core, such as the protocol database, event database, dispatcher state, etc. must be protected against data races caused by simultaneous access from event callbacks running at different TPL levels.
The primary way this is implemented in the Patina DXE Core is via the TplMutex
structure.
TplMutex
TplMutex implements mutual exclusion for the Patina DXE Core using semantics
very similar to the Rust sync::Mutex.
Each TplMutex has a type parameter which represents the data that it is
protecting. The data can only be accessed through the TplGuard objects
returned from lock() and try_lock() methods on the TplMutex.
There are two mutual exclusion mechanisms that protect the data guarded by
TplMutex:
TplMutex - TPL interactions
The first mutual exclusion mechanism used by TplMutex is the TPL - When a
TplMutex is created, it takes a tpl_lock_level parameter that specifies a
TPL level. When the a TplMutex is locked, the TPL is raised to that level;
this prevents any code at that TPL level or lower from executing. This ensures
that access to the lock is not attempted by other code, and helps avoid deadlock
scenarios.
Care must be taken when selecting the tpl_lock_level for a TplMutex. Code
executing at a TPL higher than the TplMutex will panic if it attempts to
acquire the lock (because it will attempt to raise the TPL to a lower level,
which is an error). But setting a tpl_lock_level to a high TPL level will
prevent other (unrelated) usage of that TPL, potentially reducing system
responsiveness. It is recommended to set the tpl_lock_level as low as possible
while still guaranteeing that the no access to the lock will be attempted at a
higher TPL level.
TplMutex - Locking and Reentrancy
The second mutual exclusion mechanism used by TplMutex is a flag to control
access to the lock. To acquire the TplMutex, the flag must be clear to
indicate that the lock is not owned by any other agent. There is a significant
difference between the TplMutex and sync::Mutex - while sync::Mutex will
simply block on a call to lock() when the lock is owned, TplMutex will panic
if an attempt is made to call lock() when it is already owned.
This is by design: sync:Mutex presumes the existence of a multi-threaded
environment where the owner of the lock might be another thread that will
eventually complete work and release the lock. In the sync:Mutex context a
blocking lock() call makes sense since it is reasonable to expect that the
lock will be released by another thread. In the UEFI TplMutex context,
however, there is no multi-threading, only interrupts on the same thread at
higher TPL. For a re-entrant call to lock() to occur, an attempt to call
lock() must have been made from the same or higher TPL level than the original
call to lock(). This means that if the re-entrant call to lock() were to
block, control would never return to the original caller of lock() at the same
or lower TPL. So in the UEFI context, all reentrant calls to lock() are
guaranteed to deadlock. Note that sync::Mutex behavior
is similar if lock() is attempted on the same thread that already holds the
mutex.
The try_lock() routine in TplMutex allows a lock to be attempted and fail
without blocking; this can be used for scenarios where a lock might be held by
another agent in a lower TPL but the caller can handle not acquiring the lock,
or in scenarios where a call is re-entrant at the same TPL.
TplGuard
When lock() is called on TplMutex a TplGuard structure is returned that
provides access to the locked data. The TplGuard structure implements Deref
and DerefMut, which allows access to the underlying data:
use crate::tpl_mutex::TplMutex;
use r_efi::efi;
let tpl_mutex = TplMutex::new(efi::TPL_HIGH_LEVEL, 1_usize, "test_lock");

*tpl_mutex.lock() = 2_usize; //deref to set
assert_eq!(2_usize, *tpl_mutex.lock()); //deref to read.
In addition, the when the TplGuard structure returned by lock() goes out of
scope or is dropped, the lock is automatically released:
use crate::tpl_mutex::TplMutex;
use r_efi::efi;
let tpl_mutex1 = TplMutex::new(efi::TPL_HIGH_LEVEL, 1_usize, "test_lock");

let mut guard1 = tpl_mutex1.lock(); //mutex1 locked.
*guard1 = 2_usize; //set data behind guard1
assert_eq!(2_usize, *guard1); //deref to read.
assert!(tpl_mutex1.try_lock().is_err()); //mutex1 still locked.
drop(guard1); //lock is released.
assert!(tpl_mutex1.try_lock().is_ok()); //mutex1 unlocked and can be acquired.
General Guidelines for Synchronization within Patina
This section documents some good rules of thumb for synchronization design within Patina.
-
If a type needs to be
Sync/Send, that means it is expected to be shared across contexts - Rust documentation refers to these contexts as threads, but within UEFI this generally refers to event callbacks running on the same CPU thread - see discussion above. The primary place that the Rust compiler requires this in the Patina context is global shared state, such as the protocol/event databases or global allocator state. The default safe way to do this is aTplMutexas described above that ensures that data races and deadlock do not occur on access to this global state. -
Do not use non-TPL aware synchronization primitives such as
spin::mutexorspin::rwlock. In the UEFI/Patina threading model, these primitives are prone to deadlock because they assume that contention for the lock from one context will not block execution of the context currently holding the lock. But as described in the previous section of this chapter, that is not the case for UEFI: if code running at a low TPL holds a lock and is interrupted by code in an event callback at a higher TPL that tries to acquire the lock, deadlock will occur.TplMutexhelps to ensure this doesn't happen by panicking on an attempt to acquire the lock in this case, helping the developer identify and resolve the design issues that would otherwise lead to deadlock. -
When designing a
TplMutexto guard shared data, select the highest TPL that the shared state will possibly be accessed at as the TPL level associated with the mutex. Typically this will beTPL_NOTIFYas that is the highest level that the UEFI specification normally allows for general usage - see Table 7.2 in the UEFI spec. Designs must guarantee the invariant that there will be no attempts to access theTplMutexat a higher TPL level than associated with the mutex, and this will be enforced with anassert. This is known as "TPL Inversion," and if it were allowed, it would mean that higher TPL levels could break mutual exclusion and cause data races. Table 7.3 lists the TPL restrictions associated with various core services and common protocols.Note: it is important to understand that the TPL level associated with a
TplMutexis not the same thing as the TPL level associated with an event callback routine. The TPL level associated with an event callback determines the TPL level at which the event callback is permitted to run and can be thought of as the "ground state" TPL that the event callback executes at. The callback is permitted to acquire a TplMutex at a higher level than the event callback is running at, and the TPL will be raised for the duration that the TPL guard is owned to prevent data races with event callbacks running at the higher context. -
Care should be taken to ensure that
TplMutexusages are scoped so that the critical sections are as narrow as possible. This is especially true if accessing shared data from a TPL context that is at a lower TPL than theTplMutexlock level since holding the lock at a higher TPL for long periods will starve event servicing at or below theTplMutexlock level as long as the guard is active.Prefer:
{
    let guard = my_tpl_mutex.lock();
    // TPL raised to level associated with my_tpl_mutex
    guard.mutation();
}
// mutex dropped, TPL restored to the base TPL level for the event callback.
long_running_computation();
// re-acquire mutex
my_tpl_mutex.lock().mutation2();
instead of:
let guard = my_tpl_mutex.lock(); guard.mutation(); //mutex held and TPL stays high during long_running_computation long_running_computation(); guard.mutation2(); -
If the design calls for interior mutability on data that is not shared between contexts, use a standard Rust interior mutability primitive (i.e.
UnsafeCelland its derivatives). Do not useTplMutexfor interior mutability on non-shared data. A good rule of thumb is that if your usage doesn't requireSync/Send, then you don't need aTplMutex. -
The UEFI spec APIs often use constructs like
context: *mut c_voidto share data between contexts. When implementing FFI interfaces to support these API contracts,TplMutexshould be used to guard shared data accessed via these context raw pointers even though the raw pointers are not required to beSync/Sendby the compiler. Whether data races can occur and how they are prevented should be documented as part of the safety comments for usage of the raw context pointer. Sometimes thecontextpointer is known to be unique to the event callback and never accessed from other contexts, in which case aTplMutexis not required. -
Direct
raise_tplandrestore_tplcalls should be avoided. Directly manipulating the TPL decouples the mutual exclusion primitives from the data that is being protected and makes it hard to associate the TPL requirements with the data synchronization model of the code. -
Care should be taken to avoid violating UEFI spec caller restrictions on TPL as described in Table 7.3 of the UEFI spec. For example, the following usage of
TplMutexwould be an error:let my_tpl_mutex = TplMutex::<Data>::new(efi::TPL_NOTIFY, Data::new(), "my lock"); let _guard = my_tpl_mutex.lock(); //TPL raised to NOTIFY while _guard is in scope. let acpi_services = locate_acpi_table_protocol(); acpi_services.install_acpi_table(); //BUG: UEFI spec requires invocation at < TPL_NOTIFY
As with any set of guidelines, exceptions to the above may be required for
specific cases; these should include design rationale for the departure from
these rules of thumb. For example, it might be possible to use a non-TPL
synchronization primitive that only uses try_lock to avoid deadlock and is
designed to handle failure to acquire the lock in a non-fatal manner.
-
See Event, Timer, and Task Priority Services elsewhere in this book, as well as the UEFI Specification Section 7.1. ↩
DXE Core Testing
Writing DXE Core tests follows all the same principles defined in the Testing chapter, so if you
have not reviewed it yet, please do so before continuing. One of the reasons that patina
is split into multiple crates and merged the patina_dxe_core umbrella crate is to support code separation and ease of
unit testing. Support crates (in the crates/* folder) should not contain any static data used by the core. Instead,
they should provide the generic implementation details that the core uses to function. This simplifies unit tests, code
coverage, and the future possibility of extracting functionality to be used in additional cores (such as PEI, MM, etc).
The DXE Core supports all 4 types of testing mentioned in the Testing chapter; this includes on-platform unit tests.
Any function with the patina_test attribute will be consolidated and executed on any platform that uses the
TestRunnerComponent (unless specifically filtered out by the platform).
Testing with Global State
The standout difference between typical testing as described in the testing chapter, is that the DXE core has multiple static pieces of data that are referenced throughout the codebase. Since unit tests are ran in parallel, this means that multiple tests may be manipulating this static data at the same time. This will lead to either dead-locks, panics, or the static data being in an unexpected state for the test.
To help with this issue in the patina_dxe_core crate, a test_support
module was added to make writing tests more convenient. The most important functionality in the module is the
with_global_lock function which takes your test closure / function as a parameter. This function locks a private
global mutex, ensuring you have exclusive access to all statics within the DXE Core.
It is the responsibility of the test writer to reset the global state to meet their expectations. It is not the responsibility of the test writer to clear the global state once the test is finished.
Examples
Example 1
use crate::test_support::{with_global_lock, init_test_gcd};

#[test]
fn test_that_uses_gcd() {
    with_global_lock(|| {
        init_test_gcd(None);

        todo!("Finish the test");
    });
}
Example 2
use crate::test_support::{with_global_lock, init_test_gcd};

fn with_gcd<F: Fn()>(gcd_size: Option<usize>, f: F) {
    with_global_lock(|| {
        init_test_gcd(gcd_size);
        f();
    })
}

#[test]
fn test1() {
    with_gcd(None, || {
        todo!("Write the test");
    });
}

#[test]
fn test2() {
    with_gcd(Some(0x1000), || {
        todo!("Write the test");
    });
}
UEFI Driver Model
This portion of the core is concerned with implementing boot services that support the UEFI Driver Model,
in particular the EFI_BOOT_SERVICES.ConnectController
and EFI_BOOT_SERVICES.DisconnectController
APIs. These routines are technically part of the "Protocol Handler Services" portion of the UEFI Spec
but are complex enough to merit their own module and documentation.
The driver_services.rs module within the Patina DXE Core is responsible for implementing the driver service logic for the core, and uses the services of the Protocol Database module to implement most of the logic.
In UEFI parlance, "connecting" a controller means discovering and starting any drivers that have support for managing a
given controller and providing services or capabilities on top of that controller. This is is enabled via means of the
EFI_DRIVER_BINDING_PROTOCOL
which provides APIs to determine whether a given driver supports a given controller and start the driver managing that
controller or stop a driver from managing a controller. In addition to EFI_DRIVER_BINDING_PROTOCOL the UEFI spec
describes a number of other protocols for
driver configuration and management. These protocols allow for platform control of driver priority, as well as
diagnostics, configuration, and user interface support. With the exception of the protocols that control driver
selection and priority (which are discussed below), most of these protocols do not directly impact core operation and
are beyond the scope of this documentation.
Connecting a Controller
Call core_connect_controller with a controller handle to search the protocol database for drivers to manage the
given controller handle and start a driver. This routine takes optional inputs such as a list of driver_handles
containing preferred drivers for the controller, as well as remaining_device_path and recursive arguments that
control how the tree of controllers underneath this handle (if any) is expanded. This function directly implements the
semantics of EFI_BOOT_SERVICES.ConnectController.
Prior to executing the logic to connect a controller, the device path on the controller handle to be connected is passed to the Security Architectural Protocol to check and enforce any Platform security policy around connection of the device.
Determining the Priority Order of Drivers
A firmware implementation may have multiple drivers that are capable of managing a given controller. In many cases, a driver will claim exclusive access to the controller, meaning that whichever driver executes first will be able manage the controller. The UEFI spec specifies five precedence rules that are used to order the set of drivers it discovers for managing a controller to allow the platform some measure of control over which driver is selected to manage the controller. The precedence rules are used to generate a list of candidate drivers as follows:
- Drivers in the optional
driver_handlesinput parameter tocore_connect_controllerare added to the candidate list in order. - If an instance of the
EFI_PLATFORM_DRIVER_OVERRIDEprotocol is found in the system, then drivers it returns are added to the list in order, skipping any that are already in the list. - The set of driver image handles in the protocol database supporting the
EFI_DRIVER_FAMILY_OVERRIDE_PROTOCOL, ordered by the version returned byGetVersion()API of that protocol are added to the list, skipping any that are already in the list. - If an instance of the `EFI_BUS_SPECIFIC_DRIVER_OVERRIDE' protocol is found in the system, then drivers it returns are added to the list in order, skipping any that are already in the list.
- All remaining drivers in the Protocol Database not already in the list are added to the end of the list.
Starting Drivers
Once the ordered list of driver candidates is generated as described in the previous section, the
core_connect_controller logic will then loop through the driver candidates calling EFI_DRIVER_BINDING_PROTOCOL.Supported()
on each driver. If Supported() indicates that the driver supports the controller handle passed to
core_connect_controller, then EFI_DRIVER_BINDING_PROTOCOL.Start()
is invoked for the driver. This is done for all drivers in the list, and more than one driver may be started for a
single call to core_connect_controller.
No provision is made in the specification to handle the scenario where a Driver Binding instance is uninstalled between
a call to Supported() and a call to Start(). Because mutable access to the protocol database is required by
Supported() and Start() calls, it is possible to uninstall a Driver Binding instance while a
core_connect_controller is in process which will result in undefined behavior when core_connet_controller attempts
to invoke the Supported() or Start() functions on a driver binding that has been removed (and potentially freed).
For this reason, core_connect_controller is marked unsafe; and care must be taken to ensure that Driver Binding
instances are stable during calls to core_connect_controller. This should usually be the case.
Disconnecting a Controller
Call core_disconnect_controller with a controller handle to initiate an orderly shutdown of the drivers currently
managing that controller. This routine takes optional inputs of driver_handle and child_handle to allow
finer-grained control over which drivers and/or child controllers of the present controller should be shut down. This
function directly implements the semantics of EFI_BOOT_SERVICES.DisconnectController.
To determine which drivers to stop, the Protocol Database
is queried to determine which driver handles are listed as an agent_handle that have the controller handle open with
BY_DRIVER attribute. This set of drivers is the list of drivers that are "managing" the current controller handle
and will be stopped when core_disconnect_controller is called.
The caller can narrow the scope of the disconnect operation by supplying the optional driver_handle parameter to the
function. If this parameter is supplied, then only that specific driver will be stopped, rather than all of the drivers
managing the controller.
Shutting Down a Driver
If a driver is a bus driver, the Protocol Database is queried
to determine the set of child controllers for the current handle. A "child controller" is defined as the
controller_handles for any usages of this handle where the agent_handle is the driver being stopped and the usage
has an attribute of BY_CHILD_CONTROLLER. If the optional child_handle is specified to core_disconnect_controller,
then the list of child_controllers is filtered to only include that single child_handle if present. Once the set of
child controllers is generated, then EFI_DRIVER_BINDING_PROTOCOL.Stop()
function is invoked to stop all drivers managing the child controllers.
If the driver is not a bus driver, or if all child handles were closed (i.e. the optional child_handle was not
specified, or it was specified and that was the only child_handle found on the controller), then EFI_DRIVER_BINDING_PROTOCOL.Stop()
is then invoked on the handle itself.
Driver Model State after Disconnecting a Controller
In general, if core_disconnect_controller succeeds without failure, it implies that drivers managing the controller
should have had the EFI_DRIVER_BINDING_PROTOCOL.Stop()
method invoked, and this should have caused the driver to release all resources and usages associated with the
controller.
This behavior is key to implementing some of the other flows in the boot services such as OpenProtocol and CloseProtocol operations that require interaction with the driver model.
Contributors
Here is a list of the contributors who have helped improve this documentation. Big shout-out to them!
If you feel you're missing from this list, feel free to add yourself in a PR.
License History
This file contains the history of Patina license changes.
Key Dates
-
Project Inception: BSD-2-Clause-Patent License
The project was initially licensed under the BSD-2-Clause-Patent license. This license met the overall license requirements for the project itself and was a natural starting point as it is used by C code ported to and referenced by the project.
-
September 4, 2025: Change to Apache-2.0 License
The project license was changed from BSD-2-Clause-Patent to Apache-2.0. This change was made to better align with the Rust ecosystem and to provide additional protections and clarity for contributors and users.
The change was made following the guidelines set forth in the project's governance documentation approved in RFC: Apache 2.0 License for Patina.