ODP QEMU Platform
This book documents the Open Device Partnership reference platform for the QEMU arm-virt platform. The repository assembles the platform firmware, embedded controller firmware, secure services, UEFI, Windows image, and end-to-end tests needed for development and validation.
Quick start
Open the repository in its devcontainer, then build all firmware artifacts:
make all
Boot the UEFI-only configuration:
make run
Build and boot the Windows image:
make run_os
Run the end-to-end test suite:
make e2e-test
See the repository README for project status and contribution information.
Devcontainer Image
This project uses a devcontainer for CI and local
development. The image is defined in .devcontainer/Dockerfile and configured
by .devcontainer/devcontainer.json.
How the CI cache works
The GitHub Actions workflow (.github/workflows/build.yml) builds the
devcontainer using the
devcontainers/ci action. That action
wraps the Dockerfile in a generated Dockerfile-with-features which renames
the build stage to dev_container_auto_added_stage_label. The BuildKit cache
is keyed on the full build graph including stage names, so cache images must
be built with the same wrapper to get cache hits.
Pre-seeding the cache
When the Dockerfile changes, the first CI run will rebuild every layer from scratch. To avoid this, you can pre-seed the GHCR cache from your local machine:
# 1. Log in to GHCR
gh auth token | docker login ghcr.io -u "$(gh api user --jq .login)" --password-stdin

# 2. Run the push script
./scripts/push-devcontainer-cache.sh
The script uses the devcontainer build CLI to generate the same Dockerfile
wrapper that CI uses (with the dev_container_auto_added_stage_label stage
name). It then runs docker buildx build with --cache-to type=registry,mode=max
to push all intermediate layers as registry cache. This avoids the limitations
of BUILDKIT_INLINE_CACHE=1 (inline cache), which can silently drop cache
metadata for some layers in multi-platform builds.
By default the script pushes to
ghcr.io/<your-gh-user>/odp-platform-qemu-arm-virt-devcontainer:cache. You can
override this by passing an image name:
./scripts/push-devcontainer-cache.sh ghcr.io/myorg/my-image
Cache lookup order
Both CI and Common.mk try multiple cache sources in order:
ghcr.io/dymk/odp-platform-qemu-arm-virt-devcontainer:cacheghcr.io/dymk/odp-platform-qemu-arm-virt-devcontainer:latestghcr.io/opendevicepartnership/odp-platform-qemu-arm-virt/devcontainer:cacheghcr.io/opendevicepartnership/odp-platform-qemu-arm-virt/devcontainer:latest
This means PRs from forks can benefit from the upstream org cache, and contributors can push their own cache to speed up their PRs.
Pinned external images
The Dockerfile copies QEMU binaries from a builder image. This image is pinned
by SHA digest (not :latest) to ensure deterministic builds. The digest is set
once at the top of the Dockerfile via the QEMU_BUILDER_IMAGE build arg:
ARG QEMU_BUILDER_IMAGE=ghcr.io/opendevicepartnership/odp-qemu-builder/qemu@sha256:376bc8a3...
FROM ${QEMU_BUILDER_IMAGE} AS qemu-builder
...
COPY --from=qemu-builder /usr/local/bin/qemu-system-aarch64 /usr/local/bin/qemu-system-aarch64
To update the pinned digest, pull the new image and grab its digest:
docker pull ghcr.io/opendevicepartnership/odp-qemu-builder/qemu:latest
docker inspect --format='{{index .RepoDigests 0}}' ghcr.io/opendevicepartnership/odp-qemu-builder/qemu:latest
Then update the digest in the QEMU_BUILDER_IMAGE ARG default in
.devcontainer/Dockerfile. That is the only place the digest needs to change.
E2E Tests for Secure Partition Services
End-to-end tests that exercise the EC Secure Partition (SP) running inside QEMU by sending FF-A messages from the non-secure world and validating responses.
Overview
The test harness is a set of standalone Rust UEFI applications targeting
aarch64-unknown-uefi. Each test binary boots in the UEFI Shell, issues FF-A
SMC calls directly to the Secure Partition Manager Core (SPMC / Hafnium), and
reports results over serial.
graph LR
    subgraph QEMU["QEMU (virt machine)"]
        subgraph NS["Non-Secure World"]
            Shell["UEFI Shell<br/>thermal.efi / tpm.efi"]
        end
        subgraph S["Secure World"]
            SPMC["Hafnium (SPMC)"]
            SP["EC SP (0x8002)<br/>Thermal / TPM / FwMgmt / Notify"]
        end
        Shell -- "FFA_MSG_SEND_DIRECT_REQ2<br/>(SMC #0)" --> SPMC
        SPMC --> SP
        SP --> SPMC
        SPMC -- "FFA_MSG_SEND_DIRECT_RESP2" --> Shell
    end
    Shell -- "Serial output<br/>[PASS] / [FAIL]" --> Host["Host / CI"]
Why UEFI Applications?
- Fast iteration — rebuild only the test
.efibinary, not the entire BIOS. The firmware (SECURE_FLASH0.fd+QEMU_EFI.fd) is reused as-is. - Lightweight — each binary is ~32 KB. No OS needed.
- Direct FF-A access — UEFI apps run at EL1 and can issue
smc #0directly, the same way the SP's own C test app (FfaPartitionTestApp.efi) does. - Same language as the SP — Rust, with shared types from the
odp-ffacrate.
Directory Structure
| Directory | Purpose |
|---|---|
ffa/ | FFA calling library — thin wrapper around odp-ffa with FFA_PARTITION_INFO_GET_REGS |
test-support/ | Shared test harness: run_tests(), send_direct_req2(), result reporting |
uart-logger/ | Minimal PL011 UART logging crate for serial output |
tests/thermal/ | Thermal service test suite (thermal.efi) |
tests/tpm/ | TPM service test suite (tpm.efi) |
coverage-plugin/ | QEMU TCG plugin for SP code coverage collection |
scripts/ | Post-processing tools (e.g., pcs-to-lcov.py) |
Build/ | Build artifacts: test output, coverage logs/reports, virtual drive |
How It Works
1. Build
Test binaries are compiled with cargo build --release inside the devcontainer,
targeting aarch64-unknown-uefi. The output is a PE/COFF .efi executable.
2. Virtual Drive Preparation
The Makefile creates a temporary directory (Build/vdrive/) containing:
- The compiled
.efitest binaries. - A
startup.nshscript that auto-runs the tests when UEFI Shell starts.
3. QEMU Launch
QEMU boots with:
- The pre-built BIOS firmware (pflash units 0 and 1) — includes TF-A, Hafnium, the EC Secure Partition, and UEFI.
- A virtual FAT drive (
-drive file=fat:rw:Build/vdrive,...) mounted as a disk visible to the UEFI Shell. -nographic— all output goes to serial/stdio.
4. Test Execution
The UEFI Shell finds the FAT drive, executes startup.nsh, which launches
thermal.efi. The test app:
- Negotiates FF-A version — calls
FFA_VERSIONrequesting v1.2. - Gets its own partition ID — calls
FFA_ID_GET. - Discovers the EC SP — calls
FFA_PARTITION_INFO_GET_REGSwith the Thermal service UUID (31f56da7-593c-4d72-a4b3-8fc7171ac073) to find partition0x8002. - Sends a Direct Request v2 —
FFA_MSG_SEND_DIRECT_REQ2with thermalget_temperaturecommand (opcode0x01, sensor ID0). - Validates the response — checks status == 0 in the
MsgSendDirectResp2payload. - Reports results — prints
[PASS]or[FAIL]for each test to serial. - Shuts down QEMU — calls
uefi::runtime::reset(SHUTDOWN).
5. Result Collection
The make test-sp-services target wraps QEMU execution with timeout, captures serial
output to Build/test-output.log, then greps for [PASS]/[FAIL] lines
to determine the overall result.
FFA Library (ffa/ crate)
The ffa crate is a thin wrapper around
odp-ffa
(the same FFA crate used by the Secure Partition itself). It:
- Re-exports all of
odp_ffa—Version,IdGet,MsgSendDirectReq2,MsgSendDirectResp2,DirectMessagePayload,Function,Error, etc. - Adds
FFA_PARTITION_INFO_GET_REGS— the only function not yet inodp-ffa. Uses raw inline-asm SMC sinceodp_ffa::smcispub(crate). Marked withTODO(odp-ffa)for future upstreaming.
This means test code uses the same types and UUID encoding as the SP, preventing drift between the two sides.
FF-A Messaging Protocol
Tests communicate with the EC SP using FF-A Direct Message v2 (Req2/Resp2).
The register layout for an FFA_MSG_SEND_DIRECT_REQ2 SMC is:
| Register | Contents |
|---|---|
| x0 | Function ID (0xC400008D) |
| x1 | (source_id << 16) | destination_id |
| x2 | Service UUID high 64 bits (big-endian u64) |
| x3 | Service UUID low 64 bits (big-endian u64) |
| x4–x17 | Payload arguments (Arg0–Arg13) |
The payload is serialized as a DirectMessagePayload — a 112-byte (14 × 8)
register blob accessed via u8_at(), u16_at(), u64_at(), etc.
For the Thermal get_temperature command specifically:
- Request: byte 0 = opcode (
0x01), byte 1 = sensor_id (0x00) - Response: bytes 0–7 = status (i64), bytes 8–15 = temperature (u64)
Running
Prerequisites
- BIOS firmware must be built first:
make allfrom the repo root. - The devcontainer must have the
aarch64-unknown-uefiRust target installed (included in the Dockerfile).
Commands
# Build test EFI binaries only
make -C e2e-tests build

# Run with timeout + pass/fail reporting (for CI)
make -C e2e-tests test-sp-services

# Full pipeline: build everything then run tests
make e2e-test
Adjusting the Timeout
The default QEMU timeout is 180 seconds. Override with:
make -C e2e-tests test-sp-services QEMU_TIMEOUT=60
Expected Output
=== EC Secure Partition E2E Tests ===
  FFA version: 1.2
[PASS] ffa_version
  Our partition ID: 0x0000
[PASS] ffa_id_get
  Found EC partition: id=0x8002 ctx=1 props=0x00000603
[PASS] partition_discovery
  get_temperature response: status=0, temp=0x1234
[PASS] thermal_get_temperature
--- Results: 4 passed, 0 failed ---
Adding New Tests
New test for an existing service
Add a new fn test_*() function in the relevant test binary (e.g.,
tests/thermal/src/main.rs) and call it from main().
New test binary for a different service
- Create
e2e-tests/tests/<service>/Cargo.tomlandsrc/main.rs. - Add it to the workspace in
e2e-tests/Cargo.toml:members = ["ffa", "uart-logger", "test-support", "tests/thermal", "tests/<service>"] - Update
e2e-tests/Makefile:- Add the new
.efipath (e.g.<SERVICE>_EFI := $(TARGET_DIR)/<service>.efi). - Add a per-test vdrive dir (e.g.
VDRIVE_<SERVICE>_DIR := Build/vdrive-<service>) and a target that stages it:$(call make-vdrive,$(VDRIVE_<SERVICE>_DIR),$(<SERVICE>_EFI)). - No startup script needed — the shared generic
startup.nshruns whichever single.efiis on the vdrive.
- Add the new
Service UUIDs
The EC Secure Partition (0x8002) handles these services:
| Service | UUID |
|---|---|
| Inter-Partition / Notification | e474d87e-5731-4044-a727-cb3e8cf3c8df |
| EC Management | 330c1273-fde5-4757-9819-5b6539037502 |
| EC Power | 7157addf-2fbe-4c63-ae95-efac16e3b01c |
| EC Battery | 25cb5207-ac36-427d-aaef-3aa78877d27e |
| EC Thermal | 31f56da7-593c-4d72-a4b3-8fc7171ac073 |
| TPM 2.0 | 17b862a4-1806-4faf-86b3-089a58353861 |
These are defined in the SP's device tree manifest
(secure-services/platform/linker/qemu-ec-sp.dts).
Code Coverage
E2E tests automatically collect code coverage for the EC Secure Partition
using a QEMU TCG plugin. Every make test-sp-services run produces a coverage log at
Build/coverage.log.
How it works
-
TCG plugin (
coverage-plugin/coverage.c) — a small shared library loaded into QEMU via-plugin. During translation, it instruments every instruction whose address falls within the SP memory range (0x20802000–0x21002000, matching the linker script). On execution, it sets a bit in a lock-free bitmap. At exit, it writes all unique executed PCs to the output file. -
Post-processing (
scripts/pcs-to-lcov.py) — extracts all instruction addresses from the SP ELF viallvm-objdump, resolves every address to a source file and line viallvm-addr2line, then overlays the executed PCs to produce an lcov tracefile. Lines that exist but weren't executed appear asDA:line,0, giving accurate coverage percentages. -
HTML report —
genhtmlconverts the lcov tracefile into a browsable HTML report.
Prerequisites
The SP ELF must be built with debug info so llvm-addr2line can resolve
addresses. This is configured via debug = true in the [profile.coverage]
section of secure-services/platform/Cargo.toml, which is used for e2e test
and coverage builds.
Commands
# Run tests with coverage (builds secure-services with coverage profile)
make e2e-test

# Generate HTML coverage report
make -C e2e-tests coverage-report
# Output: e2e-tests/Build/coverage-html/index.html

# Build only the coverage plugin
make -C e2e-tests Build/libcoverage.so
Directory structure
e2e-tests/
├── coverage-plugin/
│   ├── coverage.c          # QEMU TCG plugin source
│   ├── qemu-plugin.h       # Vendored minimal plugin API header
│   └── Makefile             # Builds Build/libcoverage.so
├── scripts/
│   └── pcs-to-lcov.py      # PC-to-lcov conversion script
└── Build/
    ├── libcoverage.so       # Compiled coverage plugin
    ├── coverage.log         # Raw PCs (one hex address per line)
    ├── coverage.info        # lcov tracefile
    └── coverage-html/       # HTML report (genhtml output)
QEMU Guide
This guide covers setting up QEMU, booting a Windows image, enabling WinDbg, and customizing ACPI content for the QEMU platform.
QEMU Setup
This section covers how to setup QEMU and boot windows image. We use QEMU as a reference for developing features that are not yet fully supported in hardware. This also gives us a HW agnostic platform that any SV or OEM can use for development.
Downloading and building QEMU
QEMU Builder has patches and HW features such as an I2C controller that we've added to QEMU. The QEMU that is included in the docker image already picks up the latest QEMU from here. If you want to make further modifications to QEMU download the odp-qemu-builder and follow the instructions there.
Running QEMU with Windows
The windows image generation is done by .github\workflows\build-os.yml. This downloads the latest version of Validation OS and injects drivers and ACPI content into the windows image. On pushes to main the image is zipped and published as the os-image.zip asset on the rolling latest prerelease; pull requests only build it for validation. Running "make run_os" will pull and unzip that asset.
If you want to create your own windows image you can modify the one downloaded at postbuild/os/prebuilt/ValidationOS.vhdx and place your updated image there.
ACPI Customization
Adding Test Content to ACPI
See details under mod/uefi/platform/README.md for details on how to modify ACPI content for QEMU platforms.
Modifying Windows Image
Injecting Drivers into Vhdx Windows Image
Injecting drivers and registry entries into your VHDX image is straight forward using DISM. You will need the driver binaries and inf file to install the driver.
-
Mount the VHDX by double clicking on it and noting the drive letter that is mounted
-
Inject your driver using DISM
dism /Image:e:\ /Add-Driver /Driver:d:\drivers\testdrv -
This will execute the installation steps in the INF including copying your driver into the mounted image and updating the registry. Make sure the operation completes successfully. If you have multiple drivers you can use the /Recurse option to install all inf files.
-
Make sure to cleanly unmount your VHDX drive.
-
Copy the ValidationOS.vhdx to postbuild/os/prebuilt.
-
Run
make -C postbuild/os qcow2to regenerate the qcow file for QEMU. -
Run
make run_osto boot your new windows image.
Injecting Executables and Autorun
To inject executable content you can simply click on the VHDX file to mount it and make a folder and copy content to the device. If you are trying to overwrite existing system content you may need to make yourself the owener and allow overwrite permissions. Sfpcopy can also be used to accomplish secure copy.
takeown /f <filename>
icacls <filename> /grant everyone:f
copy <localfile> <destfile>
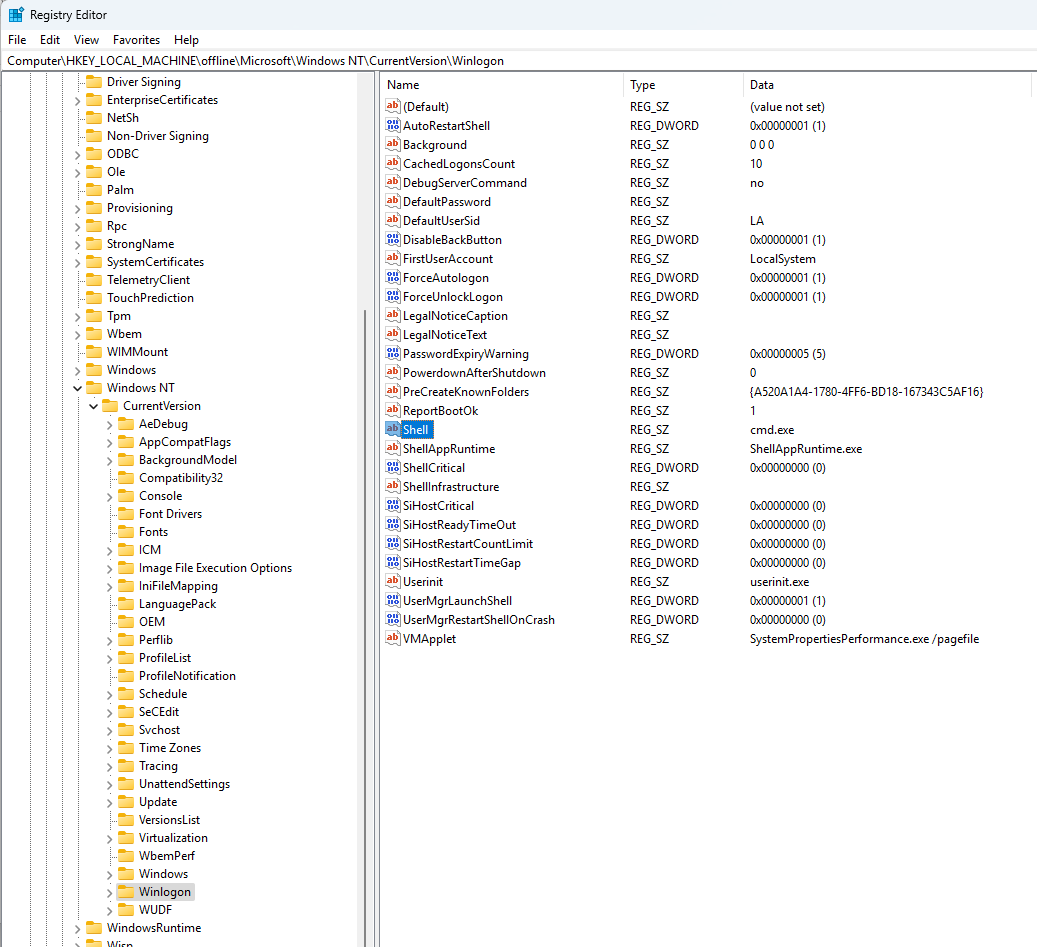
To automatically run an executable in WinVOS you can edit the registry in the VHDX.
- Mount the VHDX image by double clicking on it and noting the drive letter.
- Run regedit as administrator.
- Select the root of HKLM.
- File -> Load Hive and browse to your mounted drive under e:\windows\system32\config\SOFTWARE
- Name the mount location "Offline"
- Browse to the following key
Computer\HKEY_LOCAL_MACHINE\offline\Microsoft\Windows NT\CurrentVersion\Winlogon - Modify the "Shell" REG_SZ entry which just runs
cmd.exeby default. - After you've modified the key be sure to select the root of the offline folder and select File -> Unload Hive
- Unmount your VDHX file to make sure it is saved
- Convert windows image to qcow2 and load in QEMU
Windbg Setup for QEMU
For general instructions see postbuild/os/README.md
Enabling Windbg
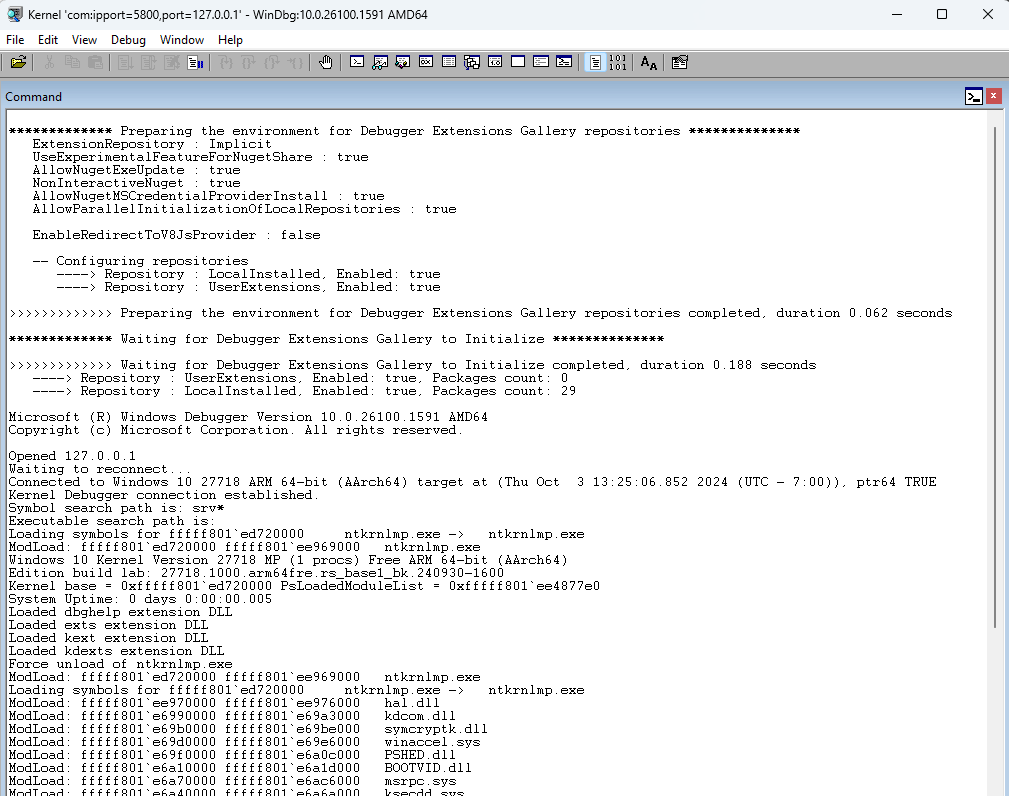
If Windows doesn't boot properly on QEMU you are basically stuck wondering what is happening with no output after bootmgr starts there will be no further update in the serial port. To debug windows we need to connect windbg to the QEMU to see what is happening as drivers boot.
As long as you pull the published windows image it has Windbg enabled by default. If you don't attach the debugger it will continue to boot after 30 seconds.
    Write-Host "Enabling debug"
    bcdedit /store ${efiLetter}:\EFI\Microsoft\Boot\BCD /set "{default}" debug on
If you want to debug early boot process because it is not making it into NTOS you can enable bootdebug as well
bcdedit /store BCD /set {globalsettings} bootdebug yes
Windbg can be connected on windbg -k com:ipport=56789,port=127.0.0.1 -v
Debugging QEMU with GDB
When debugging in UEFI, secure world, or when system isn't responding you will often find yourself needing a GDB connection to the device. QEMU has built in support for GDB interface and makes it very easy to debug with GDB.
Ffter your system starts or is in the state you want to connect you can use
gdb-multiarch
(gdb) set debug aarch64
(gdb) target extended-remote localhost:5555
For more details debugging with GDB or using Windbg with GDB you can read the following documents. Patina Debugging